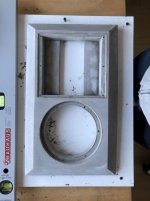
The mold is made of 3mm PVC foam. I scored it about 2mm deep, folded it into shape and glued it with super glue. The edges are reinforced with foam strips. Without these, the mold would bend outward. I used wire mesh as reinforcement in the critical areas. The threaded sleeves are fixed with screws through the bottom of the mold. Due to their shape, they cannot twist and by the bolted shims they cannot be pulled out of the concrete.
I placed the mold on a board with screws attached vertically in all four corners. By adjusting the screws and using a spirit level, I aligned the mold horizontally.
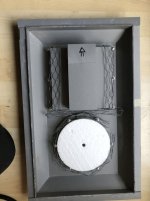
The inserts for the speaker drivers are made of styrofoam, cut into shape with a DIY hot wire styrofoam cutter.
I brushed the mold and the inserts for the speaker drivers very sparingly with olive oil as a release agent.
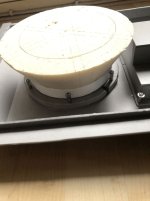
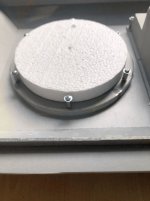
The concrete is actually liquid screed. I mixed the screed according to instructions and poured it in one pass. Air bubbles escape by themselves. Curing takes only one day. Result: It works as intended. The screed becomes rock hard, has a very smooth surface and does not shrink.
I placed the mold on a board with screws attached vertically in all four corners. By adjusting the screws and using a spirit level, I aligned the mold horizontally.
The inserts for the speaker drivers are made of styrofoam, cut into shape with a DIY hot wire styrofoam cutter.
I brushed the mold and the inserts for the speaker drivers very sparingly with olive oil as a release agent.
The concrete is actually liquid screed. I mixed the screed according to instructions and poured it in one pass. Air bubbles escape by themselves. Curing takes only one day. Result: It works as intended. The screed becomes rock hard, has a very smooth surface and does not shrink.
Attachments


Excellent work. Take the afternoon off.
I hope it was extra virgin olive oil - it should help open up the sound stage. 😉
I hope it was extra virgin olive oil - it should help open up the sound stage. 😉
Nice and rather a complex mold. Glad to see that it worked well. I've done a few Moai heads in concrete, but the were not as complex or precise as this. 👍
Oops - I forgot about that. Picture follows tonight.Nice! A picture of the backside?
//
I'm not quite shure right now. Maybe I'll cast some 30 mm concrete slabs and glue them together with epoxy, or I'll built a one piece mold for the rest of the enclosure, cast it and glue the baffle onto it. Or I'll make a conventional box of MDF ans glue the baffle onto it or ... ... ... What would you do? My primary goal was a proof of concept to get a heavy and rigid baffle.Very nice. What are your plans for the rest of the enclosure?
Wow beautiful, what a nice job!
For the rest, maybe you could use both mdf and concrete? (to add some dampening and ease the construction)
With a mold, and internal mdf box or rough panels, pouring concrete in between.
Like this but leaving the wood inside for a concrete finish.

For the rest, maybe you could use both mdf and concrete? (to add some dampening and ease the construction)
With a mold, and internal mdf box or rough panels, pouring concrete in between.
Like this but leaving the wood inside for a concrete finish.
You have the skills to do a single piece concrete enclosure. Just do it, you know you want to 😉
Nice! A picture of the backside?![IMG_6221[1].jpg](https://www.diyaudio.com/community/data/attachments/1069/1069211-241fc6ceedd07d008c1231856cfe2291.jpg?hash=JB_Gzu3QfQ "IMG_6221[1].jpg")
You have aroused my ambition ... 😏You have the skills to do a single piece concrete enclosure. Just do it, you know you want to 😉
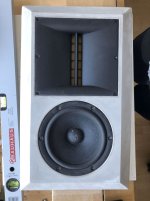
Baffle is 43 x 26 cm. Drivers are SB Acoustics MW16P-4 and HiVi RT2H-A. Volume will be 19 liters.How big is it?
I'm guessing bookshelf size?
Indeed. But I'll figure out how to do that.Thats quite tricky to do in one pour...
This is my tip, easy to do. Use a classic wooden enclosure.
https://www.diyaudio.com/community/...for-the-enclosure-matters.397725/post-7315400
https://www.diyaudio.com/community/...for-the-enclosure-matters.397725/post-7315400
You do not see the concrete just a normal box you put the concrete in side by side
http://bilder.hifi-forum.de/max/191...t-beton-loudspeaker-with-concrete_1190583.jpg
http://bilder.hifi-forum.de/max/191...t-beton-loudspeaker-with-concrete_1190583.jpg
Freedom666, that’s the technic I used for one of my sub, started with an ikea box and poured one side at a time, then the baffle at the end poured like a kitchen countertop.
Easy peasy... until you realise on the 3rd side that the weight will become an issue fast 😛
I thought I had some pics of the process but no, but it worked fine at the end.
Here’s the result.
The thing is damn’ heavy, around 200L. and probably Kgs as well.


Easy peasy... until you realise on the 3rd side that the weight will become an issue fast 😛
I thought I had some pics of the process but no, but it worked fine at the end.
Here’s the result.
The thing is damn’ heavy, around 200L. and probably Kgs as well.
You can’t see it but I kept the external box, only poured inside, and front since it was an open box, 120x64x40 besta

It was a good experiment, trying multiple methods of « reinforcement » on each internal panel, especially around the edges to make sure each new pour would attach to the previous one.
I was generous for the thickness because of the total length, and the added weight to this cheap structure.
Also by experience with thin concrete stuff around, that breaks easily.
But here I could have used less, so I had maybe 2 or 3 cm on each side, with regular full mix that I used for the house at that time.
And 5 or 6 cm for the baffle, poured over an mdf baffle for support, and internal bracing just here for the drying time.
The hardest were the holes, used a cake dish for the big one and a bowl for the small one.
Now I know better and want to try again on some speaker. With thinner mix, is it concrete screed?
And maybe even use molds, and lime for the look.
Lime might have different properties on dampening, since it’s a little softer inside.
- Home
- Design & Build
- Construction Tips
- My first attempt with a concrete baffle