Okay, b4 I get into the details I wanted to give a big thanks out to the diy community without your help this projector would not exist.
Okay I know that there many designs for diy projectors and trust me I have researched most of them. I have found the best projector to build is the overhead projector design (OHP), beamer if you will. There are many reasons for this, one it is the most cost effective design (if you are a good flea Bayer). Another reason is with this design you can focus all you want while keeping the unit still (that means no math and calibrations) it also means if you move you don’t have to take apart the diy projector and adjust it for the new room. I personally don’t like a big hunk of wood (I mean big) in my projector room.
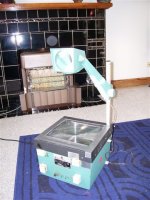
Now that I have told you the reasons that swayed me to the "beamer" design I want to go through the part list with you. First off all the quality (well 90%) is in the type of overhead projector used; my first version that still worked well was using an old cheap bell and howel 301g. The 301 beamer I first made was at first real exciting because mainly it worked. As I used the 301 beamer more and more I started to become a perfectionist with the miss alignment of the lens, fresnal lens and bulb I got a color bleed to the NE of the image. This Bleed was not that bad and my girlfriend thought the image looked good but I new it could be better. Not only did the 301 beamer have a slight bleed but it had some serious heat issues with a 600 watt bulb I was getting up to 47 degrees Celsius at the inner wall of the 301 beamer (put a digital thermometer inside). With all this heat I had to have many fans going to keep the heat down on the LCD screen. With more fans = more noise.
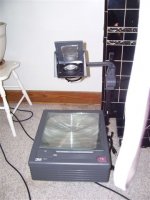
So at last I said good bye to the 301 beamer and began the hunt for the next overhead projector. Well I started out looking for the new 3m OHP 1800 series but that soon end when I started to see the price. Well I then started to look at the 3m 9500 and was intrigued at the lens they use a triplet lens which mean I can fine tune even further by focusing plus the whole image even in the corners will be in focus (Which is the main problem with OHP designs "beamers") I was Just about to buy a 9500 when I found a pair of 3m 9800 which is the same as the 9500 but can put out a 6000 lumens compared to 4000 for a good price on flea bay.
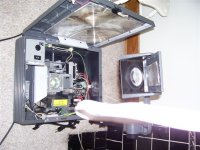
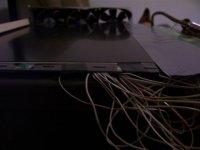
Now that I have talked about my OHP (overhead projector) choice and reasons for this I will move on to the type of LCD. Now I know that you can buy just the screen and control board and be a happy camper but I was in shock at the prices of these. You best bet is to gut an old 15" LCD screen from your local bobs tech store. Be sure to barter with him and pay cash to get the price lowered, I played 100 bucks for mine. If you can get a LCD with the backlight not working all the better because the price will be lower. Anyways I want to talk about what to look for when getting a LCD screen first you want to look at what res it can put out... 1024x768 is the tops I have seen 15" LCD screens, and until I what to make my overhead hi-def this is more then fine for DVDs and xvids and such. Next but not far behind you need to look for contrast 500:1 is great 400:1 is okay to if you have a real dark room. Do not listen to people that say diy projectors are really handicapped by their contrast, this is not true everyone has seen a DVD or video playing on a LCD screen it looks good and will also look good on the wall. No that I have finished my rant I want to talk about what LCD brand you want to gut in order to have a clean movement of the control board for the beamer. This is really a hit or miss but don’t be scared if you have a control board that does not have enough slack to move out of the way for light from the OHP to hit all of the LCD, this is where you become real diy. All you have to do is get out that solder iron and a couple of old IDE cables and solder away making enough slack for the control board to be mounted on the side of the OHP (if you are not sure what I am talking about look at the IDE wires coming from the side of the 9800 Beamer.
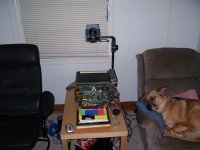
Now that I have gone on about the OHP and LCD I want to talk about how to assemble it all. First thing to do is take off the layer of glass that is on the OHP you will not need this since most 15" LCD screens are larger then the stage area of most OHP (well at least in width wise) next you want to raise the LCD a small amount from the OHP I would say about 1/4 inch should do to allow the fans to blow some air along the LCD screen to cool it.
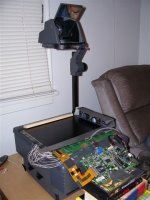
Once you have the LCD screen laying 1/4 inch on the OHP you need to mount the control board on the OHP (as you can see I have not done this yet) now attach all the cables and such. Next we have to build a VGA cable that will extend the distance from your computer to the beamer (if you plan on having the computer next to the projector then don’t worry about this step). For information on building a extended VGA cable using shielded cat 5 cable go here http://www.myhometheater.homestead.com/vgacable.html
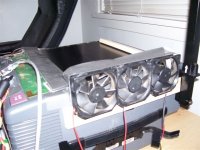
The final step we have to do is mount some fans to cool the LCD, this is really simple, I just glued on some wood to the side of the OHP and screwed in three computer fans to the wood (you can get these computers fans from old power supplies or case that have fans). To power the fans just use a old computer power supply If you don’t have a AT power supply with a hard switch and only have a ATX power supply you will have to short it to turn it on this is simple too just solder or jam some wire to join the small green wire to the small black wire next to the green wire. To turn off and on the PSU (power supply unit) u can just unplug it or instead of soldering wire to the green and black solder a switch.
Well we are done. Turn on the overhead and turn on the LCD and then turn on the fans. Next all you have to do is focus the OHP and bingo... I use notepad and type a bunch of junk and focus it till it is in the best quality.
Just to let you know there are a few things you can do to make your projector run a bit better... when you first get your projector you should take it apart and clean any surface that the light goes through lens LCD screen mirrors anything EXCEPT THE FRESNEL LENS IT SCRATCHES TO EASY JUST USE LIQUID AIR OR LEAVE IT ALONE (the fresnel lens is the lens that looks all funky with the circles). Another thing u should add is an internal thermometer I used a radio shack thermometer that has an outside cable with sensor and just drilled a hole in the OHP and put the sensor in there. Also you will want to go around with Duck tape and cover any little cracks with light come out DO NOT COVER THE FAN INTAKE AREA.
Well that is it enjoy...
Feel free to ask any questions you have
Below are some rarred pictures of my 301 OHP and my 9800 beamer.
GunRunner
Andrew
Thanks for putting up with my bad spelling and Grammer.
Okay I know that there many designs for diy projectors and trust me I have researched most of them. I have found the best projector to build is the overhead projector design (OHP), beamer if you will. There are many reasons for this, one it is the most cost effective design (if you are a good flea Bayer). Another reason is with this design you can focus all you want while keeping the unit still (that means no math and calibrations) it also means if you move you don’t have to take apart the diy projector and adjust it for the new room. I personally don’t like a big hunk of wood (I mean big) in my projector room.
Now that I have told you the reasons that swayed me to the "beamer" design I want to go through the part list with you. First off all the quality (well 90%) is in the type of overhead projector used; my first version that still worked well was using an old cheap bell and howel 301g. The 301 beamer I first made was at first real exciting because mainly it worked. As I used the 301 beamer more and more I started to become a perfectionist with the miss alignment of the lens, fresnal lens and bulb I got a color bleed to the NE of the image. This Bleed was not that bad and my girlfriend thought the image looked good but I new it could be better. Not only did the 301 beamer have a slight bleed but it had some serious heat issues with a 600 watt bulb I was getting up to 47 degrees Celsius at the inner wall of the 301 beamer (put a digital thermometer inside). With all this heat I had to have many fans going to keep the heat down on the LCD screen. With more fans = more noise.
So at last I said good bye to the 301 beamer and began the hunt for the next overhead projector. Well I started out looking for the new 3m OHP 1800 series but that soon end when I started to see the price. Well I then started to look at the 3m 9500 and was intrigued at the lens they use a triplet lens which mean I can fine tune even further by focusing plus the whole image even in the corners will be in focus (Which is the main problem with OHP designs "beamers") I was Just about to buy a 9500 when I found a pair of 3m 9800 which is the same as the 9500 but can put out a 6000 lumens compared to 4000 for a good price on flea bay.
Now that I have talked about my OHP (overhead projector) choice and reasons for this I will move on to the type of LCD. Now I know that you can buy just the screen and control board and be a happy camper but I was in shock at the prices of these. You best bet is to gut an old 15" LCD screen from your local bobs tech store. Be sure to barter with him and pay cash to get the price lowered, I played 100 bucks for mine. If you can get a LCD with the backlight not working all the better because the price will be lower. Anyways I want to talk about what to look for when getting a LCD screen first you want to look at what res it can put out... 1024x768 is the tops I have seen 15" LCD screens, and until I what to make my overhead hi-def this is more then fine for DVDs and xvids and such. Next but not far behind you need to look for contrast 500:1 is great 400:1 is okay to if you have a real dark room. Do not listen to people that say diy projectors are really handicapped by their contrast, this is not true everyone has seen a DVD or video playing on a LCD screen it looks good and will also look good on the wall. No that I have finished my rant I want to talk about what LCD brand you want to gut in order to have a clean movement of the control board for the beamer. This is really a hit or miss but don’t be scared if you have a control board that does not have enough slack to move out of the way for light from the OHP to hit all of the LCD, this is where you become real diy. All you have to do is get out that solder iron and a couple of old IDE cables and solder away making enough slack for the control board to be mounted on the side of the OHP (if you are not sure what I am talking about look at the IDE wires coming from the side of the 9800 Beamer.
Now that I have gone on about the OHP and LCD I want to talk about how to assemble it all. First thing to do is take off the layer of glass that is on the OHP you will not need this since most 15" LCD screens are larger then the stage area of most OHP (well at least in width wise) next you want to raise the LCD a small amount from the OHP I would say about 1/4 inch should do to allow the fans to blow some air along the LCD screen to cool it.
Once you have the LCD screen laying 1/4 inch on the OHP you need to mount the control board on the OHP (as you can see I have not done this yet) now attach all the cables and such. Next we have to build a VGA cable that will extend the distance from your computer to the beamer (if you plan on having the computer next to the projector then don’t worry about this step). For information on building a extended VGA cable using shielded cat 5 cable go here http://www.myhometheater.homestead.com/vgacable.html
The final step we have to do is mount some fans to cool the LCD, this is really simple, I just glued on some wood to the side of the OHP and screwed in three computer fans to the wood (you can get these computers fans from old power supplies or case that have fans). To power the fans just use a old computer power supply If you don’t have a AT power supply with a hard switch and only have a ATX power supply you will have to short it to turn it on this is simple too just solder or jam some wire to join the small green wire to the small black wire next to the green wire. To turn off and on the PSU (power supply unit) u can just unplug it or instead of soldering wire to the green and black solder a switch.
Well we are done. Turn on the overhead and turn on the LCD and then turn on the fans. Next all you have to do is focus the OHP and bingo... I use notepad and type a bunch of junk and focus it till it is in the best quality.
Just to let you know there are a few things you can do to make your projector run a bit better... when you first get your projector you should take it apart and clean any surface that the light goes through lens LCD screen mirrors anything EXCEPT THE FRESNEL LENS IT SCRATCHES TO EASY JUST USE LIQUID AIR OR LEAVE IT ALONE (the fresnel lens is the lens that looks all funky with the circles). Another thing u should add is an internal thermometer I used a radio shack thermometer that has an outside cable with sensor and just drilled a hole in the OHP and put the sensor in there. Also you will want to go around with Duck tape and cover any little cracks with light come out DO NOT COVER THE FAN INTAKE AREA.
Well that is it enjoy...
Feel free to ask any questions you have
Below are some rarred pictures of my 301 OHP and my 9800 beamer.
GunRunner
Andrew
Thanks for putting up with my bad spelling and Grammer.
Anyone knwo how to post...
Anyone knwo how to post pictures to a post i hit the IMG button then what? please and thanks
Gunrunner
Andrew
Anyone knwo how to post pictures to a post i hit the IMG button then what? please and thanks
Gunrunner
Andrew
Andrew,
To post a pic, go down below the reply window and you will see a choose file button. Click it and attach a file from your HD.
To post a pic, go down below the reply window and you will see a choose file button. Click it and attach a file from your HD.
his pictures might bee too large of a file.
tell him to use photoshop please and reduce them to post.
or like the other advice, use image shack.
tell him to use photoshop please and reduce them to post.
or like the other advice, use image shack.
cool. thanks for posting.
but don't you think for durability, especially after you had to solder all those ffc's... isn't an enclose better? what if someone bumps into your soldering job?
you will get more light from an enclosure too.
but don't you think for durability, especially after you had to solder all those ffc's... isn't an enclose better? what if someone bumps into your soldering job?
you will get more light from an enclosure too.
True but...
You are correct, a enclosed projector would give me more light however with the 9800 this is not an issue. As for the solder job after a bump; it will not budge i crazy glued it into place then epoxied it after that. I just dont want to give up the ability to focus on the fly 🙂
On a diffrent note does anyone know why when i turn on the fans i get a few waves hsync of the image. I think it is caused my electrical noise but i am not sure. I even stopped each fan with my hands and i still get the slight distortion. The distortion is of course goes away when i turn off the PSU.
GunRunner
Andrew
what do you mean by a power adapter to run computer fans?
(i was thinking of using my spare power supply to run the fans but i'm afraid of noise too)
(i was thinking of using my spare power supply to run the fans but i'm afraid of noise too)
Thanks eight_heads
I will try out that 12v RatShack adapter.
Thanks again, i will report back
Andrew
I will try out that 12v RatShack adapter.
Thanks again, i will report back
Andrew
- Status
- Not open for further replies.
- Home
- General Interest
- Everything Else
- The Moving Image
- DIY Projectors
- MY DIY projector how to and Results