Hi All,
This is a speaker I'm grateful to the forum for! I started designing the PCBs over a year ago and I probably wouldn't have got it done without the help I received here.
Baffle build video here (Using a DIY CNC): DIY Speaker Build on a DIY CNC Router? - YouTube
Original build video here (White MDF baffle): High End DIY Speaker Build | HOW TO - YouTube
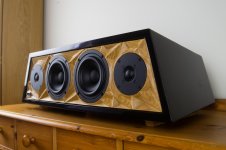
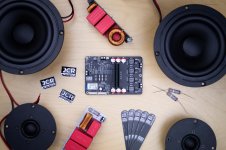
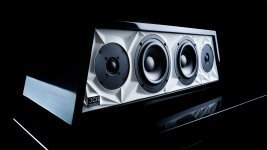
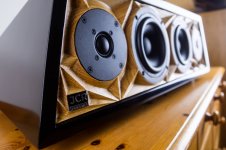
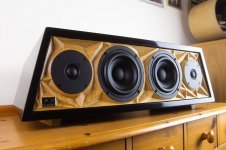
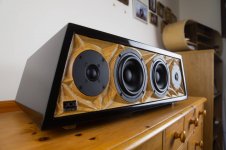
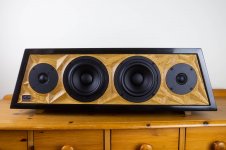
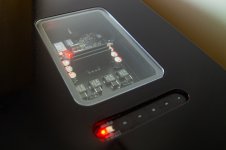
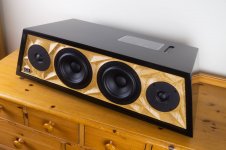
This is a stereo Bluetooth speaker running Tang Band's W5-1685 and SEAS Prestige 27TDFC's. All of the PCBs are my own design and the original prototypes hand built. Running a TPA3116 coupled with a RN-52 Bluetooth module. It also has an integrated Lithium-Ion charging IC for the 3S2P battery pack. Other boards include touch media controls and passive crossovers (2650Hz).
It's a ported design (simulations shown in original build video). The ports were 3-D printed so I could nail the exact measurements and have them flared. The PCB sits under a Perspex window (couldn't hide it after all the effort 😀) and a window for the media controls (covered under the baffle video).
The paint job was my first attempt at piano gloss, and I've covered in detail how I did it in the original build video (plus the many things I did wrong and would do differently next time). Other than being more time consuming than it needed to be it still came out like glass so no complaints from me, and again some good tips found here.
Think that covers most bits of interest, lots more detail in the videos. I'm afraid I haven't done any measurements due to lack of equipment but it's to come. This is the most in-depth project I've ever undertaken and again super grateful to this forum!
Thanks All!
This is a speaker I'm grateful to the forum for! I started designing the PCBs over a year ago and I probably wouldn't have got it done without the help I received here.
Baffle build video here (Using a DIY CNC): DIY Speaker Build on a DIY CNC Router? - YouTube
Original build video here (White MDF baffle): High End DIY Speaker Build | HOW TO - YouTube
This is a stereo Bluetooth speaker running Tang Band's W5-1685 and SEAS Prestige 27TDFC's. All of the PCBs are my own design and the original prototypes hand built. Running a TPA3116 coupled with a RN-52 Bluetooth module. It also has an integrated Lithium-Ion charging IC for the 3S2P battery pack. Other boards include touch media controls and passive crossovers (2650Hz).
It's a ported design (simulations shown in original build video). The ports were 3-D printed so I could nail the exact measurements and have them flared. The PCB sits under a Perspex window (couldn't hide it after all the effort 😀) and a window for the media controls (covered under the baffle video).
The paint job was my first attempt at piano gloss, and I've covered in detail how I did it in the original build video (plus the many things I did wrong and would do differently next time). Other than being more time consuming than it needed to be it still came out like glass so no complaints from me, and again some good tips found here.
Think that covers most bits of interest, lots more detail in the videos. I'm afraid I haven't done any measurements due to lack of equipment but it's to come. This is the most in-depth project I've ever undertaken and again super grateful to this forum!
Thanks All!
Attachments
-
 compressed (1).jpg202 KB · Views: 485
 -
 Spread_Full.jpg250.7 KB · Views: 178
 -
 Fidelity_Compressed (1).jpg83.7 KB · Views: 185
 -
 Fidelity_Compressed (2).jpg106.4 KB · Views: 200
 -
 compressed (7).jpg206.6 KB · Views: 199
 -
 compressed (6).jpg187.3 KB · Views: 153
 -
 compressed (5).jpg174.4 KB · Views: 479
 -
 compressed (4).jpg205.1 KB · Views: 484
 -
 compressed (3).jpg188.7 KB · Views: 486
 -
 compressed (2).jpg226.1 KB · Views: 487
That baffle is INSANE! Must have taken a pretty small endmill the get those tight pockets. Wood approves-
About the white version, how did you setup the "hero" shot in terms of lighting etc? Took me a min. to decide if it was a render!
About the white version, how did you setup the "hero" shot in terms of lighting etc? Took me a min. to decide if it was a render!
Last edited:
Sure looks like one!
Very Impressive! 😀 Got way more patience than I've ever had! Hope they perform at the same level of 'finish'.
Very Impressive!
😀 Got way more patience than I've ever had! Hope they perform at the same level of 'finish'.As Wolf said, without any details of how you measured and modeled it around the in-box response, hard to say much about the sound.
That said, your fabrication is very impressive, and the speaker looks great! Very impressive workmanship.
That said, your fabrication is very impressive, and the speaker looks great! Very impressive workmanship.
Frequency response? Otherwise, it sure LOOKS good.
Wolf
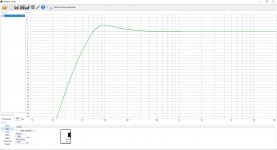
Thanks, unfortunately no equipment for testing at the moment (or a location that would make sense to). Here is what it was designed for with a tuning frequency of 58Hz to make up for its size. The bass is surprisingly punchy given its internal volume. The good thing about cutting with a CNC and designing in CAD was I was able to get the internal volume pretty much bang on even accounting for cables, battery, etc. as well as the ports made exact to specification.
As soon as I do some testing I'll share. What mics do you guys use for these things and how do you ensure the room isn't just bouncing the sound everywhere if you're testing at home?
Attachments
That baffle is INSANE! Must have taken a pretty small endmill the get those tight pockets. Wood approves-
About the white version, how did you setup the "hero" shot in terms of lighting etc? Took me a min. to decide if it was a render!
Thanks mate, the final pass was done with a 3mm ball-nose with a final "cross-hatching" path to try and aid in the sanding process. I'm sure it could probably be taken a step further as well but would need to read into it.
As for the photo I used the glass black TV stand I have, I've got a couple cheap studio lights so it's mostly a case of good lighting. When I do the same for the oak ones I'll move the speaker further back so I get the full face reflection as it's a shame it gets cut off!
I've used the same stand in a previous b-roll video coupled with some vape smoke which gives a very cool effect.
Thanks all for your comments! I hope to get some proper testing in as soon as I have a setup that allows - any suggestions on what things you guys do on a budget would be appreciated. Will also be doing some "hero shots" like I did with the white MDF front but with the oak an evening this week.
This guy gets the job done at very reasonable cost:
Gainphile: Cheap and accurate speaker measurement
Gainphile: Cheap and accurate speaker measurement
Hi All,
This is a speaker I'm grateful to the forum for! I started designing the PCBs over a year ago and I probably wouldn't have got it done without the help I received here.
Baffle build video here (Using a DIY CNC): DIY Speaker Build on a DIY CNC Router? - YouTube
Original build video here (White MDF baffle): High End DIY Speaker Build | HOW TO - YouTube
This is a stereo Bluetooth speaker running Tang Band's W5-1685 and SEAS Prestige 27TDFC's. All of the PCBs are my own design and the original prototypes hand built. Running a TPA3116 coupled with a RN-52 Bluetooth module. It also has an integrated Lithium-Ion charging IC for the 3S2P battery pack. Other boards include touch media controls and passive crossovers (2650Hz).
It's a ported design (simulations shown in original build video). The ports were 3-D printed so I could nail the exact measurements and have them flared. The PCB sits under a Perspex window (couldn't hide it after all the effort 😀) and a window for the media controls (covered under the baffle video).
The paint job was my first attempt at piano gloss, and I've covered in detail how I did it in the original build video (plus the many things I did wrong and would do differently next time). Other than being more time consuming than it needed to be it still came out like glass so no complaints from me, and again some good tips found here.
Think that covers most bits of interest, lots more detail in the videos. I'm afraid I haven't done any measurements due to lack of equipment but it's to come. This is the most in-depth project I've ever undertaken and again super grateful to this forum!
Thanks All!
I see an issue with horizontal placement between the mids and tweeter. Any decent sound bar has these placed vertically. For reason.
Otherwise nice execution.
This guy gets the job done at very reasonable cost:
Gainphile: Cheap and accurate speaker measurement
Ah thanks, that looks like a nice simple setup, will give that one a go!
I see an issue with horizontal placement between the mids and tweeter. Any decent sound bar has these placed vertically. For reason.
Otherwise nice execution.
Thanks!
The reason for vertical placement generally speaking is because you get better off-axis response on the horizontal plane. Having them how I have placed them means better off-axis response in the vertical plane (as the premise for this is it may be moved around and place on surfaces all at different heights).
No doubt you are right though, I've compromised various areas regarding sound performance for the form factor and styling but used in its intended use case it does still sound good. The concept is more a secondary speaker you can take places if going to a house party, into the garden, people moving to Uni/flats etc. as appose to a replacement for your typical 2-Way, external amp set up.
I know what you are saying, I understand. Still, I would use little fullrange drivers on outside, supported by woofers in the middle. It would yield more coherent sound.
- Home
- Loudspeakers
- Multi-Way
- My Best Speaker Yet - What's Your Thoughts?