Hello jdrouin.
I have built mar-ken few month ago.
miniOnken/Fonken Picture Gallery
I painted Kakishibu on birch ply wood. Kakishibu is farmeted Kaki(fruit) juice.
Amazon.com: Turner odorless persimmon juice 500ml by Turner color
Nice vintage color and some profits.
About Kakishibu (persimmon tannin) paint
I have painted shellac on it.
I am very satisfied for the build and the sound.
Wow, gorgeous build, tamra! Thanks for informing us about persimmon juice. Its use as a hangover preventative as well as a wood finishing product makes it especially appealing. 🙂
And Chris, thanks for the picture with the different finishes. The natural cherry on the rightmost speaker is what I had in mind for this build, though a golden oak birch would look best in the room.
I made and glued in the paper shims for behind the drivers last night. I should be able to cut and install the wool dampening material over the weekend, and glue the cabinets together over next week.
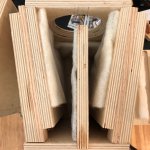
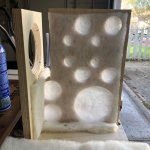
Today I cut and applied the wool batting. Since these enclosures are fairly small, there is very little space at the back. I left the back inch of the interior sides free of lining so as not to restrict airflow.
Also, I'm inclined not to put any lining on the back panel so as to allow for air flow into the vents. Seem OK, or should I add some?
Also, I'm inclined not to put any lining on the back panel so as to allow for air flow into the vents. Seem OK, or should I add some?
Attachments
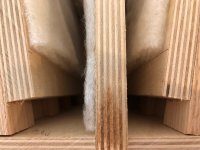
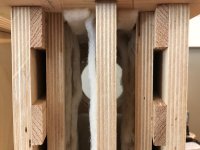
I would think you want to maintain the air flow into the vents. I could be wrong, but I would be a bit worried about blocking the vents.
Do the plans mention or show where to add the damping material?
EDIT ^^ Dave answered as I was typing, ha!
Do the plans mention or show where to add the damping material?
EDIT ^^ Dave answered as I was typing, ha!
There is room to damp out to about 1/2 way from the brace
Thanks. That was my original plan. I will add the stuff tomorrow.
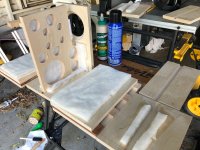
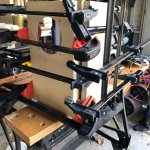
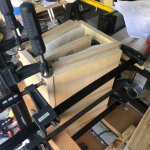
I've started gluing the side wall sandwiches in place. The procedure looks like this:
* Apply glue to the interior front edge and bottom of the assembly.
* Put the assembly in place and slowly tighten the clamps just enough that they stay put. There are 4 clamps across the front to keep the panel firmly attached to the front baffle edge, 3 from front to back to press it firm against the interior of the front baffle, and 2 from top to bottom to keep it pressed firmly to the bottom panel.
* Position the rear by lining up the joint of the vent spacer and exterior side wall with a mark on the bottom panel.
* Tighten the rearmost clamp so that the assembly wouldn't wander from the mark.
* Tighten everything else a little at a time until everything is secure.
Attachments
Last edited:
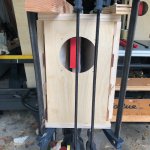
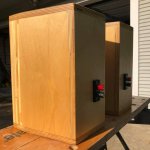
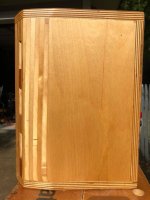
Over the last few days I finished gluing the sides and tops. Today I cut the big chamfers and the little 90* sides using the table saw.
First I used the router to flush-trim the tops and bottoms to the front and rear panels. That ensured that the front baffle would be square with the table surface and form the reference, since it would be run through the saw face down, holding a piece of sacrificial scrap to the trailing edge (bottom panel) to prevent tear-out. I also plugged the vents and driver holes with paper towel to prevent sawdust from blowing into the enclosures. For both the chamfers and the side cuts, I used the rip fence with the saw blade pointing away from the fence, incrementally moving it closer and closer to the stopping point. At first I would assess the workpiece visually after each pass, and then as it got closer to the stopping point used the rip distance measuring gauge to move it in 1/32" at a time. It was repetitive but easy.
The stripes on the sides are interesting -- much broader and better looking than I was expecting. So, construction is complete and they actually look like they're supposed to!
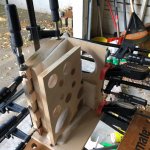
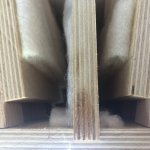
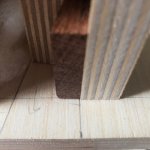
I'll post the final reveal pics in a day or two once the finishing process is complete. But here are pics of the rear wall damping and final gluing stages.
The first one shows the line where the exterior side & vent spacer meet (as described in previous post).
Also, you'll see some gaps in the interior shots. Those were a dry fit and the pieces weren't secured. Everything's accurate and airtight after gluing.
First I used the router to flush-trim the tops and bottoms to the front and rear panels. That ensured that the front baffle would be square with the table surface and form the reference, since it would be run through the saw face down, holding a piece of sacrificial scrap to the trailing edge (bottom panel) to prevent tear-out. I also plugged the vents and driver holes with paper towel to prevent sawdust from blowing into the enclosures. For both the chamfers and the side cuts, I used the rip fence with the saw blade pointing away from the fence, incrementally moving it closer and closer to the stopping point. At first I would assess the workpiece visually after each pass, and then as it got closer to the stopping point used the rip distance measuring gauge to move it in 1/32" at a time. It was repetitive but easy.
The stripes on the sides are interesting -- much broader and better looking than I was expecting. So, construction is complete and they actually look like they're supposed to!
I'll post the final reveal pics in a day or two once the finishing process is complete. But here are pics of the rear wall damping and final gluing stages.
The first one shows the line where the exterior side & vent spacer meet (as described in previous post).
Also, you'll see some gaps in the interior shots. Those were a dry fit and the pieces weren't secured. Everything's accurate and airtight after gluing.
Attachments
Last edited:
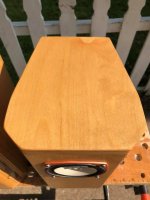
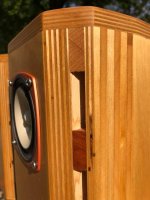
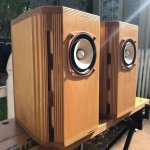
Six coats of Trader Joe's French Roast; two coats of satin polyurethane.
Attachments


Damn fine work!!
🙂
Spoken like Hemingway himself!
Listening impressions will have to wait a few hours, as I still have to solder the internal wiring and I should let the urethane cure for a little longer. 😉
How do they sound?
In a word...
cookie monster censored - YouTube
EDIT: Dang! I can't get the video to embed. Anyway, you get the idea! I'll put real words to it later today.
Attachments
Last edited:
In a word...
cookie monster censored - YouTube
EDIT: Dang! I can't get the video to embed. Anyway, you get the idea! I'll put real words to it later today.
Hahaha
The coffee stain coordinates quite nicely with the Fostex frame colour - well done
Completely agree, the drivers look fantastic against that finish.
- Status
- Not open for further replies.
- Home
- More Vendors...
- Planet 10 hifi
- mFonken103SolT Build