Hello guys
I'm trying to dig into measurement microphones in order to be able to adjust the crossover in a current speaker project, but at this point I find myself not getting any furter and therefore I ask for your help. I would certainly like to go the DIY way in order to save some money (which I'm rather sure is possible).
So, I know electret capsule are the way to go, and modifying the Panasonic capsules as shown by Mr. Linkwitz should be possible. I have a source for the capsules (WM-61A), but they cost approx. 8$/piece - probably less if I buy 5. Can anyone help me with a cheaper european source for Panasonic electrets?
I've been looking at Rod Elliot's measurement mic preamp project and housing, and almost decided to go that way. But the preamp outputs a balanced signal and I'll be using my computer for the analysis, so I need an unbalanced signal.
How should I convert from balanced to unbalanced while maintaining a proper signal level (I guess somewhere in between 1-2v in order not to overdrive the Audigy input, or am I very wrong here)?
Please help me out... 🙂
🙂
I'm trying to dig into measurement microphones in order to be able to adjust the crossover in a current speaker project, but at this point I find myself not getting any furter and therefore I ask for your help. I would certainly like to go the DIY way in order to save some money (which I'm rather sure is possible).
So, I know electret capsule are the way to go, and modifying the Panasonic capsules as shown by Mr. Linkwitz should be possible. I have a source for the capsules (WM-61A), but they cost approx. 8$/piece - probably less if I buy 5. Can anyone help me with a cheaper european source for Panasonic electrets?
I've been looking at Rod Elliot's measurement mic preamp project and housing, and almost decided to go that way. But the preamp outputs a balanced signal and I'll be using my computer for the analysis, so I need an unbalanced signal.
How should I convert from balanced to unbalanced while maintaining a proper signal level (I guess somewhere in between 1-2v in order not to overdrive the Audigy input, or am I very wrong here)?
Please help me out...
🙂IMO if you are just trying to sort out a smooth crossover, rather
than take reference measurements a standard electret omni
mike should enable you to do the job, there are plenty of these
available for the standard PC soundcard mike input.
I think one of these is also good enough to sort out baffle step correction.
What you cannot assume is the broad picture is correct.
JMO 🙂 sreten.
Well, yes. Using a simpler setup would be a solution. I suppose it would be able to sort out baffle diffraction step , which I suspect is one of the problems the speaker has. I also need to adjust the tweeter level.
However, I would like to do the more reference microphone like project in order to be prepared for future more complex projects.
However, I would like to do the more reference microphone like project in order to be prepared for future more complex projects.
Hi,
The same Panasonic capsule is sold in Europe by Monacor with part number MC2000. Paid about 4 EU for one last year at my electronics parts shop around the corner.
Cheers 😉
The same Panasonic capsule is sold in Europe by Monacor with part number MC2000. Paid about 4 EU for one last year at my electronics parts shop around the corner.
Cheers 😉
Hi Sobazz,
I just got some wm60AY mics the other day (decidedly more expensive than $8 when you add in digikeys $6 international handling and $17 postage).....
I'm going to make this preamp http://www.gti.net/wallin/audio/preamp2/preamp2.html
have got everything bar the electros, IC and voltage reference which I'm going to have to order from farnell.
You could simply hook the mic capsule directly to your audigy's mic input, I did this on the weekend, The mic is definitely better than the computer mic I was using. (note it only worked on one of the two channels (Right I think)....
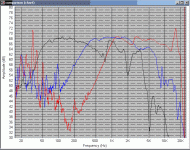
Below is a screen grab from in speaker workshop. I tested each speaker in the box individually with no crossover (nearfield), applied 1/16 Oct smoothing, scaled the results so that they were all around the same sensitivity then added each data set to a graph. As you can see the drivers aren't really suitable to be used together. when I measure the whole system, there are big dips at 500Hz (first xover freq) and again at 2Khz (upper xover freq is 3Khz)...... edit: all with the mic connected to the audigy's mic input.
The thing I find most strange is that they still sound quite good regardless..... I may change that opinon once I build my next set 🙂.
Tony.
I just got some wm60AY mics the other day (decidedly more expensive than $8 when you add in digikeys $6 international handling and $17 postage).....
I'm going to make this preamp http://www.gti.net/wallin/audio/preamp2/preamp2.html
have got everything bar the electros, IC and voltage reference which I'm going to have to order from farnell.
You could simply hook the mic capsule directly to your audigy's mic input, I did this on the weekend, The mic is definitely better than the computer mic I was using. (note it only worked on one of the two channels (Right I think)....
Below is a screen grab from in speaker workshop. I tested each speaker in the box individually with no crossover (nearfield), applied 1/16 Oct smoothing, scaled the results so that they were all around the same sensitivity then added each data set to a graph. As you can see the drivers aren't really suitable to be used together. when I measure the whole system, there are big dips at 500Hz (first xover freq) and again at 2Khz (upper xover freq is 3Khz)...... edit: all with the mic connected to the audigy's mic input.
The thing I find most strange is that they still sound quite good regardless..... I may change that opinon once I build my next set 🙂.
Tony.
Attachments
So Monacor relabels Panasonic capsules? That certainly is nice to know. The Linkwitz mod may easily destroy a couple of capsule so the price is important.
Thank you very much for letting me know.
Thank you very much for letting me know.
Hi Sobazz,
Yes Monacor does. For removing the earth link use a new very sharp scalpel. Be careful, the aluminium housing is very thin and is easily damaged. I did not solder the ground connection but used conductive glue for it. Also be careful with soldering the other two connections. The solder blobs at the back are the pins of the internal fet which are very short.
The mod is only needed if you want to measure above 90 dB SPL. Then the capsule starts to compress. For normal x-over checks you rarely go beyond 90 dB, so you can hook it up the usual way with a resistor at the drain. And do not use more than 4 - 5 V power when hooked up with a drain resistor to limit noise (caused by the gate leakage current).
Cheers
wintermute, the preamp circuit certainly looks like an interresting alternative - and cheaper than making both phantom supply and balanced receiver for converting to unbalanced for use with Rod's mic.
If I decide to go for Rod's preamp and housing, however, what would I need in order to power the preamp and convert the balanced signal?
A phantom feed supply: http://sound.westhost.com/project96.htm
And the receiver shown here: http://sound.westhost.com/project87.htm
Or am I wrong?
If I decide to go for Rod's preamp and housing, however, what would I need in order to power the preamp and convert the balanced signal?
A phantom feed supply: http://sound.westhost.com/project96.htm
And the receiver shown here: http://sound.westhost.com/project87.htm
Or am I wrong?
I use a Panasonic Mic Capsule with a modified Radio Shack SPL meter which works as a preamp, it's quite accurate, the different scales will provide different biasing. Just remove the factory mic and replace with a detachable mic wand (I used n Arrow shaft).
Hi Sobazz,
I haven't looked at the ESP mic projects in depth, are you looking at project 66 or 93. I had a quick look at 93, and he says you can run it off either a phantom supply, or a 9V battery.
I like the simplicity (and cleaness) of a 9V battery myself, and personally would be opting for that if supported.
I don't know about the balanced stuff haven't read about it.
Tony.
Yes, you're right. The project mentioned is #93. After som consideration I've decided to do the unbalanced, battery driven preamp. It will be far easier to do, and also make more sense for this application.
Thanks for the help, all of you!
Regards
Soeren
Thanks for the help, all of you!
Regards
Soeren
Price of a WM-61A at Digikey
Digikey has the WM-61A mic capsule listed for US$1.83 per piece.
Part no: P9925-ND
Digikey has the WM-61A mic capsule listed for US$1.83 per piece.
Part no: P9925-ND
Re: Price of a WM-61A at Digikey
Yes, but you have to add the $6 international handling fee, and $17 postage on top of that! that means if you buy 3 it'll work out at almost $10 each..... I know I just bought some WM60AY's from digikey 🙂
I ended up buying 11 (10+ price $2.34) and because it was over $25 no $6 fee. So even though it cost me more, I feel better that the mics only cost me about $3.88 each, instead of $10.30 each if I had bought say 3, and I have plenty to cook, or break while experimenting 🙂
Tony.
ashok said:Digikey has the WM-61A mic capsule listed for US$1.83 per piece.
Part no: P9925-ND
Yes, but you have to add the $6 international handling fee, and $17 postage on top of that! that means if you buy 3 it'll work out at almost $10 each..... I know I just bought some WM60AY's from digikey 🙂
I ended up buying 11 (10+ price $2.34) and because it was over $25 no $6 fee. So even though it cost me more, I feel better that the mics only cost me about $3.88 each, instead of $10.30 each if I had bought say 3, and I have plenty to cook, or break while experimenting 🙂
Tony.
Hi Wintermute,
Once I tried using PC mic with Speaker Workshop, but I failed.
Since you did it before, would you mind explaining how to do it, step by step?
FYI, I connected the mic to the sound card mic input and then started the near field measurement, the result showed something like noise with +1dB gain only.
Is it too bad using PC mic just to know how is the speaker response in real life?
thankyou.
Chris.
Hi Chris,
The pc mic wasn't as good, as the one I have now but it certainly was better than useless. See the first post in this thread: http://www.diyaudio.com/forums/showthread.php?s=&threadid=23465&highlight=
I didn't do anything to special, apart from play around with the settings under options settings acoustic. I'm using the left channel with none for the reference (the none for the reference is the important bit). If I didn't do that I got a completely flat freq response (I think because the mic is wired to both channels, so the measured response, and the reference are identical). This might be your problem, not sure from your description. Actually I just re-read what you said, and it sounds like what you get if you have no mic connected at all, if this happens again, try the same measurement without the mic attached, if it's the same, then your mic isn't working (could be a number of things, from incorrect channel, to not having it correctly selected in the mixer control).
The other thing I would suggest is just using some sort of sound recording program (usually something comes with the sound card) and make sure you are getting something out of the mic by simply recording your voice or something, so you know the mic is working properly before trying to measure the speakers.
Also as a word of caution, it is possible to get carried away and start worrying that the results mean something awfull.... see what I said here: http://www.diyaudio.com/forums/showthread.php?s=&threadid=23855&highlight=wintermute
I was basically using completely the wrong methodology as I was going in too quick without thinking about it properly (or researching first).
The measurements that I showed in this thread (ie the nearfield ones) are much more enlightening as to what is going on with my speakers. Note that there are still some nasty drops (especially the one at 1.2Khz) if I do 1M farfield measurements, but I think these are probably due to baffle diffraction effects, or room effects.
Tony.
edit: Oh and one other thing, when doing nearfield (especially with tweeters I found) don't have the volume to loud or it will overload the mic, resulting in a very "hairy" response curve.
Hi Tony,
thank's for your answer.
My mic is working, because I can hear at the speaker when I speak on the mic.
I set the reference to none and I got Nearfield response around 80dB, but the graph still like hair comb from 20-20KHz! Then I smoothed it with 1/2 octave and now I got roller coaster graph!
Any other thing on SW should I check?
Chris.
Hi Chris,
I'd say that your output level is too high, and you're overloading the mic. Try turning the volume down a bit and the comb effect should go away. (I had the levels very low, so low that if you were more than a few meters away you wouldn't here it).
Another thing I read yesterday (was for Just MLS software) was that when doing nearfield measurements on woofers you should drop the sampling rate to 8Khz. I guess this makes sense as you don't really need to sample higher than 4K for a woofer. would mean it's not trying to reproduce high freq's either, which would be more like the situation with a crossover, and also means more resolution in the freq range you are interested in.
If you get rid of the comb (by turning down the volume) then try using the smallest smoothing you can get away with (I used 1/16th octave), will give you a more acurate idea of where the dips and peaks are.
my woofer and Midranges freq curves, earlier in the post look reasonably smooth, but are not what I would call flat... Look at the tweeter resonse curve, now that's a rollercoaster!
The mid and woofer are both reasonably high quality units, the tweeter is cheap (the woofer is a vifa M26WR-09-08 10" (about $230Aus each, 6 years ago, although I got them at 1/2 price) and the mid is a Phillips AD02110/Sq8 Dome mid which cost about $80Aus each, around 10 or 12 years ago.
Note that the curves I posted here were with the new mic, and I think that they are quite a bit better than ones I previously did with the computer mic, part of your rollercoaster could be the mic, especially in the higher freq ranges.
Finally, are you disconnecting the other driver(s) while testing the particular driver you have the mic positioned in fron't of? The graphs I showed above were with all drivers disconnected, and no crossover, ie driver being tested connected direct to amp, still in the box though (another reason to use low levels, esp with the tweeter!)
Tony.
Another point about doing near-field- make sure that the mike is really, really close to the woofer. By "close," I mean like a few millimeters. And don't trust the measurement past a few hundred hertz. Good midrange and treble data can only be gotten with quasi-anechoic (e.g., measuring at 1 or 2 meters and truncating the impulse response just before the first reflection) or with ground-plane (ditto).
SY said:Good midrange and treble data can only be gotten with quasi-anechoic (e.g., measuring at 1 or 2 meters and truncating the impulse response just before the first reflection) or with ground-plane (ditto).
Hi SY,
I wondered about that, My mid's response even when I pull back to .5M is nowhere near as flat (even using gating like you suggest) as the nearfield test. I thought it was baffle diffraction, but then I measured it in free air and still had a nasty dip at 1.2Khz and then at each harmonic after that. I started thinking it was the face plate of the mid itself (It's square) which was causing diffraction effects.
Is this why you say nearfield is only good for woofers?
Tony.
Is this why you say nearfield is only good for woofers?
Hi Tony,
the near field top useful frequency range is given by the formula: 10950/d , where d=driver diameter in cm. So if you take a midrange that has a diameter of 11 cm., the Fmax=10950/11=995 Hz. Sometimes it is a useful, sometimes not, depends on the system.
To calculate the driver plate resonance, just do: 345/2d , where d is the plate dimension in meters.
Hope it helps.
Claudio
- Status
- Not open for further replies.
- Home
- Loudspeakers
- Multi-Way
- Measurement mic question