Hehe. For the time expended and the results I am inclined to veneer instead. I wanted to have some nice looking BB layers come together at the top of a set I just built. It didn't end up being worth the hassle. BUT, I think I ended up with a better handle on making precise cuts on a table saw.
Kyle
Kyle
Member
Joined 2009
Paid Member
I tried Veneer on an earlier project. I just don't like, can't get the results - seems that my technique is not good enough and I get delamination several months later which I can't afford as these speakers are for somebody else. Oh well.
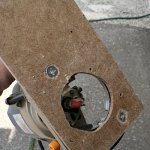
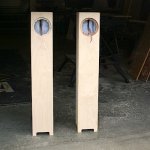
So, today was aimed at the driver cut-outs. If you read the data sheet you will know that the driver rebate needs to allow for the gasket, 8mm depth from the front baffle surface in total.
Unfortunately the required radius was the same as the size of my router base - meaning that the pivot point wasn't accessible because it was directly under the solid part of the base of my router. I didn't want to drill a hole in my router base. So I had to fit a false wooden base to the router and drill a blind hole in the wood for a pivot point around which to rotate the router. You can just see the blind holes in picture 1. One is just the right distance for cutting out the driver rebate, the other is closer to the centre point and is designed for the cut-out that goes all the way through the baffle.
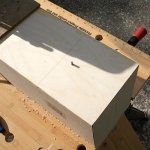
I drilled a pivot hole in the workpiece and left the drill bit embedded in it, to act as the pivot as shown in the 2nd picture (ignore the pencil lines, the pivot point is in the right spot !)
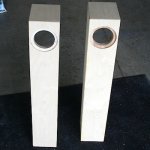
Finished is shown in 3rd picture. Dry fitting the driver shows the holes to be the right size, although I still need to file out a chamfer on the backside to allow the driver some breathing room.
So, today was aimed at the driver cut-outs. If you read the data sheet you will know that the driver rebate needs to allow for the gasket, 8mm depth from the front baffle surface in total.
Unfortunately the required radius was the same as the size of my router base - meaning that the pivot point wasn't accessible because it was directly under the solid part of the base of my router. I didn't want to drill a hole in my router base. So I had to fit a false wooden base to the router and drill a blind hole in the wood for a pivot point around which to rotate the router. You can just see the blind holes in picture 1. One is just the right distance for cutting out the driver rebate, the other is closer to the centre point and is designed for the cut-out that goes all the way through the baffle.
I drilled a pivot hole in the workpiece and left the drill bit embedded in it, to act as the pivot as shown in the 2nd picture (ignore the pencil lines, the pivot point is in the right spot !)
Finished is shown in 3rd picture. Dry fitting the driver shows the holes to be the right size, although I still need to file out a chamfer on the backside to allow the driver some breathing room.
Attachments
Last edited:
Member
Joined 2009
Paid Member

Member
Joined 2009
Paid Member
Member
Joined 2009
Paid Member
Member
Joined 2009
Paid Member
I wish I'd cut some smaller holes in my EmKen's braces.
why ?
... I just happened to have this really nice Forstener bit in my toolbox, just the one and so the size was fixed.

Member
Joined 2009
Paid Member
well, I figure lots of holes in the brace is best, but leave enough wood between them to ensure strength.
Anyhow, today I...
routed some relief for the back of the driver around the opening so that it can breath better
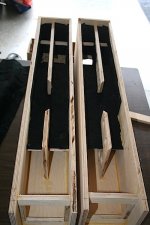
finished adding cleats for the bottom (pic 1)
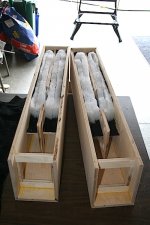
lined top half of box with felt (pic2)
installed speaker wire and poly batting for stuffing in top half of the line (pic3)
Anyhow, today I...
routed some relief for the back of the driver around the opening so that it can breath better
finished adding cleats for the bottom (pic 1)
lined top half of box with felt (pic2)
installed speaker wire and poly batting for stuffing in top half of the line (pic3)
Attachments

Member
Joined 2009
Paid Member
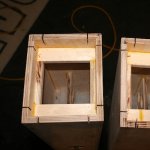
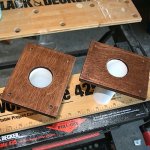
So the stuffing is done. And the backs have been glued on. The sides at the back have been routed flush. Holes were cut for the terminal cups and a wire put in before gluing the backs on of course.
Now just routing the bottom edges uniform before cutting the breathing slots.
Now just routing the bottom edges uniform before cutting the breathing slots.
Attachments

Member
Joined 2009
Paid Member
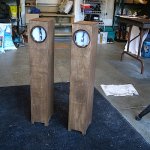
So I finished the bottom pieces with 2" plastic pipe. I cut the lengths to around 5.5 inches - being a compromise between the EL-70 and CHR-70.
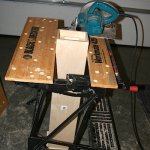
I held the speakers upside down to saw for the breathing slots, cutting to the depth needed minus radius of my router bit. Then I used a finishing router bit to route the breathing slots, using the screwed on bottom pieces as a guide for the router bit.
Now the basic construction is done - next step is sanding, tidying up, staining and varnishing.
Attachments
Member
Joined 2009
Paid Member

Member
Joined 2009
Paid Member
Thanks Sippy!
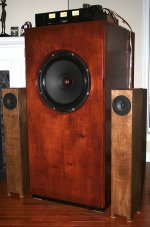
Well they are now in song.
And for the first time I understand why people rave about the bass of these drivers !
The photo shows the Martello-2's flanking my new Big'un speaker. They don't compare with the AN15, but they do a very good job of it.
I'm not sure I'll need to be doing any tweaking.
This could be a case of "It's a wrap!" 😀
Attachments
And for the first time I understand why people rave about the bass of these drivers !
and when you double up ...
nice work
Member
Joined 2009
Paid Member
Two drivers per side - that would be really nice !
Anyhow, I'll listen to them for awhile. No doubt I'll find myself wanting to go back to the AN15 eventually but they do well for their size.
Anyhow, I'll listen to them for awhile. No doubt I'll find myself wanting to go back to the AN15 eventually but they do well for their size.
Member
Joined 2009
Paid Member
I now have it on good authority that the WAF factor for these speakers, being narrow and not too tall - is extremely high 😀
well I haven't found it easy making the 45 degree mitre cuts using a hand-held circular saw
Bigun my friend!
It's not that hard if you use a Swanson square as a guide. Freehand you have to be either a miracle worker or an idiot to try. 🙂
Member
Joined 2009
Paid Member
I used a guide, a piece of wood clamped on top of the piece I was cutting and ran the edge of the baseplate of my circular saw along this guide. But you know, the slightest wobble of the saw and the cut is slightly off. Over a 30+ inch long joint you have to be spot-0n for two of these 45degree edged planks to make perfectly. So, I'm afraid my workmanship just ain't up to it !!! - but following-up with the router made things 99% good.
- Status
- Not open for further replies.
- Home
- Loudspeakers
- Full Range
- MARTELLO-2, a mini-tower from a single 2' x 4'