I am heading to the lab now to test out what you have suggested. I will get back to you shortly to let you know what I found out. Thanks so much for your help.
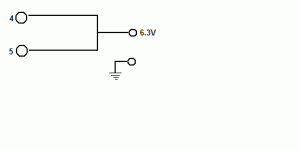
I have the right pins (4 and 5), and the supply voltage is 6.3V. The resistance b/w pins 4 an 5 is around 3 ohms, which is low. Any suggestions? Thanks.

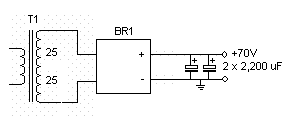
Here is my schematic for my +70V power supply. It has the correct output voltage (unloaded) of right around 70V, but when I disconnect power, it takes a couple of hours for the voltage to drop down to zero. This doesn't seem right, but I could have something wrong with my schematic. Any suggestions on how to correct the schematic would be appreciated. Thanks.
Attachments
look at your heater wireing and you will see your error...
It looks like you basicaly just shorted the pins to the heater... and left the 6.3V supply open circuit.....
From your 6V PSU... 1 wire must connect from the V+ rail and one from the PSU's ground... i.e. the refference point between which the 6.3V potential exists..
The heater is not connected internaly to the rest of the tube... think of it as a lightbulb in a room full of deaf people... without the bulb shineing, they can't sign to each other... but the bulb is not connected to them...
'The parallel thing confused you.. the filament is allready wired up like this internaly in this tube... you just need to apply your 6.3V between those 2 pins...
i connected the V+ from the 6.3 supply to pin 4 and then i connected the ground reference to pin 5. I do see that it starts to glow now. Is this correct? It is drawing right around 350mA. Thanks for the help. Any suggestions on why the 70V supply is taking so long to drop to 0V? Thanks for your help.
Your current draw is your indicator that you got that part sorted out...
Do you mean, when you switch it off?
The capacitors in your PSU acts as a store of energy...
you can put an LED in series with a 2k resistor between +70V (the LED's longer leg goes to +) and ground to help drain them a little faster...
Once it all works, you may find it has a bit of a turn on thump... give a shout if you need help with that...
Does the 70V power supply schematic look ok? I should be able to test the circuit once I get the supply out of the way.
I am building the tube buffer for a preamp feeding into a gainclone (schematic from Peter Daniel - NIGC). The gainclone amp sounds great, but when I connect the preamp to the gainclone it doesn't seem to want to work. If I inject a sin wave into the tube preamp the results are as expected (as well as the gainclone), but when I connect them together it doesn't want to seem to work. Any suggestions on what might be causing this error. Thanks ahead of time.
I'm not familiar with that topology you are useing...
http://myweb.tiscali.co.uk/nuukspot/decdun/vbigc/jr valve buffered gc.gif
Have a look at this circuit from Nuuk's site... I know it works...
Been thinking about it some more, the tube could be haveing a hard time driveing the next stage like that... drop a 47k to 1M resistor, play around with the values... from the In+ pin of the chipamp to ground...
I built the circuit that you gave me a link for, but it does not seem to work. When I connect the power supply for the chipamp, it draws over an amp with no input signal and there is a loud hum in the speaker. I have everything set up the way the picture has but I seem to be having trouble. any help would be appreciated. I just tried it without the tube power being turned on and only the chipamp and it did the same thing.
I added the 22-ohm resistor at the output of the chip amp and the hum went away, but the sound is bad and fuzzy. I pulled out the ground signal cable and the 22-ohm resistor burnt out. Everything seems to be hooked up correctly. Also I was using a +/-25V supply for the chip amp and a +/-35V supply for the tube. I don't know what I'm doing wrong here, but maybe someone has some idea what I am doing wrong. Thanks ahead of time for the help.
I am trying to test it out using the +/-25V lab power supply. I notice that when I am turning the voltage from 0-25 on both the positive and negative rail (of the chip amp), at a certain point, one rail begins to draw nearly an amp and a loud hiss comes out of the connected speakers. This must be a fault with the putting together of the circuit, but I cannot seem to figure out why this is occurring. If anyone has any knowledge on why this might be happening I would love to hear it. Thanks again.
That circuit definately works, and you almost certainly made a construction error....
Download the datasheet for the chip, useing googlem so that you can confirm you have the right pins...
With LM3875, I preffer cutting off the other pins, leaving only the 5 that are used...
Also make sure you are not useing a too small heatsink
Make sure PSU supplies DC volts...
Make sure test speaker is not too low impendance due to internal damage...
It is a good idea to build the two stages seperately to confirm both work... will also allow you to swap out the buffer or amp at a later stage...
While you are on Nuuk's site, look at his basic inverted GC, it is basicaly the most simple (and satisfying) circuit to wire up your chip to work... you can do it all point to point without PCB's etc...
Just remembered, you only have the circuit from there... just google, decibel dungeon.
WHEN it runs, add the buffer stage...
I am going to try and build the two circuit separately. Is the output of the tube buffer after the coupling cap or after the 4k7 resistor? I know this is a dumb question, but just wanted to make sure that the cap was 3.3uF. I am new to the abbreviations of resistor and cap values that many use to describe their circuits. Any tips on wiring size and grounding schemes? These could be causing me a little bit of a problem.
The power supplies are definitely putting out dc volts. The heat sink I am using is way bigger than what I need for the chip (heat sink from Logitech z-560 subwoofer). I am going to try both the circuit you suggested again today, as well as some new values for my plate follower configuration that another member suggested.
Any more suggestions would be greatly appreciated. Thanks for all the help.
Yes 3u3 is "engineerspeak" for 3.3u... it avoids mistakes when makeing photocopies etc... for proof of concept purposes any value from about 1uF upwards, should get you going, with larger values, lowering the bottom point of which frequencies get filtered out..
The 3u3 cap filters out DC (even low frequency AC can be considired as DC) from the buffer stage, which will have rather large DC offset as it reaches operating point.
You can in this case see it as the second stage and the bits to the right as a third stage...
If all else fails, click your heels together and say Nuuk, Nuuk Nuuk... and he will probably come to help us.
P.S. before I forgetm, the webpage that goes with your circuit is
http://myweb.tiscali.co.uk/nuukspot/decdun/gainclone3.html
Don't get disheartened, get it outside of your head so you can get a better perspective of how things interact... start with the chip and tube's datasheets... physicaly draw out the pins with pencil, you will be amazed how this sometimes show us our mistakes...
For your tube, some advice I can add is the resistor from input to grid, should be as close as possible to the tube itself, it is often called a gridstopper and will help preventing oscillation.
- Status
- Not open for further replies.
- Home
- Amplifiers
- Power Supplies
- Low Voltage (+70V) Power Supply Design