Sorry for the off topic,
wow, that Antek is a nice price for lotsa power, or the set of all needed iron for 200 dollars... why aren't price that low here in Europe? Or am I missing a source?
Erik
wow, that Antek is a nice price for lotsa power, or the set of all needed iron for 200 dollars... why aren't price that low here in Europe? Or am I missing a source?
Erik
question for Doug:
Eli said
is that the 150k resistor at the top of the schematic by the input? and is that correct that swapping that out will give you control of the volume, besides adding a dual rotary selector switch between the actual RCA's and the input into the amp circuit?
Thanks,
Steve
Eli said
"Converting Doug's schematic into an "integrated" amp primarily means replacing the I/P 6AU6 grid leak resistor with an Alpha Taiwan 100 KOhm log. taper pot"
is that the 150k resistor at the top of the schematic by the input? and is that correct that swapping that out will give you control of the volume, besides adding a dual rotary selector switch between the actual RCA's and the input into the amp circuit?
Thanks,
Steve
A good way to deal with the chassis issue is to buy a large, deep, plain Aluminum baking pan. Something intended for service in a commercial establishment off the WWW would be best, but even WalMart may have something suitable.
Obviously, machining and finishing are totally the builder's responsibility, if a pan is used. Sanding, self etching primer, and "Hammerite" will provide a reasonable finish, without too much fuss and muss.
Obviously, machining and finishing are totally the builder's responsibility, if a pan is used. Sanding, self etching primer, and "Hammerite" will provide a reasonable finish, without too much fuss and muss.
ErikdeBest said:Sorry for the off topic,
wow, that Antek is a nice price for lotsa power, or the set of all needed iron for 200 dollars... why aren't price that low here in Europe? Or am I missing a source?
Erik
Unfortunately, you get whacked with VAT on stuff that originates inside the EU and stuff you import. That reality is reflected in the prices you pay.
I want this to be a great looking amp, so I think I am going to have my friend help me build a chassis. They have a press break for bending sheet metal, drill presses, and so forth. Will take a little more planning, but he said he'd do it for just the cost of materials.
If I wanted to ad VU meters for each channel, would you drive those off the 8 ohm speaker outs? How would that be set up?
I have to say I am really excited about this amp. I've been planning for a long time to build one and this could be the prefect time to do it.
If I wanted to ad VU meters for each channel, would you drive those off the 8 ohm speaker outs? How would that be set up?
I have to say I am really excited about this amp. I've been planning for a long time to build one and this could be the prefect time to do it.
Hi Eli Duttman
Thanks for the input: yes, VAT is not included in the US prices, but once included that would elevate the prices by about 20%. Even adding that to the ANTEK or the Heyboer prices makes the US products cheaper than the European similars. What really kills the advantage are the shipping costs: sending that 50 dollars ANTEK would cost me another 37 dollars for shipment.
Well, I should not complain that loud. Most iron I get is second hand and that drops prices considerably!
Erik
I am making chasses (is that plural for chassis?) both ways. But you can't beat the cost effectiveness and ease of using an industrial bake pan. I got mine from here...
http://www.surfasonline.com/productlines/214.cfm
The self-etching primer, as Eli said, is really the key. Otherwise the paint won't stick. This is what I've used.
http://www.surfasonline.com/productlines/214.cfm
The self-etching primer, as Eli said, is really the key. Otherwise the paint won't stick. This is what I've used.
An externally hosted image should be here but it was not working when we last tested it.
ErikdeBest said:What really kills the advantage are the shipping costs: sending that 50 dollars ANTEK would cost me another 37 dollars for shipment.
Well, I should not complain that loud. Most iron I get is second hand and that drops prices considerably!
Erik
What we need is an international pony express. This stuff would be fine everywhere but carry-on. I know I'd drive to the local airport to get a package...🙂
Also a big fan of vintage stuff, but for E-Linear apps needing more than a single tap, pr put that tap elsewhere...it is new custom based on the good vintage designs. Peerless for example...🙂 like their 16446 and 16431 or the 20-20 and 20-20 Plus stuff...all it takes is One to hand the unwinder/winder. Prices and terms at Heyboer are orders of magnitude better too.
cheers,
Douglas
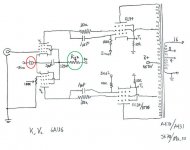
OK, some questions. I am not well versed in reading schematics so bear with me:
Circled in red, what is that symbol.
Circled in green, what is that? It has the resistor symbol, but no value.
Where is the power portion of the circuit(or it just not on this drawing)?
I switched out the grid leak resistor for the potentiometer, is that correct?
What are T1 and T2 referencing?
Circled in red, what is that symbol.
Circled in green, what is that? It has the resistor symbol, but no value.
Where is the power portion of the circuit(or it just not on this drawing)?
I switched out the grid leak resistor for the potentiometer, is that correct?
What are T1 and T2 referencing?
Attachments
SigloOne said:Circled in red, what is that symbol.
Constant current source.
Circled in green, what is that? It has the resistor symbol, but no value.
Yep, it's a resistor. The schemo there is just a partial one to illustrate the basic idea. It's missing a lot of details. If there is no resistor value, it's probably because it's unknown what value it needs.
Circled in red, what is that symbol.
CCS aka Constant current sink, essentially a transistor or two to set current through the pair of pentodes to be constant. You might ask Doug to sketch his CCS that he likes to use.
Circled in green, what is that? It has the resistor symbol, but no value.
It is a resistor. I'll let someone else more experience tell you how to calculate the value. It suppose to limit the current that the control screen can draw.
The power supply isn't part of the schematic. Maybe Doug will share that with you too. Basically, this is a simplified schematic.
T1 and T2 are likely test points to determine the bias current in the finals.
The Red bit is a CCSink. You need to know what the required current is and go away and design one (there are plenty of good designs listed on this site).
The resistor is for setting the screen current, its value should be chosen to achieve the correct current through the LTP and will depend on the valves chosen and the final +B voltage. I would also add screen stoppers at about 1K straight on the screen pins - for stabilitys sake.
Shoog
The resistor is for setting the screen current, its value should be chosen to achieve the correct current through the LTP and will depend on the valves chosen and the final +B voltage. I would also add screen stoppers at about 1K straight on the screen pins - for stabilitys sake.
Shoog
Eli Duttman said:A good way to deal with the chassis issue is to buy a large, deep, plain Aluminum baking pan. Something intended for service in a commercial establishment off the WWW would be best, but even WalMart may have something suitable.
Obviously, machining and finishing are totally the builder's responsibility, if a pan is used. Sanding, self etching primer, and "Hammerite" will provide a reasonable finish, without too much fuss and muss.
I agree. I saw a very nice looking amp last year at a DIY event, based on a Caphalon baking pan. Made me realize my cookware might have a second life.
I have seen the baking pan chassis as well. Luckily I have a friend who works at a machine shop and we are going to make our own chassis from .090" aluminum sheet. I may even make the front panel, where the controls are mounted, out of a piece of polished copper for a nice accent.
The only thing I haven't figured out is labels for the input selector and volume knobs. Silk screening is an option but it might be sloppy. Any suggestions?
The only thing I haven't figured out is labels for the input selector and volume knobs. Silk screening is an option but it might be sloppy. Any suggestions?
hey-Hey!!!,
The Rg2 for the 6AU6 isn't calculated. For 6AC7 and running typical St.70 B+ it should be to deliver ~100V g2 voltage and would be 100-110kOhms. A good cascode CCS is my preference. Depletion-mode MOSFET are quite easy to implement.
cheers,
Douglas
The Rg2 for the 6AU6 isn't calculated. For 6AC7 and running typical St.70 B+ it should be to deliver ~100V g2 voltage and would be 100-110kOhms. A good cascode CCS is my preference. Depletion-mode MOSFET are quite easy to implement.
cheers,
Douglas
- Status
- Not open for further replies.
- Home
- Amplifiers
- Tubes / Valves
- Looking to build a 25-30 WPC Push Pull amp - Need Help