If you do a PCB run, always order spare boards so you have a template. It’s the only way to get TO-3 holes to line up, short of a CNC machine. Tubes are easy by comparison. I’ve even done it with partially stuffed boards, but far easier if one can be sacrificed. I don’t even bother marking the holes. Fix the board to the chassis or heat sink and drill right thru the whole thing. Guaranteed alignment. If aligning to an existing hole in the board, use the same size bit as the hole. If you want to bigger, go back and re-drill with a bigger bit (and no board). With tube stockers, I use the center hole as a guide for the *hole saw*. A drill press is necessary if you want clean holes.
If you’re a messy worker, or get scratches all over the thing you’ll learn to fall in love with the “brushed aluminum finish” you get from hitting it with an orbital sander and 220 grit paper after you’re done.
If you’re a messy worker, or get scratches all over the thing you’ll learn to fall in love with the “brushed aluminum finish” you get from hitting it with an orbital sander and 220 grit paper after you’re done.
If all the hints above don't help, I'd recommend to put the PCB on your scanner with the copper side facing the glass. Scanners usually do an isometric (1:1) scan. Then print it in it's original size and proceed as yet suggested.
Best regards!
Best regards!
Lots of great information here. Thanks to all who contributed to help a novice. It’s greatly appreciated.
And naturally, the chassis hole should be 1/4" inch larger than the tube diameter.
For a 12AX7, a 1"inch hole is good.
For a 12AX7, a 1"inch hole is good.
All you need is patience and a ruler. Better yet if you have or are willing to get hold of an adjustable/combination square.
Drilling a hole in the board is not necessary and if not done perfectly won't put the holes in the right place. DO you have a centering guide?
Remember that when using the same type sockets the distance from center to center is exactly the same as the distance from edge to edge.
If you either can't or don't want to do the simplest of the simple and contact the person who designed the board for a drilling template , which they will certainly be able to provide . . . . .
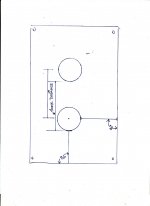
. . . . . then carefully measure the perimeter dimensions of the board so that you can first (!) locate the outline on the top plate. You need to be sure that where you place the sockets , the board still fits within the boundaries of the chassis so locating the board where you want it is first.
Next measure the distances from the edge of the socket to the outline in both dimensions.
Next , measure the diameter of the socket. Add half that measurement (the radius) to both distance measurements . That's your distance from the board edges to the center of the socket.
If you have a carpenter's adjustable/combination square (like this one) you can use it for much more easily measured lines running at 90 degrees to the board edges. It can be used like a caliper, placing the guide on the edge of the board and sliding the ruler out until it touches the socket, giving you the distance at right angles.
All this is probably better explained with photos or a video. I hope the quick sketch is enough as it is to be helpful.
Patience and careful measuring will result in a good job. do everything carefully.
PS. No one has talked about how to mount the board. Are you just going to hang it from the sockets on the top plate? You need to think about this beforehand too.
Good Luck
Drilling a hole in the board is not necessary and if not done perfectly won't put the holes in the right place. DO you have a centering guide?
Remember that when using the same type sockets the distance from center to center is exactly the same as the distance from edge to edge.
If you either can't or don't want to do the simplest of the simple and contact the person who designed the board for a drilling template , which they will certainly be able to provide . . . . .
. . . . . then carefully measure the perimeter dimensions of the board so that you can first (!) locate the outline on the top plate. You need to be sure that where you place the sockets , the board still fits within the boundaries of the chassis so locating the board where you want it is first.
Next measure the distances from the edge of the socket to the outline in both dimensions.
Next , measure the diameter of the socket. Add half that measurement (the radius) to both distance measurements . That's your distance from the board edges to the center of the socket.
If you have a carpenter's adjustable/combination square (like this one) you can use it for much more easily measured lines running at 90 degrees to the board edges. It can be used like a caliper, placing the guide on the edge of the board and sliding the ruler out until it touches the socket, giving you the distance at right angles.
All this is probably better explained with photos or a video. I hope the quick sketch is enough as it is to be helpful.
Patience and careful measuring will result in a good job. do everything carefully.
PS. No one has talked about how to mount the board. Are you just going to hang it from the sockets on the top plate? You need to think about this beforehand too.
Good Luck