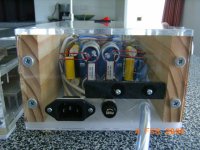
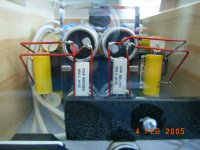
This was finished about 2 months ago. Had it running ever since with no problems. A lot better sound than my first one, which was just the standard power boards from Brian. This one has a bigger Tran- 225, and filter caps with a couple of bleeder resistors. I also replaced the rectifiers for some beefier bridges and also added snubbers (22nf 1000v poly's). And I know there's been a lot of talk about those. Do they make it sound better? who know as i've made a number of changes from the first one. But they are in now and thats where they are staying.
The front panel has come off on the power supply box, as i'm thinking about changhing it, didn't like the first one. I only wish i had a bench saw and a really good quality drill press to make the work accurate.......... I'm working on the mrs as this is written, for my allowance to be increased") .
.
Cheers
Brett
The front panel has come off on the power supply box, as i'm thinking about changhing it, didn't like the first one. I only wish i had a bench saw and a really good quality drill press to make the work accurate.......... I'm working on the mrs as this is written, for my allowance to be increased
.Cheers
Brett
Attachments

Cheers
Thanks carlos,
I had to build this from stuff i had. I really like alluminium, but it's just sooooo expensive here. Thats why i went out and bought a 2.5 metre length just to make this. It was cheaper than buying a special heat sink in the shops.
God knows what I'm going to do with all the rest of it......
Brett
The problem is that there is no airflow, so the heatsink will absorb heat for quite a while (due to its size), but then it will need to dump some of that heat into colder air or it will just keep heating up.....
Hope you used 105C caps too... high temps drasticaly shorten the lifetime of components like these.
Edit:
Forgot to say it looks darn nice though.
Hope you used 105C caps too... high temps drasticaly shorten the lifetime of components like these.
Edit:
Forgot to say it looks darn nice though.
Stabist
Sorry for not getting back to you, but I have been away from the net.
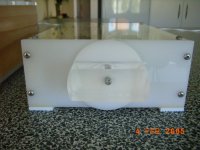
The perspex is just standard...sanded with wet and dry with a maximum of 1200 grit paper. I then polished it with a product called BRASSO which is a metal polisher, this gets the perspex really nice and takes out all the smaller scratches left from sanding.
I attatched the volume knob to the volume pot with a tiny bit of shatter proof super-glue.
Brett.
Sorry for not getting back to you, but I have been away from the net.
The perspex is just standard...sanded with wet and dry with a maximum of 1200 grit paper. I then polished it with a product called BRASSO which is a metal polisher, this gets the perspex really nice and takes out all the smaller scratches left from sanding.
I attatched the volume knob to the volume pot with a tiny bit of shatter proof super-glue.
Brett.
- Status
- This old topic is closed. If you want to reopen this topic, contact a moderator using the "Report Post" button.
- Home
- Amplifiers
- Chip Amps
- LM3875-semi finished