Hi Guys, I am almost done, also picked up two of the chips to do a prototype with. I was well on my way when I saw Daniel's request to be able to fit diffirent input caps.
I won't bother with SMD feedback resistors, lets keep this boards simple (I know SMD is too, but it is scary for the newer guys).
As you know I have made up to 250W RMS amps and those have feedback paths orders of magnitude longer without any adverse effects.
The only places you need to take care on these chipamp boards is the high impendance connections...(around the inputs)
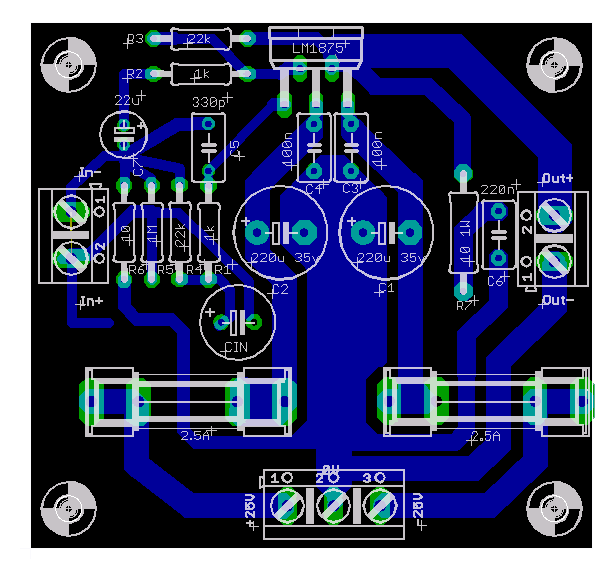
Daniel nice to see you takeing up PCB layout... on your last board, there is something you can learn... look at the schematic, at the bit above the 10R ground lift resistor, see how those connections can aslo form a star (Signal ground star) so each can refference the same ground point voltage. Now translate that to your traces...
I won't bother with SMD feedback resistors, lets keep this boards simple (I know SMD is too, but it is scary for the newer guys).
As you know I have made up to 250W RMS amps and those have feedback paths orders of magnitude longer without any adverse effects.
The only places you need to take care on these chipamp boards is the high impendance connections...(around the inputs)
Daniel nice to see you takeing up PCB layout... on your last board, there is something you can learn... look at the schematic, at the bit above the 10R ground lift resistor, see how those connections can aslo form a star (Signal ground star) so each can refference the same ground point voltage. Now translate that to your traces...
Nordic, Paswa:
If you are having this PCB built - please add a few and set-up a wiki for us to buy.
I'm interested in at least 6 single-channel boards.
And if you can add the PS to a single board this would be heaven!
thanks
Bob
If you are having this PCB built - please add a few and set-up a wiki for us to buy.
I'm interested in at least 6 single-channel boards.
And if you can add the PS to a single board this would be heaven!
thanks
Bob

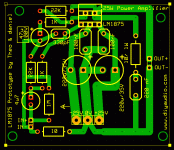
I measuered the fuses, they are not worth wile takeing out I think, you gain a handful of mm at best.
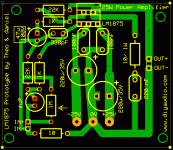
I tried a few layout, each have their own issues, like mounting holes etc...
This one seems to be the best, good routing, can accommodate a number of diffirent caps by drilling hole in inline trace... and on input cap you can choose between two points for connecting one of the leads, by cutting through the other trace with a blade.
Paswa said:daniel,
I've modofied my PCB as you said and added your name🙂 coz u helped me a very kinda way
Thank you for the kind remarks. If you put my name on then it appears that Nordic needs credit too.
Nordic said:. . .
Daniel nice to see you takeing up PCB layout... on your last board, there is something you can learn... look at the schematic, at the bit above the 10R ground lift resistor, see how those connections can aslo form a star (Signal ground star) so each can refference the same ground point voltage. Now translate that to your traces...
I do wish I knew what that meant. Can you make a photo or quickie pencil sketch?
EDIT2: I think I realized it. The NFB needs a stronger ground than the input so the trace, currently containing a 1m, could run straight up to the NFB. . . and then the 1m could go on the outboard side?
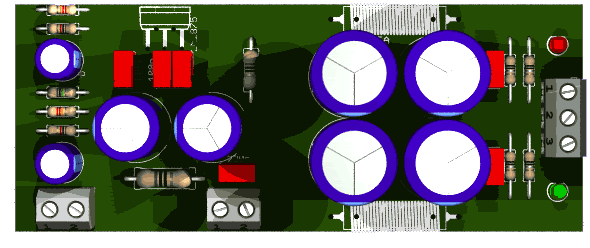
OH, please doublecheck your power caps and terminal block polarity. Pin3 (center) is "-25v" and the negative stripe on the cap will also be onto the "-" trace.
EDIT:
Thanks for the nice comments!!
But, I have more editing skill than creating skill. The first time I made a PCB "from scratch," I was puzzled for half the day.
for Nordic for post #26,
The center pin or pin 3 is negative or Vee point of LM1875. Nordic, just see it, that the + and - has reversed in your PCB. Otherwise the PCB is the best and so good-looking gal.
The center pin or pin 3 is negative or Vee point of LM1875. Nordic, just see it, that the + and - has reversed in your PCB. Otherwise the PCB is the best and so good-looking gal.
 :
:  :whack
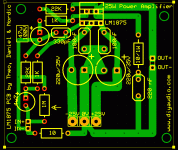
Nordic, Paswa: If you are having this PCB built - please add a few and set-up a wiki for us to buy. I'm interested in at least 6 single-channel boards. And if you can add the PS to a single board this would be heaven! thanks Bob
I dont know will nordic raise his PCB for sale or not.. But I'll not make it for sell. But I'll upload the expresspcb file for them, who wanna build the LM1875 PCB. well ?
Okay, Nordic has pointed out a possible error in that the ground for the input is stronger than the ground for the NFB (because of trace distance).
It needs an input star ground system. Okay.
There was also some mention about solving the problem by running the ground to between the centerpoint of both NFB and input.
I haven't figured this out.
It needs an input star ground system. Okay.
There was also some mention about solving the problem by running the ground to between the centerpoint of both NFB and input.
I haven't figured this out.
Hi Daniel, I seriously doubt it is audiable, but on some level it is sure to be measureable, but we have many new guys in the chipamp section so t is good to show good principles and best practices, something they can fall back on when experiments fail.
Anyhow I have played with the suggestion of an integrated board, and I think it is a good one...
THe PSU included is of CLC design and is similar to the one we use in the DX amplifier range.
If there is a demand I can have some boards made..., the cost is probably lower than elsewere in the world, but you need at least ten guys to share the setup cost between, then it can be as little as $2.50 setup + cost of the board wish is way less than Olimex...
I made it so that the board can be scored and snapped off it two seperate modules are required. and can be made as a 2 channel set with the PSU on opposing sides for symmetry.
I'm going out with a band now to one of their gigs, so I probably won't be able to finish this on before tommorrow...
There was also some mention about solving the problem by running the ground to between the centerpoint of both NFB and input. I haven't figured this
out.
daniel, please explain it a litle or draw or edit my attached pcb image to show me the solution.. I can't figure it out🙄 🙂
Hi Nordic:
Can I drive a pair of tweeters with your design, in a triamp project, without a dc protection circuit?
Thanks
Can I drive a pair of tweeters with your design, in a triamp project, without a dc protection circuit?
Thanks
- Status
- Not open for further replies.
- Home
- Amplifiers
- Chip Amps
- LM1875 PCB, Which To Use