Hello All
I have been repairing Klipsch subwoofer amps for about 15 years as a hobby. I have decided to start blogging my repairs and eventually do videos of each one. This thread is intended to be a blog and a resource for information. I will try to answer repair questions as best I can. Comments and tips are also welcome, If you do not have the experience or the tools, PLEASE do not attempt any of these repairs. You will only end up damaging the board and it will end up costing more for a tech to repair the damage. If you do not have a high quality vacuum desoldering station (Hakko or Weller) and a current limited mains supply, you should not be working on these amps. These subwoofers do not have any user serviceable parts inside. If you open up the sub or attempt any repair you see in this thread, you are doing so at your own risk!!!
I have been repairing Klipsch subwoofer amps for about 15 years as a hobby. I have decided to start blogging my repairs and eventually do videos of each one. This thread is intended to be a blog and a resource for information. I will try to answer repair questions as best I can. Comments and tips are also welcome, If you do not have the experience or the tools, PLEASE do not attempt any of these repairs. You will only end up damaging the board and it will end up costing more for a tech to repair the damage. If you do not have a high quality vacuum desoldering station (Hakko or Weller) and a current limited mains supply, you should not be working on these amps. These subwoofers do not have any user serviceable parts inside. If you open up the sub or attempt any repair you see in this thread, you are doing so at your own risk!!!
Last edited:
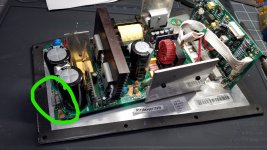
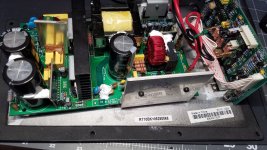
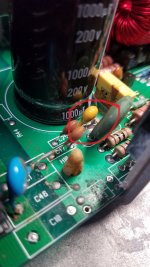
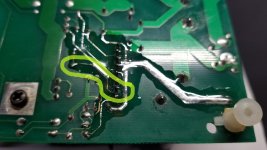
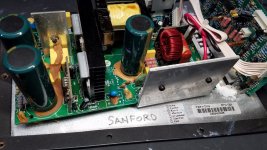
Plate serial number B207010042
This amp was having a power supply issue. I was not getting main power out or either rail on the op amps. This moves the problem to the primary side of the transformer. The fuse was not blowing, but the supply would not come on. After inspection I found that burnt glue was causing a short between R5 and the PCB. I used my hot air station to soften the glue and remove it and once removed, I replaced all of the caps on the board. I generally only use Nichicon 2000hr+ caps. This was one of the easier repairs on this model aside from removing all the bad glue.
ALWAYS REMEMBER TO UNPLUG OR SWITCH OFF YOUR AMPS. CAPACITORS HAVE A LIFESPAN AND WHEN POWER IS APPLIED THE CLOCK IS TICKING. THE AUTO ON/OFF FUNCTION DOES NOT PREVENT THIS ON MOST MODELS!!!!!!!
Attachments
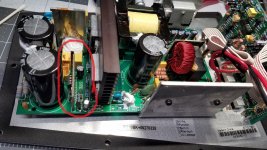
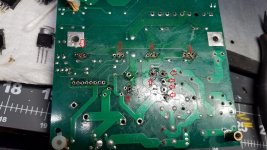
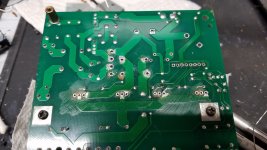
RT-12 Plate serial number 06440047
This amp was not getting any power on the secondary side of the transformer. A know weak point is the controller board 660045-1 failing. This was not The case with this amp. Pin 2 connects to the power supply that is on the board. This pin had voltage, but also a lot of noise. This noise will not let the supply start or properly regulate. The only way to see this is to look at pin 2 with a scope Pin 3 is the common and connects to the negative side of the rectifier. Pin 6 will have over 300V present. If you are poking around and slip, you will do some damage or worse shock yourself. The noise points to a bad capacitor, which is the only thing that pin 2 connects to. Replacing this cap brings the supply back to life. The whole supply will be recapped and it should be good to go.
This amp was not getting any power on the secondary side of the transformer. A know weak point is the controller board 660045-1 failing. This was not The case with this amp. Pin 2 connects to the power supply that is on the board. This pin had voltage, but also a lot of noise. This noise will not let the supply start or properly regulate. The only way to see this is to look at pin 2 with a scope Pin 3 is the common and connects to the negative side of the rectifier. Pin 6 will have over 300V present. If you are poking around and slip, you will do some damage or worse shock yourself. The noise points to a bad capacitor, which is the only thing that pin 2 connects to. Replacing this cap brings the supply back to life. The whole supply will be recapped and it should be good to go.
Attachments

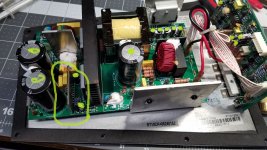
RT10CH PLATE SERIAL NUMBER 06240152
This amp also suffered from a damaged power supply control board and needed to be rebuilt. Once complete, a full recap and it successfully cooked my 10in test woofer. Note to self lower the volume level before connecting an input signal. Some people have their settings way too high!!!
This amp also suffered from a damaged power supply control board and needed to be rebuilt. Once complete, a full recap and it successfully cooked my 10in test woofer. Note to self lower the volume level before connecting an input signal. Some people have their settings way too high!!!
Attachments
RT10 Plate serial number A908400036
This amp has some nice browning glue causing all sorts of havoc on the power supply. The glue all has to be removed and the whole amp needed to be rebuilt and recapped.
This amp has some nice browning glue causing all sorts of havoc on the power supply. The glue all has to be removed and the whole amp needed to be rebuilt and recapped.
Attachments

RT??
Here is another that I am working on. It really sucks to see work that is this bad. I had to replace 20 thru holes on this power supply section, because whoever attempted the first repair didn't have the proper tools. $3 a thru hole starts to add up. I am about 40% through this one so more to come.
Here is another that I am working on. It really sucks to see work that is this bad. I had to replace 20 thru holes on this power supply section, because whoever attempted the first repair didn't have the proper tools. $3 a thru hole starts to add up. I am about 40% through this one so more to come.
Attachments
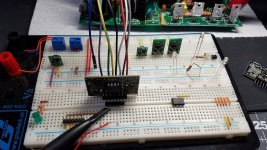
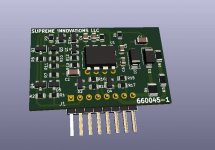
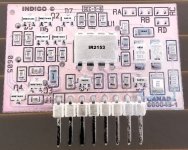
Well it is time for new control boards. Some of these 660045-1 boards are too far gone to repair. Here is my prototype that I am ordering to try out. I rolled my own layout on the board to reduce traces going under parts. More to come when boards arrive.
Attachments
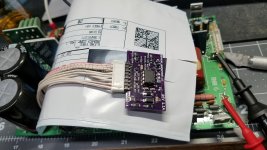
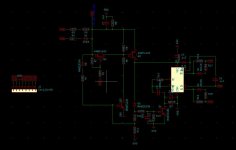
Finally got around to assembling one of these boards and testing. Worked great the first time so I will post the schematic for some of you. I am currently on summer break from repairs so my posts will be less frequent.
Attachments
My first post on this forum, sorryGaszuki. Your posts have been move to a new thread. Please do not post the same thing in multiple threads. This is made quite clear in the RULES.
Glenn
Where is the new thread?
I can't seem to find it.
I have a fried RT-10 and would be really interested in the 660045-1 gerbers if available.
I can't seem to find it.
I have a fried RT-10 and would be really interested in the 660045-1 gerbers if available.
- Home
- Loudspeakers
- Subwoofers
- Klipsch RT-10 / RT-12 REPAIR BLOG