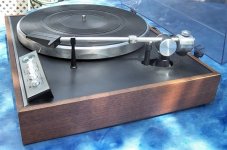
I bought this 2 years ago on the advice of forum member sreten with the intention of eventually rebuilding it. One thing leads to another and it has sat neglected while I do other more pressing projects.
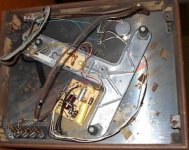
It has a suspension that is very similar to the much better known AR XA turntable:
And the heavy aluminum platter:
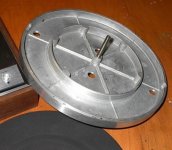
It came with a ribbed rubber mat (as seen in the pic above) and also a felt mat. I have used it but it needs quite a bit of work, new belt other upgrades.
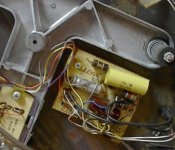
My original intent was to restore this to working original condition but the prospect of that bored me so I've decided to do a complete reinvention.
I have begun.
The plan: Retain the important parts of the original - the suspension, deck and controls, the platter. Everything else is expendable, with the exception of the tone arm (providing I can do something with the cartridge carrier) and the blue plastic lid (providing I can polish the scratches out and it looks right on the new base). The objective is to end up with a visually appealing and perfectly functioning unit, I can't have one without the other.
Starting with how it looks presently, rather tallish and clunky, I see room for improvement. The base is 3/4" plywood with a mahogany veneer, still solid and relatively undamaged but nasty looking, cheap looking. I want it to have some substance, some mass and solid wood is the way to go. To achieve the look and stability I want the base needs to be made from wood that is thick and heavy.
I chose black walnut, stock that is 2 inches thick. The base needs to be 2.5 inches high for clearance of the suspension and allow for a bottom cover. To accentuate the massive appearance of the base, I rejected miter joined corners in favour of box joints.
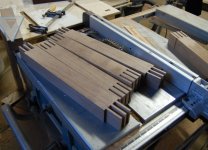
These are the parts, cut and ready for assembly. Cutting box joints in 2" walnut is tricky and demands precision and care - you don't want to make mistakes and start again, this wood is expensive.
After the glue has had a day to dry it's time for sanding and other finishing touches. I want the base to be plain and to keep decoration to a minimum.
In this pic I have set up an auxiliary fence on my tablesaw to cut a small cove around base near the bottom. Running the wood askew through the blade creates the cove, raising the blade a bit at a time until I have the correct depth.
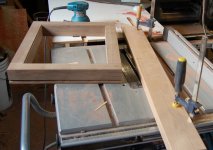
After there is sanding, lots of it starting with 100 grit and ending with 400 grit. Sanding make a big difference in the final outcome and it is what separates a great finish from a mediocre one.
Note in the pic above the base has a small rabbet around its inside edge - this is where the deck fits. Details.
Starting with how it looks presently, rather tallish and clunky, I see room for improvement. The base is 3/4" plywood with a mahogany veneer, still solid and relatively undamaged but nasty looking, cheap looking. I want it to have some substance, some mass and solid wood is the way to go. To achieve the look and stability I want the base needs to be made from wood that is thick and heavy.
I chose black walnut, stock that is 2 inches thick. The base needs to be 2.5 inches high for clearance of the suspension and allow for a bottom cover. To accentuate the massive appearance of the base, I rejected miter joined corners in favour of box joints.

These are the parts, cut and ready for assembly. Cutting box joints in 2" walnut is tricky and demands precision and care - you don't want to make mistakes and start again, this wood is expensive.
After the glue has had a day to dry it's time for sanding and other finishing touches. I want the base to be plain and to keep decoration to a minimum.
In this pic I have set up an auxiliary fence on my tablesaw to cut a small cove around base near the bottom. Running the wood askew through the blade creates the cove, raising the blade a bit at a time until I have the correct depth.

After there is sanding, lots of it starting with 100 grit and ending with 400 grit. Sanding make a big difference in the final outcome and it is what separates a great finish from a mediocre one.
Note in the pic above the base has a small rabbet around its inside edge - this is where the deck fits. Details.
Last edited:
John,
I got the link to your TT project off the "Friends" site and have to say that it looks like your on your way. This should turn out to be very, very nice.
I've got an old, original AR TT and a couple of Pioneers that, while they aren't anything special, really call out for some improvement in their appearance. Your use of Walnut is almost a guarantee of an attractive end result, with a classic look that few can argue with.
I, OTOH, am exploring the vast vistas of modern materials and the aesthetic that is often referred to as "The New Look" by those with a well developed sense of taste.
I hope to blend and integrate my TT's appearance into the overall look of my entire system. I'll be using mature, aged MDF with a selection of "seasoned," vintage NOS non-galvinized nails (never use galvinized nails, especially on speakers, as they produce a strident, hard sound!). I may even depart from the "norm" and avoid glue, instead substituting roofing tar for it's subtle damping qualities. Finally, to render this effort into an undeniable masterpiece I will use Bondo with different colors of hardener to give a variegated, multihued blending of muted, subtle coloration. While many prefer the raw honesty of unsealed Bondo for it's sonic coupling with the environment, I may choose to depart from this approach by using a synthetic clear plastic coating for it's modern appearance. The emphasis of using a clear coat is to highlight the texture of the work itself, with the gentle undulations produced by the "cheese-grater" Bondo files and #40 sandpaper.
Remember: "Bondo is the new Rosewood!"
Best Regards,
Terry😀
Hi Terry,
I get the feeling you got my little joke? 🙂
No new rosewood to be found in this beauty 😉 I'm with you on the nails, zinc free is the way to go.
I have the base finished:
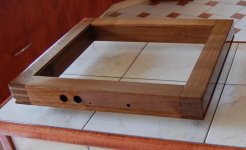
Closer:
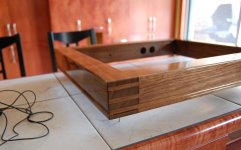
3 thin brushed on coats of urethane, each coat allowed to dry overnight then sanded with 400 paper before the next coat. Today I sanded with 1000 paper and sprayed on a final thin coat. Still not quite dry in the pics.
The holes on the back are for output RCAs, ground and the power cord.
I get the feeling you got my little joke? 🙂
No new rosewood to be found in this beauty 😉 I'm with you on the nails, zinc free is the way to go.
I have the base finished:

Closer:

3 thin brushed on coats of urethane, each coat allowed to dry overnight then sanded with 400 paper before the next coat. Today I sanded with 1000 paper and sprayed on a final thin coat. Still not quite dry in the pics.
The holes on the back are for output RCAs, ground and the power cord.
Very pretty, looking forward to next build-up stage pics.
(in the meantime on the cable thread : says one banana plug to his neighbor, i've just about had it with that evil litz and her load of rap)
(in the meantime on the cable thread : says one banana plug to his neighbor, i've just about had it with that evil litz and her load of rap)
Thanks Jacco,
I have been taking the deck apart in order to paint it - it has some rust spots on it. I also started the messy job of polishing the edge of the platter and cleaning it up. Some pics soon.
Looking at the electronics, I see the bulk of the circuit is dedicated to the on / off switch and the (non-functional) cueing. The cueing is semi-auto (?) and relies on a lamp / photocell as a position detector for the tone arm, pressing the "down" cue button powers the solenoid that lowers the tone arm. I would like to get this working again so I've spent some time tracing the whole circuit:
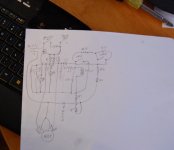
A little rough, I still need to check it over. The entire circuit is at mains potential - no transformer.
I have been taking the deck apart in order to paint it - it has some rust spots on it. I also started the messy job of polishing the edge of the platter and cleaning it up. Some pics soon.
Looking at the electronics, I see the bulk of the circuit is dedicated to the on / off switch and the (non-functional) cueing. The cueing is semi-auto (?) and relies on a lamp / photocell as a position detector for the tone arm, pressing the "down" cue button powers the solenoid that lowers the tone arm. I would like to get this working again so I've spent some time tracing the whole circuit:

A little rough, I still need to check it over. The entire circuit is at mains potential - no transformer.
Last edited:
- Status
- Not open for further replies.