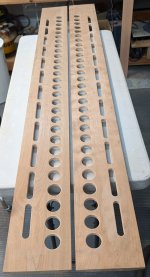
I hand to cut those ovals using my DIY flattening jig 🙁. And then spend several hours cleaning up the burn marks (cherry). But the front panel is finally ready to glue to the side panels. I still need to make 23 more tweeter assemblies. Fortunately, the 20-channel amp is done, although there is lots of code involved, which by definition is never done 🙂
Attachments


Too late now....but some very nice CNC routers just down the road from you at Nova Labs Makerspace.
https://www.nova-labs.org/
https://www.nova-labs.org/
Last edited:
There were a number of labs in Northern Virginia before the pandemic that I wanted to try but never got around to using them. But then we moved to Oakland, MD, and there isn't anything like that in this area. I guess I should update my profile info.
I used the architecture department woodshop in college days to make some speakers, so I'm fine with using shared equipment, and I think the maker labs are a great model. Oh well--I've gotten used to tedious manual labor living up here in the mountains. And there is no easy way to finish off the wiring for this project, other than lots of alcohol.
I used the architecture department woodshop in college days to make some speakers, so I'm fine with using shared equipment, and I think the maker labs are a great model. Oh well--I've gotten used to tedious manual labor living up here in the mountains. And there is no easy way to finish off the wiring for this project, other than lots of alcohol.

Hey, Neil, I see you are still at it! Those are looking exceptional, and I look forward to your results.
I feel your pain as I've often had to improvise like that in my earlier years. Excellent work though, and congrats for seeing it through!
On an entirely different note, I swear I initially read the title of this thread to the tune of Pencil Thin Moustache:
I wish I had a CNC router,
The Porter-Cable kind...
On an entirely different note, I swear I initially read the title of this thread to the tune of Pencil Thin Moustache:
I wish I had a CNC router,
The Porter-Cable kind...
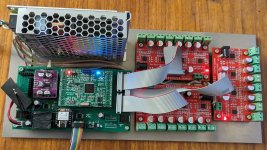
Can you tell more about this, on image it looks more like 3x8 channel DAC and DSP.Fortunately, the 20-channel amp is done, although there is lots of code involved, which by definition is never done
I'm a big DIYer, I love to build anything. I built myself a laser cutter a few years back that can cut 20mm MDF, then i thought I'd build a CNC, at the time I had no purpose for it really, just love to build things.
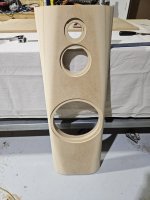
Recently got back into the audio scene and have built myself a nice set of floor standing speakers. Triple 18mm mdf front baffle, with variable edge roundover on the sides. All done on the CNC. Could not have done it without it.
Pic attached.
Recently got back into the audio scene and have built myself a nice set of floor standing speakers. Triple 18mm mdf front baffle, with variable edge roundover on the sides. All done on the CNC. Could not have done it without it.
Pic attached.
Attachments
Neil,
Does this project have it own thread on the forum somewhere? It looks like it would be an interesting read, especially the 20 channel amp.
James
It's a complicated project that doesn't fit neatly into any single forum here at diyAudio, so it will get discussed in pieces here and in totality at my web site, audiodevelopers.com.
The first thread here was the line array AMT, which is in the Planars and Exotics forum. The line arrays will fit into a "pocket" on ripole subs, and I'll probably post about the ripoles in the Subwoofer forum. This post was just focusing on the woodworking challenge. But the really interesting feature of these arrays is the electronic shading and curvature that I discussed in this article about the original version: http://www.audiodevelopers.com/10-case-study-3-a-line-array-with-dsp/. It takes a 20-channel amp with a 24 channel DSP to make this work, plus lots of Arduino control code to change the curvature from a cell phone app. That's too much to discuss in the Multi-way forum, so I'll document that part of the design on audiodevelopers.com. The DSP/amp hardware is discussed in this blog: http://www.audiodevelopers.com/2024/03/17/another-prototype-line-array-amp/
Also, this line array will be open-back, which requires DSP to flatten out the response. I'm expecting some interesting "challenges" to combine the dipole compensation with curvature.
Not trying to open up an old wound, but I'd still like to see a dedicated line array forum at diyAudio, given the many unique issues with this class of speaker. It would be nice to have that forum to discuss design challenges such as full-range versus multi-way line arrays, curvature, shading, results with cheap drivers, open back vs closed, frequency compensation, construction techniques, etc.
Last edited:
is this a parabolic profile? what are the dimensions / specs?with variable edge roundover
without access to CNC I've been thinking about using the largest thumbnail bit I can find as an approximation to a parabola.
I'd be interested in hearing how your version performs.
The whole speaker was modeled in fusion 360, i knew the size of my speaker and i knew i wanted a wide radius roundover near the tweeter to help it out, then really small roundover near the bass driver, then back to wide at the bottom for looks.
I then done a rough cut on the cnc to take out the bulk material, then a small router bit going doing a really fine cut of the profile. Just needed a sand after that.
Dimensions of the speaker are 386mm wide, 1130mm high, 420mm deep. They are monsters.
Drivers are
Tweeter - SB Acoustics - Satori TW29BN Beryllium
Mid - SB Acoustics - Satori MW16TX-4 Textreme 6.5"
Bass - SB Acoustics - SB34NRXL75-8 12"
Running off a Hypex Fa253 amp per speaker.
They are currently at a paint shop getting 2pak painted.
- Home
- Loudspeakers
- Multi-Way
- I wish I had a CNC router