Hi Gents,
I am hoping someone can give me a link to a video or tutorial that will show me how to convert the files that I get testing speakers using Room Equalization Wizard into files that can be imported to X Sim. I have very limited computer skills and experience. Getting REW up and running was a process that took me many hours and only succeeded when I found an hour long video describing what to do in painstaking detail. I had these difficulties despite REW's reputation as being simple to set up and run.
I'm enjoying being able to use REW to test the frequency response of the speakers I'm building, but want to be able to import those files to X Sim so that I can create crossovers.
I have a Windows 10 computer with X Sim installed, but have not even been able to import the FRD files posted for the Dayton drivers on the Parts Express web site. I do not know how to unzip the files so I am dead in the water before I even try to get the files into X Sim. I mention this to show how severely limited my computer skills are. My goal is to learn both how to convert the REW files to something usable in X Sim and learn how to import them into X Sim.
From videos posted on using X Sim once the files are imported, using X Sim itself to model crossovers appears to be reasonably intuitive to anyone who has built dozens of crossovers as I have; my problem is getting the REW files into X Sim in a usable form.
I am probably in the 5th percentile or lower of computer skills on this forum. Please be kind and help me get to the next level of speaker building.
Thanks!
Jay
When looking at the measurement in REW, go to File>Export>Export measurement as text. On the second screen you can choose to use frd as the extension. There is a header on this file.
Allen has explained the export from REW, but going back to your issues with the zips from PE, Win10 may (I'm still on Win7 so don't know) have an extractor built in - right click on the file (in Windows explorer or whatever Win10 calls it) and see if any of the options include terms like extract or unzip.
Failing that, WinRAR is freeware that is dead simple to download and use for unzipping - once installed, it is available via the right click as above.
HTH,
David.
Failing that, WinRAR is freeware that is dead simple to download and use for unzipping - once installed, it is available via the right click as above.
HTH,
David.
I'm using Windows 10 and it does indeed have an extractor built in. Here's what to do:
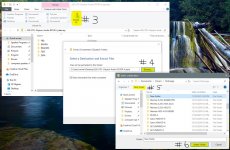
1- Download the PE driver specifications, I'll use the Dayton RS100-4 as an example. I choose my desktop as the location.
2- From your desktop, open (double click) the zipped file.
3- Click on the "Extract All" icon.
4- Click on the "Browse" button to choose or create a new folder for the new unzipped file.
5- Create the new folder if it doesn't already exist. It helps to organize yourself here - in my Documents folder, I already have a Drivers folder created, which then contains individual folders for Tweeters, Midrange, Woofers and so on. Or choose whatever works best for you. Here, I'll choose the Midrange folder (or whichever one you want to use) and then click on the "New Folder" button to create a new folder named something like "Dayton RS100-4".
6- Then with the new folder highlighted, hit the "Select Folder" button.
You should get something very similar to the 1st attachment. Appropriate buttons are highlighted in yellow. Sequence is from left to right.
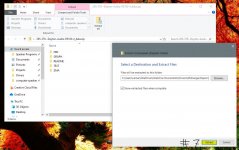
7- Now hit the "Extract" button (pic 2) and you are all done.
You should be left with 2 open windows. Close them up and you can also delete the original zipped folder on your desktop and you should be good to go.
Now in XSim when you are "Tuning" your drivers, simply navigate to the correct driver folder (hopefully after you have correctly added in the box and baffle effects) and open up the frd or zma file you want to use.
There is another way of doing this too which you might find easier. Create a folder for the new driver and open it up. Download the zip file like before, open it up and move it over beside your open driver window file. Now open the FRD or the ZMA folders in the zipped folder as desired and then simply drag and drop the files you want from the zipped folder to your new driver folder (or copy and paste too). Once you have what you want, you can again now delete the downloaded zipped folder.
1- Download the PE driver specifications, I'll use the Dayton RS100-4 as an example. I choose my desktop as the location.
2- From your desktop, open (double click) the zipped file.
3- Click on the "Extract All" icon.
4- Click on the "Browse" button to choose or create a new folder for the new unzipped file.
5- Create the new folder if it doesn't already exist. It helps to organize yourself here - in my Documents folder, I already have a Drivers folder created, which then contains individual folders for Tweeters, Midrange, Woofers and so on. Or choose whatever works best for you. Here, I'll choose the Midrange folder (or whichever one you want to use) and then click on the "New Folder" button to create a new folder named something like "Dayton RS100-4".
6- Then with the new folder highlighted, hit the "Select Folder" button.
You should get something very similar to the 1st attachment. Appropriate buttons are highlighted in yellow. Sequence is from left to right.
7- Now hit the "Extract" button (pic 2) and you are all done.
You should be left with 2 open windows. Close them up and you can also delete the original zipped folder on your desktop and you should be good to go.
Now in XSim when you are "Tuning" your drivers, simply navigate to the correct driver folder (hopefully after you have correctly added in the box and baffle effects) and open up the frd or zma file you want to use.
There is another way of doing this too which you might find easier. Create a folder for the new driver and open it up. Download the zip file like before, open it up and move it over beside your open driver window file. Now open the FRD or the ZMA folders in the zipped folder as desired and then simply drag and drop the files you want from the zipped folder to your new driver folder (or copy and paste too). Once you have what you want, you can again now delete the downloaded zipped folder.
Attachments
Many, many thanks guys. I am now successfully importing FRD files into XSim and starting to try to learn how to use it. I'll be posting a new therad soon to see if anyone is aware of any tutorials other than the good, but super fast paced one on Impulse Audio.
Thanks again!
Jay
Thanks again!
Jay