How should I measure this speaker?
Hello!
I would love some input on how I should measure this speaker in order to make a simple crossover.
I will be using REW for measurement, and miniDSP for crossover duty.
The measurements will need to be taken inside, as I don't have the option to do it outside unfortunately.
First, I need some input on mic placement and gating. Then I can provide the measurements later.
Which of these alternatives will be the best approach?
1. Measure woofer nearfield, horn farfield (with gate), then combine the two
2. Measure both drivers farfield with mic in between both (with gate)
3. Measure both drivers farfield with mic on axis of horn (with gate)
4. Point 2 and 3, but without gating (tailoring the crossover to my room)
Cheers")
Hello!
I would love some input on how I should measure this speaker in order to make a simple crossover.
I will be using REW for measurement, and miniDSP for crossover duty.
The measurements will need to be taken inside, as I don't have the option to do it outside unfortunately.
First, I need some input on mic placement and gating. Then I can provide the measurements later.
Which of these alternatives will be the best approach?
1. Measure woofer nearfield, horn farfield (with gate), then combine the two
2. Measure both drivers farfield with mic in between both (with gate)
3. Measure both drivers farfield with mic on axis of horn (with gate)
4. Point 2 and 3, but without gating (tailoring the crossover to my room)
Cheers
Attachments

Last edited:
1. Measure woofer nearfield, horn farfield (with gate), then combine the two
Match the freq. to the gating. and measure woofer far-field as well (with gate).
Be sure to use a lot of pillows on the floor around the speaker and mic.
Match the freq. to the gating. and measure woofer far-field as well (with gate).
Be sure to use a lot of pillows on the floor around the speaker and mic.
So measure both the horn and woofer farfield? On axis with the horn, or between both?
What do you mean by "Match the freq. to the gating"?
So measure both the horn and woofer farfield? On axis with the horn, or between both?
What do you mean by "Match the freq. to the gating"?
Yes, measure both far field, and also measure the woofer near field.
When measuring far field (meter), for the *loudspeaker* (not individual drivers), place the mic in a small range of vertical axis's close to *ear height (when seated normally) - ie. measure at listener "center" and then move the mic stand up 50mm and measure, and down 50 mm from "center" and measure. This is on the 0 degree horizontal axis for the loudspeaker. You are basically looking for an average here and a sweet spot relative to that average to use as a reference (making your additional axis measurements from there). (..note, some reference to the tweeter, but I don't.)
Gating is relative to the closest reflection's distance.. I tend to think of it in terms of freq..
*Note, if you are lifting the speaker off of the floor a bit for a better measurement, then make sure you lift the mic an appropriate amount to compensate.
For "best practice" do the far field measurement outside at one meter (and also again at 2 meters - if possible if you can raise the speaker higher for the same gating, and definitely at a higher freq./shorter gating for 2 meters distance even if you can't raise the loudspeaker higher).
Even for a one meter measurement, you only have to elevate most loudspeakers about 2 meters (from its bottom) to get a really good idea of performance down to 150 Hz. (..the mic height is usually about 3 meters.) Just having this can make a world of difference.
Last edited:
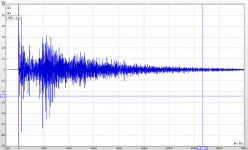
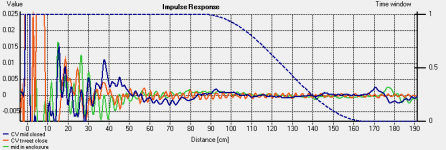
Here are the impulse responses HF, LF farfield, and LF nearfield. Any suggestions on what gate I should set for each one? (no gate on the LF nearfield I presume though).
Attachments
How far away is the front wall (wall behind the speaker)?Here are the impulse responses HF, LF farfield, and LF nearfield. Any suggestions on what gate I should set for each one? (no gate on the LF nearfield I presume though).
Distance = Time = Frequency
Do you have some means of zooming in on the early part of the impulse? Most of what you are showing is the reverberation of the room long after the direct sound. You will probably want to gate around 5ms after the first sound arrival. As you expand the impulse you will see the decaying initial impulse and then the first reflection arrival. Gate just prior to the first reflection arrival.
Judging from your layout the arrival time before the floor bounce will not bee too great and it is unlikely that you will get an accurate low frequency curve. You still should be able to see the upper range of the woofer and the full range of the horn, both free from room effect.
David S.
Judging from your layout the arrival time before the floor bounce will not bee too great and it is unlikely that you will get an accurate low frequency curve. You still should be able to see the upper range of the woofer and the full range of the horn, both free from room effect.
David S.
Indoors, I have never zoomed out of the impulse response graph to show more than 2 meters. You generally have boundary reflections within a few meters, or milliseconds (don't need more than 10 ms, that is for sure!).
So zoom in to at least 1 or 2 meters, or less than 10 ms.
Generally, I can see the actual impulse wavelengths due to zooming in so far on the graph.
With how far out you are zoomed, it's hard to see the first reflections...
I had better luck raising the speaker off the floor so the CTC of the tweeter and woofer is about midway between ceiling and floor and as far away from 2 walls as possible.
I had 10 foot ceilings in one room, and the two closest walls were 10 feet as well. I got deep in the midrange with the CTC being 4.5 feet off the ground with no reflections from walls closer than that. The ceiling fan did cause a tiny blip that I was not happy about, but did not change the FR much at all. Not enough to matter for making a crossover.
I lucked out and had an empty room at my disposal for a while.
That was nice.
I did some measurements in the bedroom with the speaker on the bed, and I got pretty much the same results. So, the gating works nicely. I set small speakers with their back on the bed, on the far edge of bed away from wall. That worked well.
I put pillows and whatnot on the floor, and it did not help the bass or lower midrange at all.
I tried lots of things. You just can't be near a floor or wall. Pillows only do so much.
I think they might help in the crossover range for most tweeters, though. That is all you really need anyways. But, concentrate on getting the speaker as far away from boundaries as possible.
Here is an example of where I set gate on this speaker.
Holmimpulse.
You can see a tiny bump at 145 CM.
The major first reflection is at 170.
When you move the gate, you will see it will effect the bass response the most when you are in the shorter time domain, or closer distance, until you get deep into the farther distances and then the reflections will start messing with the highs.
I usually try to look at the impulse to find the first reflection, then move the gate around that area to see how the highs are affected. I try to get the frequency as low as possible without effecting the highs. It usually always ends up being as recommended. Just before the first reflection...
Keep in mind that the louder you play the signal, the higher the peaks on the impulse, making it easier to read. I keep the signal to the recommended -2db on holm. On every measurement. I always check.
I heard the recommendation that you don't want to "tape measure" anything, as far as what is around your speaker. Just keep everything away in the room, if you can.
I showed you the graph to give you a visual representation of what others have recommended. Look at the response itself to set the gate. Don't measure your surroundings. Don't waste your time pulling out the tape measure. Your eyes can tell you "hey, the speaker is high off the floor, away from the ceiling and walls". Good enough
The speaker I really wanted to measure is a big fat pig. I hate moving it. And the waveguide sits on top all loose.
So I used some tiny satellites to learn how to set everything up and learn holmimpulse. I recommend having a small test mule small speaker to practice with.
That way you can try different measuring techniques (distance of microphone and placement of speaker in particular area) and see what the changes are.
Heck you can use a loose driver or just a clock radio. Whatever is easier.
*dangit Dave, I wanted to sound almost smart for once! I wasted too much time opening holm and saving a pic of the impulse.
Attachments
Last edited:
A few things I'd add:
1. Lift the speaker up more than half a meter (usually with books) and raise the mic by the same amount.
2. Add a lot more pillows around the loudspeaker and between the mic.
3. Start with shorter gate (3ms), and expand on it until you start running into trailing noise (and back-off from that as appropriate).
Remember the longer the gate (that's clean), the higher the resolution (or the less "averaging" that's taking place) at lower freq.s within that window.
Here is Dan's info. on REW and gating:
audio blog: Gating loudspeaker measurements
Here is ARTA's info. on gating:
http://audio.claub.net/tutorials/FR measurement using ARTA.pdf
and on measurements in general:
http://www.artalabs.hr/AppNotes/AP4_FreeField-Rev03eng.pdf
http://www.artalabs.hr/AppNotes/AP6_Directivity_Measurements-EngRev1.01.pdf
Last edited:
search on ground plane measurement techniques. This effectively doubles or quadruples the first reflection point (meaning a lower gate frequency). Downsides is artificially high efficiency (is it +3dB) due to ground plane loading plus you lose baffle diffraction effects. It might be useful anyway as a "2nd opinion" measurement technique (I try and measure multiple ways to confirm behaviour).
You could raise the speaker off the floor (midpoint between floor / ceiling) to gain a few miliseconds. Based on software though - this may not increase resolution or decrease measurable frequency, if the software (like speakerworkshop) measures in "bands".
If you can - try and use a balcony outside with a mic on a boom.
What xover point are you targetting? That will give you a good measurement goal.
composit measurement of a nearfield woofer and farfield gated tweeter will work but remember you lose relative phase (separate measurements with mic being moved) so need to re-extract minimum phase and enter driver offset (since VCs are not time aligned?) when modeling your xover
I have a seos12/dna360.
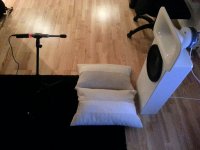
Here is how I measured...
I did a nearfield on the woofer just for the heck of it. Don't need it for the crossover.
But first, I put the microphone on the tweeter axis. 3 Feet away.
Measured the tweeter with no xover.
I did not touch ANYTHING, including volume of signal output.
I then measured the woofer.
If you know how to do it, I would measure the tweeter first with detect time zero.
After you get the measurement, then time zero lock and press "use" on "last detected".
This is on Holm... Not sure on REW. My computer can't handle any more programs.
I would check it out if I could...
This will allow you to set your acoustic offset to perfect.
One benefit of having non baffled horn! And you don't have to enter the offset in PCD7 once you physically align them. One less thing to enter...
I know you are going active, but I figured I would mention PCD anyways.
What woofer are you using?
I am using a crappy Cerwin Vega.
I want to upgrade in the future.
Curious what your measurements are once you get it all ready for digital crossover.
I have the same seos12/dna360, so I can post up measurements just to compare.
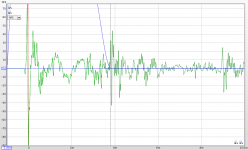
Here are the measurements zoomed into a 10 ms window. What I'm suprised of, is that the farfield and nearfield impulse response of the woofer is nearly the same...
I will try to raise the speaker, add more pillows, and raise the gain, and see how that changes the measurements.
My target crossover point is 1600hz in order to match directivity with the woofer (B&C 10HPL64).
The horn is the SEOS 15 btw, with B&C 250. Voice coils are time aligned, or are at the same vertical plane at least.
Attachments
Last edited:
Looks like there is your first big reflection just after 2m.
I would look into measuring the acoustic centers as they don't always match the voicecoil center... Then you know you are perfect.
Now that you are measuring, save everything. You are going to get crazy with all the measuring.
Even with just one little speaker, I have tons of measurements from one short session.
I was trying tape on tweeter edges, removing grilles, different baffles, different stuffing. I went nuts. And learned a lot. I am trying to learn about as much as I can as to what effects the frequency response and what is worth as far as modification. I don't want to have to eq much at all.
Measure with and without pillows just to see if it is even helping.
After you get all set with your measuring set up, don't forget to try different stuffing in your cabinet.
I was surprised how incredible one speaker sounded, and how incredibly flat it measured in midrange up to about 1.7k after I removed the back of the cabinet and stuffed the heck out of it. I left it open back. It had some polyfill in the regular cabinet, and adding a bit more didn't help.
I took the back off and stuffed a complete wool blanket in there.
Sure, it killed the bass, but for a midrange it would be incredible.
Have fun playing, now.
You will notice in the nearfield that the response below about 500-ish is really nice with very little to no reflections due to low volume of signal. But the highs starting at around 1k or so has weird responses due to the mic picking up competing signals from each side of the outer edge of cone. So you will have weird cancellations. This is why nearfield is not good for highs. Mainly for bass.
There is a good thread about Jeff Bagby and another guy who made a nice nearfield-farfield splicing program to allow you to have both on one FR graph. I have not gotten that far yet in my design.
*edit.
The tweeter is much more precise and the highs reveal more, so I set the gate with the seos impulse response.
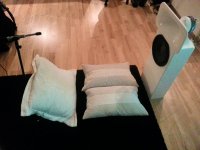
I will try to raise the speaker, add more pillows, and raise the gain, and see how that changes the measurements.
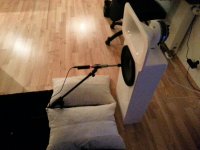
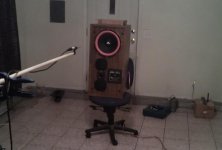
..also move it away from the wall and the chair in the picture.
I wanted to pull my speaker farther from back wall, but there was a ceiling fan that hung really low in middle of room. I hate that thing.
Front baffle is 5 feet from back wall.
Center of baffle is 5 feet from wall on each side.
Later, I made a table to raise the speaker up a little higher to take advantage of 10 foot ceilings.
Front baffle is 5 feet from back wall.
Center of baffle is 5 feet from wall on each side.
Later, I made a table to raise the speaker up a little higher to take advantage of 10 foot ceilings.
Attachments
Yes to first one, as that is how you are going to listen to it. On axis with tweeter.
Also, when I put the measurements in PCD, I don't have to enter the acoustic offset, as I measure it at 0 and can enter the listening (and mic) distance along with driver vertical alignment. It will sim different listening distances.
You don't listen to the woofer on axis, so why measure it on axis?
But I am new to this, so others will chime in, I am sure.
You are going active, so you need to know how to measure the acoustic offset.
I think it's better to measure farther away (actual listening position) as the two drivers become more aligned as they get farther away. No one listens to most floor standing speakers from 3 feet away (especially a big waveguide or horn). Small nearfield mixing monitors are different, obviously.
Another nice thing about active, is that you can measure at listening position to account for room interaction.
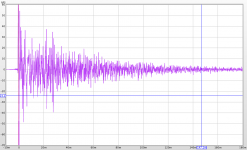
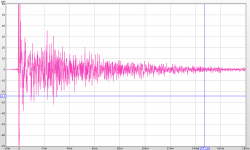
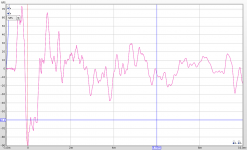
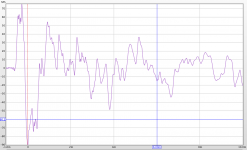
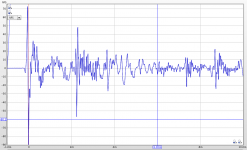
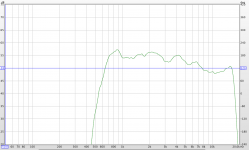
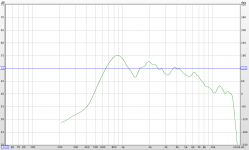
Made some new measurements with elevated gain, longer distance (1m), and experimented with and without pillows. I get the smoothest impulse response using pillows, so I stuck with that.
I've set the gate to 3.8m, just before the reflection on the impulse response.
What boggles me, is that the response is so much nicer without a gate... Makes it hard to trust the results I get with the gate set to 3.8m...
I've set the gate to 3.8m, just before the reflection on the impulse response.
What boggles me, is that the response is so much nicer without a gate... Makes it hard to trust the results I get with the gate set to 3.8m...
Attachments
- Status
- This old topic is closed. If you want to reopen this topic, contact a moderator using the "Report Post" button.
- Home
- Loudspeakers
- Multi-Way
- How should I measure this speaker? (for crossover creation)