Use a triac based fan regulator and 35 V transformer.
AC supply is given to the wire.
Unless overheated or kinked, Nichrome is durable.
Other materials are best experimented with, here we tend to be basic, stick to known materials and processes.
Now decide if you want to get something done, or keep your mind occupied with different circuits.
Your circuit is complicated, no need to make so much effort.
...for 20 years
Uses it to cut fabric, not foam
To cut fabric that is what I would do, in fact it is what I did do to cut fabric, more than 40 years.
But this is different.
Experience counts...
Yes, see above, but so does ability to read a thread and rethink for new requirements.
I really like the idea of ...the hotwire as both heat[er] and temperature sensor.
Thanks Steve, nice to have someone who understands.😉
From this perspective, steel wire (stainless?) seems attractive
Yes, stainless looks fine, quite a lot of variation, as you say, but probably a bit of trial and error then just buy a spool. It's sufficiently cheap that a lifetime supply wouldn't be a problem.
Since the temperature will be controlled the corrosion will be practically zero what ever the alloy.
So a lifetime supply is only a few metres for accidents.
Titanium also looks fine, maybe overkill.
I would make the hotwire one of the resistors
Thanks also for the well considered response, I will think over your circuit and explanation.
Best wishes
David
Last edited:
Actually, if your quantity is decent and repeated, you can have it done on a clicking machine or power press using a punching tool.
Clicking machines are used in shoe factories for example, they can swivel the head over a sheet of leather, foam or fabric, whatever, the tool is kept over the area to be cut, then the machine comes down very fast, and the cut is made.
Then the tool is moved to and adjacent part of the same sheet.
The tool for a shoe sole costs about 60 US dollars here, it is a sharp edged strip bent to shape, with cross braces.
Safety precautions like dual operation buttons are standard.
Just a suggestion...
Also, please tell us the foam material and density.
Off hand, I think stainless steel has slightly lower resistance than Nichrome.
Keep us updated...
Last edited:
David, thank you for your kind remarks.
I'm sorry if I aggravated anyone by being overly cute. I love circuit design, for more than 60 years, and I sorely miss it.
Regards to all.
I'm sorry if I aggravated anyone by being overly cute. I love circuit design, for more than 60 years, and I sorely miss it.
Regards to all.
I'm sorry if I [was] overly cute..
On the contrary, the circuit is cute in the best way, it's a classic Wheatstone, I like it!
I noticed another contributor who avoided hot wire completely and just bent sheets of XPS.
That's even simpler and I may try it on the prototype.
Probably need the hot wire to cut production moulds eventually.
Best wishes
David
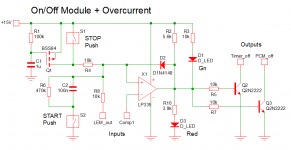
I have a similar application and tried to make a simple control circuit for the FET.

I use a 48V/10A supply and the 6A LEM as mentioned in my first post.

Pot VR1 is used for calibration of the cold wire resistance
With VR2 the desired temperature can be set between 100°C to 300°
the 5ohm wire has 6.8R at100°, 9.05R at 200°, 11.3R at 300° for pure metal like W(Tungsten)
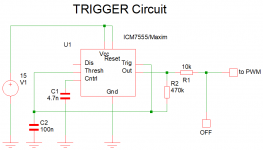
function of the circuit:
trigger from timer switches output to high and stays high as long as the load current is greater than the preset value at -in. When the wire heats up the current ramps down, the moment the preset temp is reached it switches to low. It continuously heats up the wire as long as it takes with 400W start value.
when low the same starts again when the next trigger comes after 100ms.
If the current is lower than the preset only a short 50us pulse is done which we use for the calibration.
sorry have breakfast now, continue later Bansuri
I use a 48V/10A supply and the 6A LEM as mentioned in my first post.
Pot VR1 is used for calibration of the cold wire resistance
With VR2 the desired temperature can be set between 100°C to 300°
the 5ohm wire has 6.8R at100°, 9.05R at 200°, 11.3R at 300° for pure metal like W(Tungsten)
function of the circuit:
trigger from timer switches output to high and stays high as long as the load current is greater than the preset value at -in. When the wire heats up the current ramps down, the moment the preset temp is reached it switches to low. It continuously heats up the wire as long as it takes with 400W start value.
when low the same starts again when the next trigger comes after 100ms.
If the current is lower than the preset only a short 50us pulse is done which we use for the calibration.
sorry have breakfast now, continue later Bansuri
Attachments
![On_Off [Original Size].jpg](https://www.diyaudio.com/community/data/attachments/880/880974-4109e8ef26b443ccc3a6655c3fc44259.jpg?hash=QQno7ya0Q8 "On_Off [Original Size].jpg")
The second comparator controls the user interface. On startup the P-MFET pulls up the +in for 3s , D2 latches it on high and only a manual pulse with pushbutton can start it with comp= low
now it compares the preset value with the LEM out and switches only off when the current is too high (short or R<5ohm) or when the stop button is pressed.
It also performs the calibration. Very easy
turn temp control to 300° and R-control to 5ohms , press START
Now we have the 50us full current output pulses and turning the calibration pot slowly up when the proper threshold is reached the comparator switches to low
now the temp can be chosen and the start button allows normal function.
Last edited:
- Home
- Design & Build
- Equipment & Tools
- Hot wire cutter circuitry for better speakers?