I have been reading this forum for a few months now and was inspired by fellow DIYers on here in particular Ace_3000 and I_ eat_ flowers to give this whole projection setup a bash. Sourcing parts in Australia as previously mentioned by others on this forum is a hassle, other than the lighting and cooling components the rest must be sourced from overseas!
I would just like to make special mention to Trev for all his help on msn answering my 'noob' questions in the wee small hours of the morning he has gone above and beyond the call of duty ...thankyou Trev 🙂
So...this is what i have and where im at so far in this little journey
Osram 250watt HQI-TS Neutral White deluxe Metal Halide $AD95
Ballast ignitor and capacitor to suit $AD98
Ceramic ends $ADfree 🙂
7" XGA Lilliput 1,152,000 pixels $AD307 + $AD54 postage
Fujion Copy lens 240mm focal from Ace (waiting delivery) $AD38.72
Fresnel set cut to size 106mmx167mm top focal 310mm bottom focal 210mm $AD46.72 (waiting delivery)
condenser, 80mm diam, 89mm focal from Ace $AD26.70 (waiting delivery)
Reflector, spherical, 32.6mm focal from Ace $AD20.03 (waiting delivery)
3mm 106mm x 167mm glass $AD5.00
3m UV filter film $ADfree
2 X 80mm Antec fans $AD18
1 x Evercool PCAC Black 100cfm fan $AD16.50 + $AD10.00 postage
12v 1amp ac adapter $AD0 (had it in cupboard from old printer.)
MDF $AD12 cut at local cabnet makers to my size specifications $AD5.00
Alumiinium $AD20
Undercoat and Metalic SilverPaint $AD15
Assorted electrically components $AD10
Screws and bolts $AD15
Well thats the gear I have and am waiting on and what it has cost me thus far.... so let the contruction begin ! lol
I have borrowed my mates Digital camera to take some of the pictures as I dropped my old camera on the weekend :-( and it no go no more lol
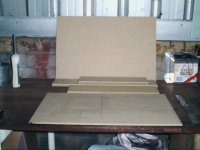
Heres where it all began...the mdf im using for the construction of the box cut to size by my local cabnet maker on his table saw
Heres where it all began...the mdf im using for the construction of the box cut to size by my local cabnet maker on his table saw
Attachments
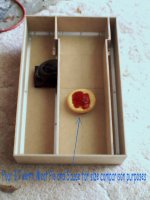
I have used 90 degree 10mm dia aluminium for all the corner joints, this helps keep the whole job square and strong, i have mitre cut all corners (bloody time consuming this is to say the least grrr) but it gives a proffesional finished look i guess 🙂
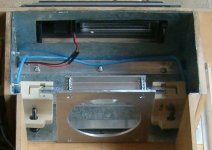
This picture shows the general layout i have come up with, I had originally planned on using a front surface mirror but opted not to get the mirror when i ordered the other optics from Ace in favour of getting one locally, since then i have discovered fs mirrors aren't available in Australia :-( so due to time constraints with delivery etc as Ace is in Spain i have opted to go ahead with the projector in a straight through configuration not before i might ad i had partially constructed a setup based on Ace's projector, will keep that in the cupboard along with the light box i constructed for it for future use on a mates projector and get a fs mirror down the track from "The Guru" hehe 😛
This picture shows the general layout i have come up with, I had originally planned on using a front surface mirror but opted not to get the mirror when i ordered the other optics from Ace in favour of getting one locally, since then i have discovered fs mirrors aren't available in Australia :-( so due to time constraints with delivery etc as Ace is in Spain i have opted to go ahead with the projector in a straight through configuration not before i might ad i had partially constructed a setup based on Ace's projector, will keep that in the cupboard along with the light box i constructed for it for future use on a mates projector and get a fs mirror down the track from "The Guru" hehe 😛
Attachments
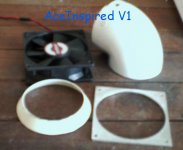
For cooling the LCD and supplying some cool air to the lamp i am using a 80mm antec fan, I fabricated a duct from the following 2mm ali with 80mm hole cut in it, a plastic funnel and a 60mm 90degree pvc elbow
This is how i put it together and a few pics of the end result
This is how i put it together and a few pics of the end result
Attachments
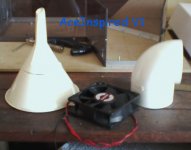
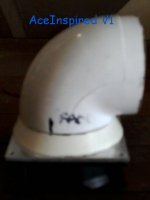
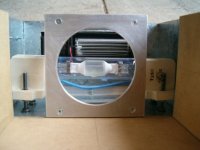
And the final product with a couple coats of black epoxy paint 🙂 Some might ask why i didnt use a 80mm elbow to start with to do away with messing around with the "flange" arrangement, simple answer to that ... my local hardware didn't have any 80mm elbows so I had to improvise 😛 lol
Attachments
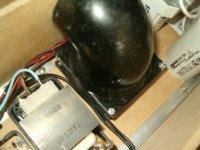
I have cut a 60mm hole 10mm before the LCD to vent air into the lcd chamber...i have also fitted a "V" shaped piece of metal in the opening of the 90degree elbow to direct airflow towards the LCD and towards the llamp...I forgot to take a picture of this however and I dont have my mates camera anymore. I have mounted the fan inbetween the AC adapter for the fans and the ignitor and capacitor...it looks a little like this...
Attachments
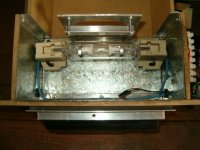
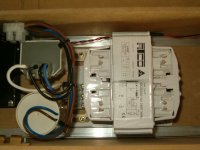
Here's a front top shot ... good shot of the fan and the holder i have fabricated out of 3mm aluminium to house/hold the 80mm condenser when it arrives. I have used 4 springs to provide tension to keep the condenser in place and allow for a 'lil' movement when she heats up...hopefully lol 🙂
Attachments
Nothing has been fully tightned as yet, due to the fact i will be pulling it all apart in the next day or so to paint the inside of the box...the light box area will be hit with 750degree flat black stove paint ...the rest gets the treatment from black flat black epoxy.
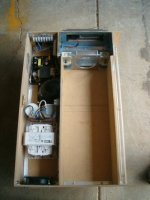
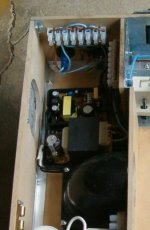
Here's a copule pics of the wiring side of things...AC adapters
Here's a copule pics of the wiring side of things...AC adapters
Attachments
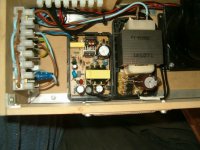
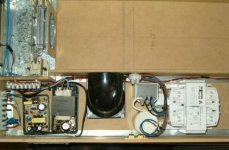
Looking from the front...you can see vent to left and if you look closely also a brass latch i have picked up to secure the top of the box internally...the opposite side is hinged...pics comming lol I have another 80mm fan at the front of the electic compartment to vent cool air over the ballast and AC adapters
Attachments
Thanks Ancorp much appreciated comments mate... have been working on it for about a week thus far ...still along way to go but i can see progress now lol so i thought i would start a thread to show the state of things... 🙂
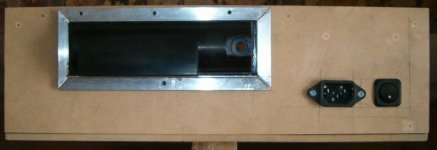
Anyways..to the outside of the box, starting from the rear
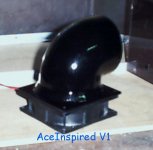
The mounting of the rear cylinder fan is at this point in time still a work in progress will knock that over today hole, filing and sanding on the cards for this still, I have fabricated the metal surround and epoxied it to the plastic fan casing, this inturn will be mounted in the position it is now with rubber double side adhesive tape type material, im not familar with the proper name of this stuff, i picked up a roll of it from local hardware for 5 bucks , its 10mm wide and 5mm thick resembles mouse pad material this will help prevent vibration and thus un-wanted noise. The fan itsself is 100cfm model as previously mentioned but makes only 23db...extremely quiet and rapt in its performance. ,
The computer power supply fitting can be seen in the pic along with the switch to power up the Lamp,fans and LCD
Anyways..to the outside of the box, starting from the rear
The mounting of the rear cylinder fan is at this point in time still a work in progress will knock that over today hole, filing and sanding on the cards for this still, I have fabricated the metal surround and epoxied it to the plastic fan casing, this inturn will be mounted in the position it is now with rubber double side adhesive tape type material, im not familar with the proper name of this stuff, i picked up a roll of it from local hardware for 5 bucks , its 10mm wide and 5mm thick resembles mouse pad material this will help prevent vibration and thus un-wanted noise. The fan itsself is 100cfm model as previously mentioned but makes only 23db...extremely quiet and rapt in its performance. ,
The computer power supply fitting can be seen in the pic along with the switch to power up the Lamp,fans and LCD
Attachments
So many people are making projectors from them 7 inch lillies...
Too bad I cant afford one😉
Great craftsmanship, I like the cooling system.
Too bad I cant afford one😉
Great craftsmanship, I like the cooling system.
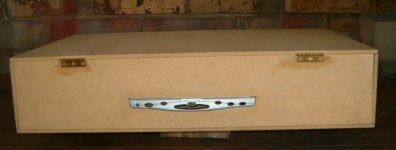
left side of the box is where i have mounted the Lilliput control panel section...I cut and dremelled it to the size i wanted...i then cut a hole in the mdf to mount it in...My attempt is to make this flush with the side of the box...much filing and sanding to get it fitting to my liking lol...
The hinges will not be visible (apart from the cylinder part of hinge) once the box is painted i have also recessed these into the mdf and they will be painted over...top is latched with brass latch seen in previious pics in this thread.
The hinges will not be visible (apart from the cylinder part of hinge) once the box is painted i have also recessed these into the mdf and they will be painted over...top is latched with brass latch seen in previious pics in this thread.
Attachments
- Status
- Not open for further replies.
- Home
- General Interest
- Everything Else
- The Moving Image
- DIY Projectors
- HiLLBiLLY'S 7" Lilliput Projector