Mine's 0.025" IIRC, so just a tiny bit bigger than yours.@GM now I'm wondering if 0.6mm is too small for epoxy even when thinned
I just played devils advocate with the A.I. for a while. First, 0.6mm translates to 0.023622" so we are in the neighborhood =). A.I. seems to be pretty confident that the minimal 3.5% isopropanol per weight thinning ratio would be suffice... Even if thinning more, the degradation of strength results in a product thats still much stronger than PVA. Resin also is the clear choice as far as bonding performance to the fiberglass. Its hard to say that the choice is obvious. Self leveling is beneficial for the top coat. ArtResin was recommended for its resistance to yellowing but I I am wondering should I even care... For an adhesive for the Fabric tot he wood, yellowing doesn't matter much but what I was thinking is that if the epoxy is dyed black, yellowing won't be much of a factor. Dyed black, and with a thin coat, for the top coat, it should be something like a tint, which is what I really wanted.
The Fabric I bought is double biased, which means that on top you have the stitched pattern but underneath you would see the layer of chopped strand matt. These two layers are joined together somehow... You would think..... that this scenario is good for everything that I am trying to do. At this point my biggest worry is incorrect curing... From my research it seems its best to error on extra hardener instead of extra resin. Ideally things would be perfectly matched, but somehow things happen and I think a small calculated additional percentage of hardener is warranted


I have 6 gallons worth of resin/hardener bought back at the beginning of this project... It is yellowing but as I said, after is dyed black I don't think this issue will matter. Thanks for the convo!
Here, have a laugh

The Fabric I bought is double biased, which means that on top you have the stitched pattern but underneath you would see the layer of chopped strand matt. These two layers are joined together somehow... You would think..... that this scenario is good for everything that I am trying to do. At this point my biggest worry is incorrect curing... From my research it seems its best to error on extra hardener instead of extra resin. Ideally things would be perfectly matched, but somehow things happen and I think a small calculated additional percentage of hardener is warranted
I have 6 gallons worth of resin/hardener bought back at the beginning of this project... It is yellowing but as I said, after is dyed black I don't think this issue will matter. Thanks for the convo!
Here, have a laugh

You have 6 gallons of "extra" resin 😵 . I always try a small test batch of resin before actually applying it to check the ratios and working time for the conditions.
I would do something to strengthen the kerf slots. You have 2 large woofers coupled by a remaining thin sheet with thin plywood ribs attached. I would not use water based products in the slots because of swelling concerns. You're probably OK with a heavy epoxy fill and fiberglass over top. A chopped mat underside of the cloth will keep the cloth "pattern" straight, otherwise it can wander and look wonky.
I would do something to strengthen the kerf slots. You have 2 large woofers coupled by a remaining thin sheet with thin plywood ribs attached. I would not use water based products in the slots because of swelling concerns. You're probably OK with a heavy epoxy fill and fiberglass over top. A chopped mat underside of the cloth will keep the cloth "pattern" straight, otherwise it can wander and look wonky.
The kerf voids are reduction of wood thickness in the highest pressure area in the entire box, and an invitation to buzzing as the small sections start to delaminate.I wasn't planning on filling the voids in the kerfs... I don't think its needed do you?
Using BondoGlass, TigerHair or any of the fiberglass reinforced polyester fillers would be a relatively fast permanent solution to the problem created by the kerfs.
From my experience with using fiber mat and resin (epoxy or poly) I'd say fiberglass reinforced polyester filler would be at least twice as fast, have better finished appearance, and far easier with less mess than laying up mat.
Art
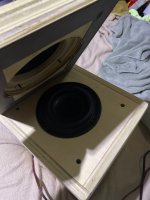
I don't know how much difference it will make but the CSA through the circle separating the front and rear chamber should be that of slot loading the front of the woofers. Sounded like a good idea but probably won't matter. All bracing spaced according to matrix bracing recipe adjusted for 3/4" wood and a little over kill. The coolest thing is eveything for the most part is repurposed wood from the first 15" enclosure. I only had to buy wood for the woofer baffles.
Last edited:
Slow and steady. I still have more work to do. Filling in gaps were construction isn't perfect... filling in holes from previous construction. The top box is more rigid than the lower box but most resonances are good to go I think. The top box panel resonances are as high as ~800hz and as low as ~600hz judging by finger tapping and monitoring using a RTA on my phone. The lower box walls adjacent to the rear of the driver magnet res some where around 300hz if I recall correctly.. The rib bracing has a high effect on the ceiling and floor panels, which I did not predict, but makes perfect sense. I was worried about those panels but thought of them less considering the mass loading of the stacked boxes, etc, and the aim was to raise the resonances of the side walls behind the woofers. There is only a something near 2" of space left with the woofer installed, the beams are 1.5" BB ply (Market place find, 1.5" thick 39x39 pieces for 10 bucks a shot) I could afford to do a few more ribs placed horizontally, splitting the dimension in half. The resonances nears the box ends will go up with the final baffles. The rear baffles have bracing placed to rest against it but the front baffles my need to be thickened to remedy the lack of bracing there.... at 10 dollars are peice for the 1.5" BB panels I might just use that wood for the front baffles. This leaves enough wood for rounding corners, so I like the sound of it, already.... pun not intended.

All in all I feel things are going good... This is just a prototype anyway right? Also my personal pair but long term goals would be a 3d printed enclosure using the knowledge gained and improving were possible.
All in all I feel things are going good... This is just a prototype anyway right? Also my personal pair but long term goals would be a 3d printed enclosure using the knowledge gained and improving were possible.
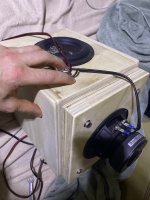
Probably not exciting but the most gratifying addition for me, has been these 45degreee screws helping to secure the slot floor/ceiling to the side walls... why I didn't screw the whole pieces from the side when they were exposed is beyond me... Any crevices create, I filled with epoxy sand mortar, that stuff works like a charm.

Isn’t it weird how you can push the other side of the driver farther and farther away inside the box and avoid going out of phase, but suffering in an abyss of resonace?
Dont laugh, im just nerding 😝
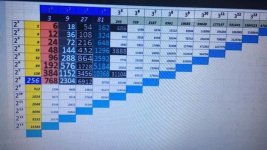
So, 216, 432,etc hz is a (300cm total/4 ) wavelength multiple of the inside of the ‘box/pipe thingy’ and the series exit resonator is just more loud noise in the 150cm/57.6 hz region..
Conveniently these pipe lengths and 1/4 wavelength multiples all are associated with the number ‘3’, units of time and divisions of a circle in degrees 🤓
Attachments
Last edited:
have you guys ever had to deal with improperly or imperfectly fitting pieces? How did you fill the areas where material needs to meet flush but did not?

For example, the baffle at the top, has a gap.... It will let air though... how do I fill it while still being able to remove the that baffle??? My first thought was my mortar mix, get it to a state like putty, force it into the gap, let it set up and then remove the baffle so the mortar doesn't end up being glued to the baffle on top.
For example, the baffle at the top, has a gap.... It will let air though... how do I fill it while still being able to remove the that baffle??? My first thought was my mortar mix, get it to a state like putty, force it into the gap, let it set up and then remove the baffle so the mortar doesn't end up being glued to the baffle on top.
How is the removable baffle secured to the cabinet?For example, the baffle at the top, has a gap.... It will let air though... how do I fill it while still being able to remove the that baffle???
This is how a removable baffle should be screwed in place. The weatherstripping will ensure an airtight seal.

I built a forward casting deck in my Smartwave 3500. The top is made from ply and has a recess for a flush fitting lid/hatch, which is also ply. The lower edges of the lid are rounded off. I made a mix of wood flour and epoxy goop. This is a structural filling bond and one I recommend for any cabinet making to get properly closed systemshave you guys ever had to deal with improperly or imperfectly fitting pieces? How did you fill the areas where material needs to meet flush but did not?
The goop is thickly laid into the recess and the lid is wrapped in polythene plastic and pulled and stretched over the rounded edges. Cling wrap works. The lid is laid into place and all the excess goop getting squeezed out of the recces is cleaned up. Lid is pulled out after cure and plastic removed. A bead of silicone all the way around the recess and then wiped down with a wet finger creates the final seal
Looks like you screwed up by not leaving enough depth for the cleats required for an airtight removable panel.Screws
The brace obstructions probably make mounting through the rear panels impossible.
You could use paintable caulk for sealing your panels, cut through the caulk with a knife if/when you need to remove them.
There are many good reasons for a back facing port.I prefer front ports, what do I need to do?
In your case, the nasty midrange resonances of the box come out the back so they are much less audible
Corner loading is an excellent reason for rear firing ports!


- Home
- Loudspeakers
- Subwoofers
- High Output Subs that play 20Hz to ≥200Hz