Ok, found a broken trace. Repaired, now the triangle disappeared. I have high DC. If i connect the Batterie, the is a small maybe disturbed drivesignal on the DC. That means, the Rectangular waveform doesnt hit the center line.
This is what I suggest if the breaks have been at the board header in the main board...
Remove the driver board and use wires to connect to the main board. Solder top and bottom on every connection that has traces top and/or bottom.
If the board was removed leaving the header in the main board, you may need to remove the header and solder wires to every trace on either side of the board.
There have been too many bad connections. Even if you appear to find all bad connections, the amp will likely fail again.
If you can get the driver board to work with all of the wired connections, then you can look at some solution to get the driver board connected reliably.
This sort of problem is almost always due to damaged vias that were damaged when the driver board was removed. That's why I recommend ChipQuik so many times for driver board removal.
Ok, iam going to order that end of the months, together with other parts. I saw in your tutorial, how you are using this to desolder drive boards. But you also told, that is not possible if you have a long driveboard with maybe tree headers to keep the solder liquid.
Are you using a alloy barrel with a iron inside, to hit all at the ssame time, or is the bulb hot enough?
Are you using a alloy barrel with a iron inside, to hit all at the ssame time, or is the bulb hot enough?
There are various things you can do for long boards. If you use a relatively hot iron and run it from one end of the board to the other a few times, the solder will be hot enough for the board to fall out. Using a heat gun to gently heat the driver board area (top or bottom) can prevent the board from soaking the heat.
I'm not sure what you mean by alloy barrel.
I'm not sure what you mean by alloy barrel.
that material the heatsinks are made from. That in a rectangular form with a hole inside to put the iron in.
I'm not using anything on the tip of the iron.
When you use the chipquik, add additional regular solder to all pads then desolder as best you can using a good desoldering pump (DS017 is good). Then apply the chipquik flux and add the CQ solder to each pin. Use the soldering iron tip to move the pin in the hole (after the solder is fully molten) After doing this, runn the iron back and forth along the pins but dont pull the pins out until all will move if you gently wiggle the driver board. When it's right, the driver board will often try to fall out on it's own but don't let that happen. The chipquik solder will splatter and make a mess (time consuming to clean up).
When you use the chipquik, add additional regular solder to all pads then desolder as best you can using a good desoldering pump (DS017 is good). Then apply the chipquik flux and add the CQ solder to each pin. Use the soldering iron tip to move the pin in the hole (after the solder is fully molten) After doing this, runn the iron back and forth along the pins but dont pull the pins out until all will move if you gently wiggle the driver board. When it's right, the driver board will often try to fall out on it's own but don't let that happen. The chipquik solder will splatter and make a mess (time consuming to clean up).
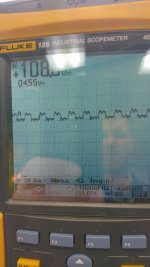
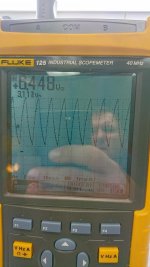
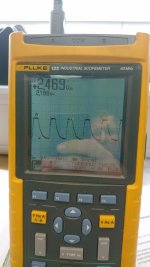
Ok, repaired all the traces with cables. Ok, but looks the same. I made some Pictures. 1st, High Side non working side with 9V Batterie. The 2nd is Pin1 of that irs, the 3rd is also Pin1 of working side irs.
Please Note, the center line is on the Bottom to catch the signal.
Please Note, the center line is on the Bottom to catch the signal.
Attachments
Hello, so i tried to use my brain a little bit. This bad Signal on Pin 1 of the IRS seems to me, that the ground reference over the resistor is missing. Both irs should get the same signal from the opamp. The transistor measured ok inside circuit.
I have tried my best, but i dont understand why i have such a signal on Pin 1 of irs. The resistors are ok, voltages all ok. Changed Q2 with a new one, but no changes at all. Can it be, that the irs is damaged and change the signal? And why i have only this weak signal on Highside. Can somebody try to explain it for me, that i can understand?
I lifted pin1, after supply power, it make pffft. I have a short between diode 4 in front of the board. Expect, that the 12Regulator is broken, because now i have 32V on this contacs.
so, i give up. It seems, that both drivers are damaged now. I measured with diode check the black diode in front of the board, there was only 0,04V. On each end of the board is such a diode. Lifted the diode and measured ok. Put back, all voltages are normal.but no more drive signal at all. I will study your tutorial and maybe when i patient enough i will try again.
Thanks a lot for assistance.
Thanks a lot for assistance.
I think that IC was already damaged, dragging the signal down. When it failed, it damaged the regulator which damaged the other IC.
I think virtually all of the problems were either due to counterfeit parts or intermittent connections between the main and driver boards.
I think virtually all of the problems were either due to counterfeit parts or intermittent connections between the main and driver boards.
yes, thats maybe possible. The driver was this time good one. But with intermittend connection that could be a reason. At the moment iam very frustrated. Other amps ive repaired before was not a big deal, but this hifonics and also the dd z1a seriuosly bring me to my limit. Anyway, iam going to order new parts, and then maybe i will try my luck again.
Even this both amps only for education of my selve. So there is no need to repair them quickly.
Even this both amps only for education of my selve. So there is no need to repair them quickly.
- Status
- Not open for further replies.
- Home
- General Interest
- Car Audio
- Hifonics BXI-6000D