Today at the local trash, um, thrift shop, amid the usual detritus donations, was a pair of Infinity "Reference 5" in looking good condition with the usual rotted foam on woofs and mids. $32 the pair? , yes I'll take them 🙂
I knew they would need re-foaming and the Ijit has even done so, albeit on Bose 901 a few years back. Quick research shows that, yes kits are available for only slightly more than the speakers themselves 😀
Common sense says "just spend the $35 already" but the super-cheapskate in me demands: "Aren't there any 100% DIY methods (e.g. surround rings not allowed, you must make your own.) I did find a "hacks" to repair car speakers with masking tape but even I have (low) standards to maintain. But there's a low-tech DIY question: has anyone tried a more DIY method to completely "re-foam" a woofer? cloth tape? Thanks.
Before you dive into this have you hooked them up to see if they actually work? Providing they do I would check with SimplySpeakers.com to see what they have available.
Last edited:
Years ago I used a technique that was probably worse than the tape hack: I cut rings of felt and glued them to frame & cone - flat, so not great for Xmax.
A more advanced version with would be:
Cut slightly oversized foam rings
Make a form - e.g. use a router to inscribe a circle into a sheet of MDF
Coat the form with a release agent (such as a layer of sandwich wrap plastic)
Wet the felt and hammer it into the form
Leave to dry
Remove the felt
Trim ring to size
Glue onto speaker
Seal it (make it airtight) with something flexible, such as thinned down latex glue
Excellent advice
CraigSu: excellent point. I will hook them up to a "source" and see if noise comes out 🙂 I am familiar with the "9 volt battery" test. I have a 12V car battery that works as well...maybe just for woofer 😀
Hollow Boy: thanks for sharing, that is too much "DIY" for me, even though I asked for that 🙄
I think it's time to order a re-foam kit, after checking to make sure that the thing in the middle wiggles when current is applied 😉
Another DIY idea I may try...
Hollowboy's idea gives me a derivative idea 🙂 Since I lack a router (or felt), another way a mold might be made is to form a circle of the correct diameter out of something like rope of a certain diameter. This could be stiffened with glue and affixed to a backing board. The rest of Hollowboy's idea would be utilized: felt (not foam?) rings cut to rough size, dampened, pounded with felt tenderizing mallet 🙂 , left to dry and then coated with rubbery, flexible imprgenating solution.
May be worth a try. Now where is my ball of twine...?
Imperfect work at this would be a death sentence for the speakers' baskets.
I had all my Kappa 9's woofers redone for less than $100
I had all my Kappa 9's woofers redone for less than $100
"Death sentence?" Why? Maybe I didn't explain my vague procedure clearly enough 🙄 Actualy, 1st test run is promising and no damage: I made a "mold"by cutting a piece of (est. 1/2 inch) rope and shaping it in a circle of the diameter of the gap between cone and frame. This I then hot glue to a surface (coroplast). 1st layer is food grade plastic wrap.
2nd layer is my "fabric": I only have some flannel like stuff I used for making earlier horns/waveguides. Fabric is wetted with some type of adhesive -- I used thinned Gorilla Glue (this fabric and glue worked well for the waveguide, but probaby too stiff here...)
Top with another layer of plastic wrap. Carefully place the driver face-down onto this mess, press/twist slightly for better fit. Let dry (1+ hours). While the above fabric, glue combo is probably too stiff -- this looks promising. No damage to driver ( if plastic doesn't have a hole). I am going to try thinner fabric and more flexible adhesive for next trials.
Soldermzer Technology proposed motto #1: Reseraching DIY methods that only cost slightly more than just buying the correct replacement parts 🙄
I think I would spend the $35 on the correct surrounds.
I admire your efforts, but you will change the Frequency Response and Sensitivity of your speakers if you make your own surrounds, then you will lose the sonic character of the original speakers.
I admire your efforts, but you will change the Frequency Response and Sensitivity of your speakers if you make your own surrounds, then you will lose the sonic character of the original speakers.
"Death sentence?" Why? Maybe I didn't explain my vague procedure clearly enough 🙄 Actualy, 1st test run is promising and no damage: I made a "mold"by cutting a piece of (est. 1/2 inch) rope and shaping it in a circle of the diameter of the gap between cone and frame. This I then hot glue to a surface (coroplast). 1st layer is food grade plastic wrap.
2nd layer is my "fabric": I only have some flannel like stuff I used for making earlier horns/waveguides. Fabric is wetted with some type of adhesive -- I used thinned Gorilla Glue (this fabric and glue worked well for the waveguide, but probaby too stiff here...)
Top with another layer of plastic wrap. Carefully place the driver face-down onto this mess, press/twist slightly for better fit. Let dry (1+ hours). While the above fabric, glue combo is probably too stiff -- this looks promising. No damage to driver ( if plastic doesn't have a hole). I am going to try thinner fabric and more flexible adhesive for next trials.
Soldermzer Technology proposed motto #1: Reseraching DIY methods that only cost slightly more than just buying the correct replacement parts 🙄
Easy: "Carefully place the driver face-down"
If the cone is not exactly placed and centered, the piston will abrade because the cone will eventually move side-to-side as well as in-and-out.
This is normally done very carefully by attaching the new surround to the basket and letting the glue set. Then glue is beaded and the cone is momentarily depressed exactly in the center (by a gizmo more accurate than your finger,) capturing the cone to the new surround.
The new surround should be shaped very nearly like the original (they usually are not at all flat) so that the piston "rests" in it's original, neutral, in-out position so it has less chance of bottoming against the spider when you listen to TV on the Radio..
To clarify: my procedure above does not involve glueing the surround to the cone, but to use the circular gap between cone and frame as part of the mold, as well as the mass of the driver to press down on the still-drying surround. The driver itself is still protected by a layer of plastic wrap (excepting a leak in that layer).
I may well kill my driver, but I would do a poor job of affixing a surround -- whether legitimate or my home made immitation -- which would cause the voice coil to be off center.
I may well kill my driver, but I would do a poor job of affixing a surround -- whether legitimate or my home made immitation -- which would cause the voice coil to be off center.
My inner cheap skate wins
Trial #2 was a cotton fabric (probably old sheet) doped with diluted silicone caulk. The result was not very good, too soft. Trial #3 is with same fabric just hot glued first to cone, then set in my "mold" to get a roll and then tacked/glued on the frame. Oh yeah, forgot to mention that I measure the inner and outer diameters and cut an "annulus" of close to correct size.
Eyeball/hold up to light and seal the several places there are gaps 🙂
When I try the woofer I will be a bit more careful and will probably use the "30 Hz" method to (attempt to) center the driver while final glueing.
I have decided it's not worth spending even $40 to repair a $32 pair of speakers. They are for experimentation (Soldermizing) and so be it.
Yes, I understand that my "West Virginia" mending job may not work. Even if it does, my drivers will not meet their original specs. But, I retort, neither would they if I had bought a made-to-order set of rings and successfully glued them on to each driver. Heck, for that matter, an OEM driver (if they were available? Reasonable prices?) or certainly a substitute won't meet spec either. Granted, proper surrounds or OEM would get much closer than my hillbilly method.
Passive crossover gets grumpy if it's drivers change values. Yes. Another argument for active EQ 🙂
I am off to buy some "Liquid Tape" or similar rubbery gooey stuff to (1) seal the cloth a bit better (2) Hide my apalling patch job. 🙄
If I knew twenty years ago what I know now, I wouldn't have thrown away my RS-III pair because replacement woofers from factory were too expensive. In other words, I would have screwed up those drivers with my slightly-skilled repairs!
Last edited:
Well Soldermizer, I have never come across West Virginia mending before, but if its good enough for John Denver, its good enough for me.
Sometimes having fun is what its all about.
Sometimes having fun is what its all about.
Trial #2 was a cotton fabric (probably old sheet) doped with diluted silicone caulk. The result was not very good, too soft. Trial #3 is with same fabric just hot glued first to cone, then set in my "mold" to get a roll and then tacked/glued on the frame. Oh yeah, forgot to mention that I measure the inner and outer diameters and cut an "annulus" of close to correct size.
Eyeball/hold up to light and seal the several places there are gaps 🙂
When I try the woofer I will be a bit more careful and will probably use the "30 Hz" method to (attempt to) center the driver while final glueing.
I have decided it's not worth spending even $40 to repair a $32 pair of speakers. They are for experimentation (Soldermizing) and so be it.
Yes, I understand that my "West Virginia" mending job may not work. Even if it does, my drivers will not meet their original specs. But, I retort, neither would they if I had bought a made-to-order set of rings and successfully glued them on to each driver. Heck, for that matter, an OEM driver (if they were available? Reasonable prices?) or certainly a substitute won't meet spec either. Granted, proper surrounds or OEM would get much closer than my hillbilly method.
Passive crossover gets grumpy if it's drivers change values. Yes. Another argument for active EQ 🙂
I am off to buy some "Liquid Tape" or similar rubbery gooey stuff to (1) seal the cloth a bit better (2) Hide my apalling patch job. 🙄
If I knew twenty years ago what I know now, I wouldn't have thrown away my RS-III pair because replacement woofers from factory were too expensive. In other words, I would have screwed up those drivers with my slightly-skilled repairs!
I fixed my Smaller Advents years ago with poly drivers that are vastly better than the original drivers and I didn't have to pretend to know material science. Note the speakers in question are not of such a low value as yours.
Last edited:
Some progress
MIKEVO: A true West Virginia repair would probably use buckskin for the surround and pine tar for the adhesive 🙂 Actually WV is not that backwards. In fact it is my understanding that they have electricity most places nowadays 🙂
To pski: Ooh, good sarcasm! It is rare that someone out-sarcasms me 🙂
In defense of Infinity, I would think they were at least "mid-fi" quality during their "golden age" (e.g. before sale to Harman about 1991); the pair of Reference Five date to just before this, I believe. Now I've never owned Advents but perhaps yours are a collectible classic? I'm too lazy to look up values of our speakers but I'm sure you mean that my Reference Five pair are of "low value" solely because they are being Soldermized 😀.
More relevant: No doubt upgrading your Advents with poly cones was a tech improvement, but did you not have to alter the crosovers to match? Otherwise your quality speakers lost some quality 😕
Returning now to my experiments: one mid is repaired if I dare use the word; I am going to do one woofer. Since the woofer is more valuable (?) than a mid I am being a bit more careful. Current "materials science" is finding which adhesive sticks best (or "at all" 😛 ) to unknown plastic ("injection molded graphite") cone. Details to follow.
MIKEVO: A true West Virginia repair would probably use buckskin for the surround and pine tar for the adhesive 🙂 Actually WV is not that backwards. In fact it is my understanding that they have electricity most places nowadays 🙂
To pski: Ooh, good sarcasm!
It is rare that someone out-sarcasms me 🙂In defense of Infinity, I would think they were at least "mid-fi" quality during their "golden age" (e.g. before sale to Harman about 1991); the pair of Reference Five date to just before this, I believe. Now I've never owned Advents but perhaps yours are a collectible classic? I'm too lazy to look up values of our speakers but I'm sure you mean that my Reference Five pair are of "low value" solely because they are being Soldermized 😀.
More relevant: No doubt upgrading your Advents with poly cones was a tech improvement, but did you not have to alter the crosovers to match? Otherwise your quality speakers lost some quality 😕
Returning now to my experiments: one mid is repaired if I dare use the word; I am going to do one woofer. Since the woofer is more valuable (?) than a mid I am being a bit more careful. Current "materials science" is finding which adhesive sticks best (or "at all" 😛 ) to unknown plastic ("injection molded graphite") cone. Details to follow.
Initial results on victim number one are good. Details given below. The sound is much better than the appearance. Adhesive report: on the Infinity IMG cone, Gorilla glue does not stick very well. Hot melt is much better. Both of these cones were adhered with hot melt to the cone, and Elmer's "Glue-All" to metal basket (even though Elmer's says not for metals). Cloth area then treated with "Liquid Electrical Tape" in a suceessful attempt to seal, failed attempt to hide, the repair area  Voice coil was kinda-sorta centered during adhesive dry time by a combination of manual press up/down of the cone and 30 Hz sine and/or bassy music.
This may be the first ever speaker that an audiophile says is better with the grille than without (hides the Sodermized repair area.) Lacking any measurements, the only claim I can make is they work better than if they had no surrounds at all 🙂

Voice coil was kinda-sorta centered during adhesive dry time by a combination of manual press up/down of the cone and 30 Hz sine and/or bassy music.This may be the first ever speaker that an audiophile says is better with the grille than without (hides the Sodermized repair area.) Lacking any measurements, the only claim I can make is they work better than if they had no surrounds at all 🙂
Last edited:
Hi,
TBH I never seen such a pointlessly poor botched speaker repair.
Horrible. Personally I'd say you could have got away with a neat
DIY surround on the midranges, but you should have bought the
surrounds for the bass units or in fact for both units given the
apparent DIY skills on display. What happened to the trim rings ?
FWIW I've no doubt they sound better than they look, because
if they sounded like they look they would be utterly awful.
Used resale value is of course very near zero or the going rate for
the tweeters and selling the cabinets. No way have you saved $35
by not spending $35, you've ruined the midranges and bass units.
rgds, sreten.
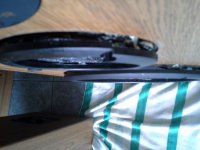
Appearance-wise you are correct!
Mr Sreten, I agree that it looks like a speaker that escaped from Dr. Frankenstein's lab Looks aside (I'm not striving for appearance, you have gathered? 🙂 ) I declared woofer #1 a botch (too much distortion) and tore it down again. I blame this on my using too many cloth strips and/or haphazard glueing and/or too much "Liquid tape"
Before I divulge my improved (?) process, I found two helpful tutorials for us cheap skates:
This guy used TOILET PAPER !!! (albeit quality tissue and six layers) and claims a good repair 😀
How to Repair a Torn or Broken Speaker
This 2nd link is closest to what I did:
Replace dry rotted speaker surrounds with cloth replacements. - All
Even his method was too precise for me! I used the driver to draw on my cloth (sheet of cotton?) the OD and the ID of the cone. I have to remember that i want the inner circle about 1/8' smaller than the drawn diameter. I do have a compass but could not draw well on the cotton, so I just eyeballed it. Mostly ok. The OD is not as important and can be trimmed in place if needed.
I've done quite a bit of reading about what glues to poly cones (or IMG) and the consensus is "nothing, very well." It does occur to me that the mfr. used adhesive so... hot glue was ok, Elmer's not very good (only to metal in my trial). I used my favorite, Gorilla Glue. Rather than a dozen tiny sloppy strips, or one well-cut ring with "slight compound cuts" (I don't understand this) along the edges of the ring, I got decent results by cutting the ring into quarters and sticking each quarter on separately.
I've done this enough that I learned to glue the inside of ring (to cone) first, and let dry. Do the usual smooth on, align each ring as well as I can. I then sprayed the water mist onto the dry cloth (required by Gorilla).
In an odd plot twist, the Instructable guy did not shim the speaker at all.. Wrong! Wrong! Wrong! Even the Soldermizer knows that the voice coil and all the rest must be aligned. I've never used shims with a speaker and if I tried to remove a dust cap would be more likely to give myself an appendectomy
I've had good results using the 30 Hz (-ish) method and/or just playing music at a moderate volume. Of course, do some last minute pressing and aligning if needed.
I'm impressed ow good the Infinity 10" sounds "full range" -- or the (so far not wrecked by me) 18sound 15" woofer in the Yorkville U15 (playing on the other channel.) Maybe I'm just easy to please.
Back to Sretens critiques: yes the trim rings are an issue. For openers I cracked one 🙁 Secondly they may not fit back on. Not a priority.
After a full cure i will "dope" the cloth with the Liquid Tape.
I only have a minor resentment that Instructable guy found a $1200 pair of speakers at road side. I had to pay $32 for my $700 (list?) pair. 🙂
Finally, the Reference Five, with drivers removed, makes a good hide away for cat, who was startled (me too!) when I came for the cabinet yesterday 🙂
Mr Sreten, I agree that it looks like a speaker that escaped from Dr. Frankenstein's lab
Looks aside (I'm not striving for appearance, you have gathered? 🙂 ) I declared woofer #1 a botch (too much distortion) and tore it down again. I blame this on my using too many cloth strips and/or haphazard glueing and/or too much "Liquid tape"Before I divulge my improved (?) process, I found two helpful tutorials for us cheap skates:
This guy used TOILET PAPER !!! (albeit quality tissue and six layers) and claims a good repair 😀
How to Repair a Torn or Broken Speaker
This 2nd link is closest to what I did:
Replace dry rotted speaker surrounds with cloth replacements. - All
Even his method was too precise for me! I used the driver to draw on my cloth (sheet of cotton?) the OD and the ID of the cone. I have to remember that i want the inner circle about 1/8' smaller than the drawn diameter. I do have a compass but could not draw well on the cotton, so I just eyeballed it. Mostly ok. The OD is not as important and can be trimmed in place if needed.
I've done quite a bit of reading about what glues to poly cones (or IMG) and the consensus is "nothing, very well." It does occur to me that the mfr. used adhesive so... hot glue was ok, Elmer's not very good (only to metal in my trial). I used my favorite, Gorilla Glue. Rather than a dozen tiny sloppy strips, or one well-cut ring with "slight compound cuts" (I don't understand this) along the edges of the ring, I got decent results by cutting the ring into quarters and sticking each quarter on separately.
I've done this enough that I learned to glue the inside of ring (to cone) first, and let dry. Do the usual smooth on, align each ring as well as I can. I then sprayed the water mist onto the dry cloth (required by Gorilla).
In an odd plot twist, the Instructable guy did not shim the speaker at all.. Wrong! Wrong! Wrong! Even the Soldermizer knows that the voice coil and all the rest must be aligned. I've never used shims with a speaker and if I tried to remove a dust cap would be more likely to give myself an appendectomy
I've had good results using the 30 Hz (-ish) method and/or just playing music at a moderate volume. Of course, do some last minute pressing and aligning if needed.
I'm impressed ow good the Infinity 10" sounds "full range" -- or the (so far not wrecked by me) 18sound 15" woofer in the Yorkville U15 (playing on the other channel.) Maybe I'm just easy to please.
Back to Sretens critiques: yes the trim rings are an issue. For openers I cracked one 🙁 Secondly they may not fit back on. Not a priority.
After a full cure i will "dope" the cloth with the Liquid Tape.
I only have a minor resentment that Instructable guy found a $1200 pair of speakers at road side. I had to pay $32 for my $700 (list?) pair. 🙂
Finally, the Reference Five, with drivers removed, makes a good hide away for cat, who was startled (me too!) when I came for the cabinet yesterday 🙂
Last edited:
Soldermizing completed.
Speakers are re-assembled. They play music fairly well. One woofer I was not able to fully repair. 2nd repair attempt yes is better but it still has distortion and awful noise on transients (bottoming out?) I have exhausted my obviously limited repair skills so am done. You cannot prove this woofer wasn't damaged "before", therefore there is no reason to implicate my repair methods 🙂
Appearance wise, as Sreten so eloquently notes, is horrible. Yes, the mids and woofers look like an aborted experiment by an apprentice inner tube maker. 🙄
A positive view: this is (now) the best pair of $32 speakers I've ever owned. I have proven that even an Ijit with modest skills can disregared wise advice ("Buy the reforam kit and do it right.") and instead make a working repair using cloth and glue. Did not even need a compass or ruler.
How do they measure now compared to a correct repair?Speakers are re-assembled. They play music fairly well. One woofer I was not able to fully repair. 2nd repair attempt yes is better but it still has distortion and awful noise on transients (bottoming out?) I have exhausted my obviously limited repair skills so am done. You cannot prove this woofer wasn't damaged "before", therefore there is no reason to implicate my repair methods 🙂
Appearance wise, as Sreten so eloquently notes, is horrible. Yes, the mids and woofers look like an aborted experiment by an apprentice inner tube maker. 🙄
A positive view: this is (now) the best pair of $32 speakers I've ever owned. I have proven that even an Ijit with modest skills can disregared wise advice ("Buy the reforam kit and do it right.") and instead make a working repair using cloth and glue. Did not even need a compass or ruler.
You may have left a lot on the table here. Disregarding the correct refoaming kit is poor advice.
Fit and Finish
It is likely that I would have gotten better results with a refoaming ring kit. It also would have cost me (approx.) $90 for a pair of repaired speakers. For my ~$32 investment ( + fiddling) I was able to a "good enough for me" repair.
I do not have any test data for reference, other than my own ears. Yes the woofers are not perfect. Both have some distortion with a sine sweep. One has bad bottoming (?) distortion with loud passages. Despite my amateur repair, they both play music quite well.
If I sell them, of curse ["course" -- but an apt typo !] I probably won't even get my $32 I have in them. But I might not get my investment back if I'd fixed them "correctly."
As I'm done with this, er, restoration project, let me close with this observation: "At Soldermizer Technology, we strive for fit and finish. This means that customers will have a fit when we are finsihed with their repair." 🙄
Attachments
- Status
- Not open for further replies.
- Home
- Loudspeakers
- Multi-Way
- Help the Ijit: surround repair or cheaper options?