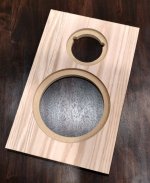
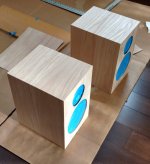
I just finished building a pair of these (Denovo Audio Helix Dome MT). I veneered them with red oak and then finished with polyurethane.
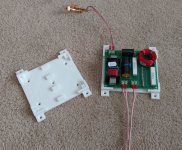
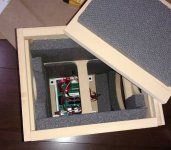
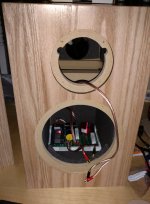
I ordered the crossover PCBs (which at $9.25 each are pretty much a no-brainer for this kit), but I didn't like the idea of just mounting them via the four corner mounting holes so I 3D printed a holder. The crossover has some pretty heavy parts, so I designed some additional supports into my holder and used two-sided tape to seat the board onto them. I also put a thin piece of compliant material between the holder and the bottom of the cabinet to eliminate any change of the PLA plastic buzzing against the bottom of the cabinet.
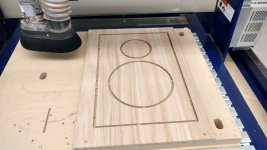
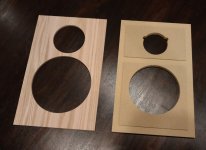
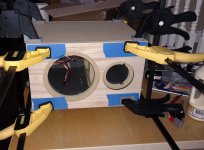
The cabinet itself was quite an adventure. I ordered some paper-backed red oak veneer with the PSA adhesive from veneersupplies.com. I was nervous about applying it to the front panels included with the kit since I didn't have a router to do the cutouts, so I re-made the front panels out of two pieces of MDF (1/4 + 1/2") using a desktop Shopbot at my local makerspace. This allowed me to put reliefs in the back of the front panel to seat the adjacent four sides plus the brace into, which should make for a slightly stronger cabinet than the front from the kit which is just flat on the back. It made for a fun hobby project and a good intro to the shopbot, but it was a lot of work.
I used Sonic Barrier 1" foam to line the inside of the cabinet (the stuff with the PSA from Parts Express). It's super easy to work with and I highly recommend it for this sort of thing.
I eventually ended up getting a small router to trim the veneer. I purchased a small saw from the veneer supplier but this didn't work very well - I ended up using a utility knife, the router and a small trimming plane to clean up the veneer prior to final sanding. The PSA adhesive worked out pretty well, but I did have a tiny bit of peeling I fixed with some wood glue.
I tried a bunch of different stains but I didn't find anything I liked better than just Varthane water-based polyurethane over the bare (sanded) veneer. Three coats of this came up really nice and it's great that it has basically no odor after just a few hours of drying.
The speakers sound great. Really smooth with a surprising amount of low-end. I've been going back and fourth between these and my old B&W P5 3-ways for the past couple of days (with both sitting side-by-side driven from the same Marantz PM8004). I still prefer the P5's just slightly - the sound is fuller with a more musical midrange - but the Helix Domes are close (and this is with basically no break-in).
Some other things I found useful:
KabelDirekt AWG 16 Speaker Wire for internal hook-up (a little overkill, but it's cheap and one strand is clearly labeled with a red stripe)
McMaster Carr 91555A102 and 91555A104 screws for attaching the crossover board and my holder
Tite-bond wood glue
Lots of clamps from harbor freight
Buck Bros 3" plane model 120LSO from Home Depot, sharpened with a diamond block from Harbor Freight
Bosch Variable Speed Fixed Corded Router PR20EVS and 85268MC flush trimmer bit
I ordered the crossover PCBs (which at $9.25 each are pretty much a no-brainer for this kit), but I didn't like the idea of just mounting them via the four corner mounting holes so I 3D printed a holder. The crossover has some pretty heavy parts, so I designed some additional supports into my holder and used two-sided tape to seat the board onto them. I also put a thin piece of compliant material between the holder and the bottom of the cabinet to eliminate any change of the PLA plastic buzzing against the bottom of the cabinet.
The cabinet itself was quite an adventure. I ordered some paper-backed red oak veneer with the PSA adhesive from veneersupplies.com. I was nervous about applying it to the front panels included with the kit since I didn't have a router to do the cutouts, so I re-made the front panels out of two pieces of MDF (1/4 + 1/2") using a desktop Shopbot at my local makerspace. This allowed me to put reliefs in the back of the front panel to seat the adjacent four sides plus the brace into, which should make for a slightly stronger cabinet than the front from the kit which is just flat on the back. It made for a fun hobby project and a good intro to the shopbot, but it was a lot of work.
I used Sonic Barrier 1" foam to line the inside of the cabinet (the stuff with the PSA from Parts Express). It's super easy to work with and I highly recommend it for this sort of thing.
I eventually ended up getting a small router to trim the veneer. I purchased a small saw from the veneer supplier but this didn't work very well - I ended up using a utility knife, the router and a small trimming plane to clean up the veneer prior to final sanding. The PSA adhesive worked out pretty well, but I did have a tiny bit of peeling I fixed with some wood glue.
I tried a bunch of different stains but I didn't find anything I liked better than just Varthane water-based polyurethane over the bare (sanded) veneer. Three coats of this came up really nice and it's great that it has basically no odor after just a few hours of drying.
The speakers sound great. Really smooth with a surprising amount of low-end. I've been going back and fourth between these and my old B&W P5 3-ways for the past couple of days (with both sitting side-by-side driven from the same Marantz PM8004). I still prefer the P5's just slightly - the sound is fuller with a more musical midrange - but the Helix Domes are close (and this is with basically no break-in).
Some other things I found useful:
KabelDirekt AWG 16 Speaker Wire for internal hook-up (a little overkill, but it's cheap and one strand is clearly labeled with a red stripe)
McMaster Carr 91555A102 and 91555A104 screws for attaching the crossover board and my holder
Tite-bond wood glue
Lots of clamps from harbor freight
Buck Bros 3" plane model 120LSO from Home Depot, sharpened with a diamond block from Harbor Freight
Bosch Variable Speed Fixed Corded Router PR20EVS and 85268MC flush trimmer bit
Attachments
-
 IMG_20181210_104906098_HDR.jpg399.5 KB · Views: 450
 -
 IMG_20181210_182857409.jpg348.5 KB · Views: 457
 -
 IMG_20181210_182939405_HDR.jpg290.5 KB · Views: 454
 -
 IMG_20181215_135142982.jpg482.2 KB · Views: 464
 -
 IMG_20181215_164037527.jpg344.3 KB · Views: 453
 -
 IMG_20181215_210018165.jpg304.8 KB · Views: 263
 -
 IMG_20181225_114815413_HDR.jpg152.9 KB · Views: 234
 -
 IMG_20181230_204034972.jpg378.9 KB · Views: 379
 -
 IMG_20181230_205608418.jpg201 KB · Views: 311
 -
 IMG_20181230_205554923.jpg276.6 KB · Views: 333
They look great! I like your second layer/dados on the baffle and no flies on that veneer work either. Very nice job.