I just got an onkyo a9555 and the mids are a little recessed and it lacks drive. The soundstage is huge but diffuse. A guy named bobwire on audioasylum modded his but didn't post pics.
I have a little experience with soldering and modding but I don't think I can do surface mount components. Any help would be greatly appreciated.
Anyone work on one of these? It has a lot of potential and I like the efficiency of digital amps.
I have a little experience with soldering and modding but I don't think I can do surface mount components. Any help would be greatly appreciated.
Anyone work on one of these? It has a lot of potential and I like the efficiency of digital amps.
Here are someone else's mods for the Onkyo:
When my secondary system finally gave it up and died I decided to replace it with an integrated amp and new DVD player. I chose the Onkyo A9555 amp after reading the review in Stereophile.
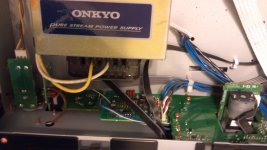
The amp looks good and did not sound to bad right out of the box, but compared to my first line system of modded Classe’ electronics (Maggie 3.3’s with crossover mods) it needed a little work. It was short on depth, a sure sign that the power supply is short on filtering.
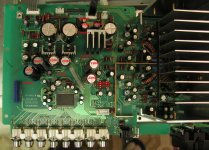
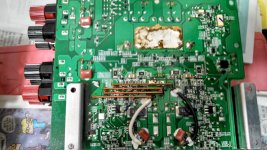
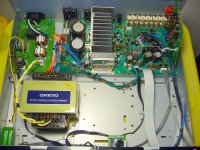
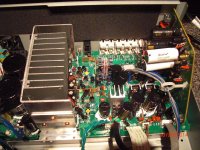
A look inside told the story. Op-amps were 5532’s, good but out of the eighties. There are four of these op-amps. Two in the tone control PCB, two more on the main PCB. One is for headphones so I didn’t do anything to that one. The other is in the middle of the power amp.
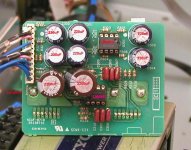
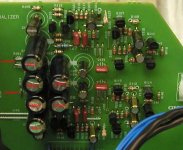
The first thing I did was to remove the IC’s from the tone control PCB and put in sockets. The IC’s were up-graded to LM4562’s. I first tried some OPA2132’s that I had on hand. They worked but showed there color. The 4562’s are much better in every way.
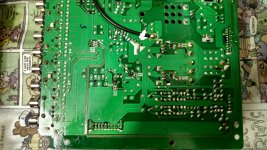
There are also eight capacitors to change on that PCB. The six 47uF coupling caps and were changed out for 220uF. Next, the two 470uF power filter caps were changed out for 2200uF/16V caps. There are two 33ohm resistors that I shorted with jumpers. This ties the caps closer to the power supply for more impact.
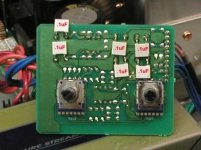
I don’t use the phono stage but decide to make use of it to help out the power supply rails. First, I jumpered out R’s 151, 152, 153, and 154 (33ohm) and then I changed out C’s 109, 110, 125, 126, 127, and 128 for 1000uF units.
On the main PCB there are 100pF caps at all input and output jacks. These are little red poly-prop caps. I clipped all of these right off the PCB, removing them all. They only dull the high end. These caps are numbered C201 to C216.
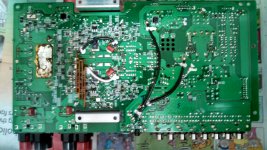
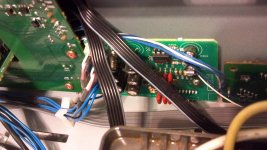
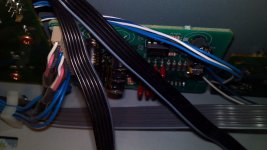
Last and most important, are the two pair of caps on the main PCB. These are C345-C346 and C975-C976. I could not un-solder them without taking the whole amp apart so, I clipped them off as CLOSE TO THE BODY as I could. This left me a little stub that I could solder the new cap leads to. It was very tight in there, so take great care not to melt anything else near by.
Once these changes are made the amp is all new and better than you could imagine. Detail and imaging are much improved. Depth is as deep as it gets. The amp can localize any spot on the stage. Vocals are really something. My Classe’ electronics with my Maggies was pretty good but this in even better. I started this project to use with my second system but it is so good that it’s replaced my main system electronics and now I’ll need another one for the second system.
I have pictures for those that might want to try this for themselves. Good luck, bobwire.
Here's a pic:
http://www.avsforum.com/avs-vb/attachment.php?attachmentid=75889&d=1171930945
I dont want to lose the phono stage. I just want better bass and midrange. What are the minimum mods I should do based on the above information? What brand caps would give me those desired results?
Thanks
When my secondary system finally gave it up and died I decided to replace it with an integrated amp and new DVD player. I chose the Onkyo A9555 amp after reading the review in Stereophile.
The amp looks good and did not sound to bad right out of the box, but compared to my first line system of modded Classe’ electronics (Maggie 3.3’s with crossover mods) it needed a little work. It was short on depth, a sure sign that the power supply is short on filtering.
A look inside told the story. Op-amps were 5532’s, good but out of the eighties. There are four of these op-amps. Two in the tone control PCB, two more on the main PCB. One is for headphones so I didn’t do anything to that one. The other is in the middle of the power amp.
The first thing I did was to remove the IC’s from the tone control PCB and put in sockets. The IC’s were up-graded to LM4562’s. I first tried some OPA2132’s that I had on hand. They worked but showed there color. The 4562’s are much better in every way.
There are also eight capacitors to change on that PCB. The six 47uF coupling caps and were changed out for 220uF. Next, the two 470uF power filter caps were changed out for 2200uF/16V caps. There are two 33ohm resistors that I shorted with jumpers. This ties the caps closer to the power supply for more impact.
I don’t use the phono stage but decide to make use of it to help out the power supply rails. First, I jumpered out R’s 151, 152, 153, and 154 (33ohm) and then I changed out C’s 109, 110, 125, 126, 127, and 128 for 1000uF units.
On the main PCB there are 100pF caps at all input and output jacks. These are little red poly-prop caps. I clipped all of these right off the PCB, removing them all. They only dull the high end. These caps are numbered C201 to C216.
Last and most important, are the two pair of caps on the main PCB. These are C345-C346 and C975-C976. I could not un-solder them without taking the whole amp apart so, I clipped them off as CLOSE TO THE BODY as I could. This left me a little stub that I could solder the new cap leads to. It was very tight in there, so take great care not to melt anything else near by.
Once these changes are made the amp is all new and better than you could imagine. Detail and imaging are much improved. Depth is as deep as it gets. The amp can localize any spot on the stage. Vocals are really something. My Classe’ electronics with my Maggies was pretty good but this in even better. I started this project to use with my second system but it is so good that it’s replaced my main system electronics and now I’ll need another one for the second system.
I have pictures for those that might want to try this for themselves. Good luck, bobwire.
Here's a pic:
http://www.avsforum.com/avs-vb/attachment.php?attachmentid=75889&d=1171930945
I dont want to lose the phono stage. I just want better bass and midrange. What are the minimum mods I should do based on the above information? What brand caps would give me those desired results?
Thanks
bobwire's a9555 mod
tried it.
tried it.
Attachments
a9555
to reset the amp to factory default - pressing and holding the PURE DIRECT button, then also press the LOUDNESS button. Release both at the same time.
or you need to do the above in combination with any or all of the following:
- turn VOLUME all the way down to zero
- turn SPEAKER selection to OFF
- UNPLUG the amplifier from power outlet for a while. an hour, but a few minutes works. plug back in.
After the blinking light stops - turn speakers and volume back to desired settings.
amp clicking on & off
remote control. Pres the CRL button rapidly during that 3 sec interval and get the number down
No sound and blue light on Volume nob is Flashing.
fuse
Attachments
- Home
- Amplifiers
- Class D
- Has anyone modded the onkyo a9555?