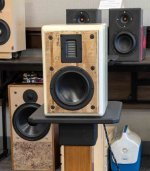
This is the fourth completed build in my VersaBox cabinets, however, I call it build 5 because 4a (Jaekels) and 4b (Itasca) are yet to be completed. There was a lot of gumption to finish this one first due to interest in the drivers from other parties and builders. So, these were finished out of turn. It started when I was awarded a pair of the Sig180-4 woofers as a door prize about a year and a half ago at the PE sponsored Speaker Design Competition. I honestly did not think it had been that long ago, but they have now been available just a few months longer than I've had them. The Signature line has been met with I feel undue criticism, and I feel they are an impressive set of drivers with good cost benefits. Obviously, the name is a play on Signature, and insisted I sign my Hancock on the bottom line.
Why the AMT?
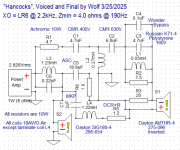
The tweeter choice was from looking at the Dayton offerings and trying to decide what was the "unofficial best fit" as a Dayton Signature tweeter. The Reference Series have their own models, but the Sig woofers are left with them omitted. The Esoteric had one, Euro had one, and the Epique has one coming soon. Heck, even the Classics have the DC28 Silkie and the ND have several models. Since the Reference vs the Signature are 2 of the 3 current upper class sectors, I gathered the inexplicably unattached AMT line was the best direction to go as a different flavor from line to line. That meant the AMTHR-4 was likely the best unit to make an attempt at a 2way here. It doesn't rolloff the top-end like the AMT3-4 or AMT-Pro. It is the otherwise largest and most robust Dayton AMT currently offered that should allow the somewhat lower xover points required in a 7" 2way. Additionally, while I think it does have output to spare, an MTM is out of the cards in this case because the Signature line woofers are 4 ohm nominal impedance. Any thought of paralleling 2 woofers to increase sensitivity is a wash without a 2 ohm stable high current amplifier. Also of note- the resistor across the AMT added considerable damping to their operation, and that is substantial enough to recommend this kind of component addition wherever it is utilized.
About the VersaBox...
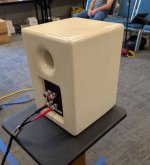
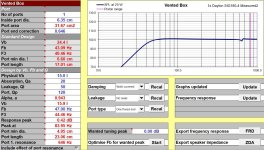
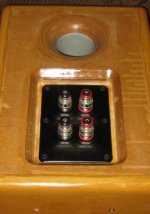
It's a fairly basic 15 liter vented box. There is a rear port with grey 2.5" electrical conduit. One solid shelf brace connects the rear and sides for about 2/3 of the cabinet depth, ending just below the inner port exit. Fb is fixed at 47Hz, yielding an F3 of 44Hz, and so far has been a really good place to tune these cabinets with good results in all of the builds used herein. The front baffle has a 3/4" deep inset mount for an interchangeable baffle which is secured with 6x 1/4-20 furniture style hex-drive bolts. All edges have a 3/4" roundover, and the port has a 1" roundover on the exit.
The baffles were originally going to be textured black/white cutting boards, backed to make up the thickness required. Upon looking for the backer pieces, I found a piece of 3/8" thick T111 tongue and groove plywood siding that I had forgotten I had. It had apparently been laid face down and used as a spray paint base or platform at some point. Since the Dayton drivers are purportedly 'Amazingly Affordable', I felt a well implemented piece of scrap wood would give these a very unique aesthetic against the gloss white the rest of the VersaBox cabinets bring to the table.
If you don't read these for woodworking information, skip this next long paragraph about woodworking....
This board had obviously seen better days, and wasn't thick enough for the 3/4" deep recess, but there was enough of it that I could use it with mirrored inherent grooves on left and right adjacent cabinets and have enough for both speakers. I used a piece of 3/4" ply as backer for both, resulting in 1.25" thick boards. Once that was glued, trimmed to width size, and deemed still usable, I gave it a light sanding and used the shop-vac to remove any dust debris or dirt. The board had a void that travelled from one side of the baffle to the other about 2-3 layers down from the face on one end. The middle was riddled with worm tunnels, which my thought was to save as much of at this point. Spalted/Wormy wood always costs more, and it provided a path for stark contrast against the tone of the pine plywood. I made my cut to separate the then conjoined twin boards and salvage the majority of their former pesty lunch travels. I then used West Systems epoxy and some tongue depressors to remedy the void, which involved applying tape prior the pour, and then applying tape on the face after poured because the epoxy was finding gaps and feathering through the surface. It came out okay luckily, just had more fill in some irregular areas. Then I applied a very light coat of the same epoxy to seal the board surfaces using a fake-advertising style fake-credit-card that came in the mail. It allowed a very thin coat and solidified all of the loose or soft fibers in this aged board, and only filled the worm channels minutely so they could still be filled with something else. Sanded and vacuumed yet again, followed by a small chamfer of the face perimeters, and then driver rebates and rear-side reliefs; I came upon a Youtube vid channel I had been watching periodically by Four Eyes Furniture. He was using black glue-sticks in a hot-glue gun to fill voids in a table, setting 321 aluminum blocks on them to cool, scraping off excess with a chisel, and then a light sand to finish it before his final resin coat or epoxy. I thought I could use this to enhance the spalted lines' visibility as contrast, and it worked rather well. I used an old heatsink and pressure since they weren't as heavy as the 321 blocks. I would recommend the low setting on the glue gun, as it is easier to use without drips or stringy problems. I got the glue sticks at Home Depot under the Ryobi brand. Another light sand, and that is where I have them at the moment. They are due to be 'epoxy-carded' one more time with sanding to follow in finale. I hope to be able to leave some texture to the boards as they have a good feel to the touch as they are.
The drivers' characteristics....
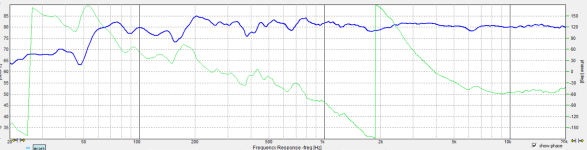
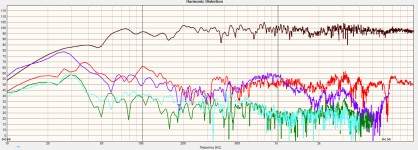
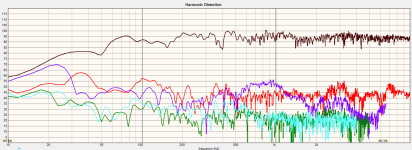
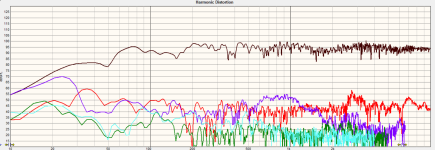
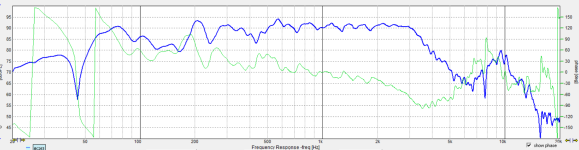
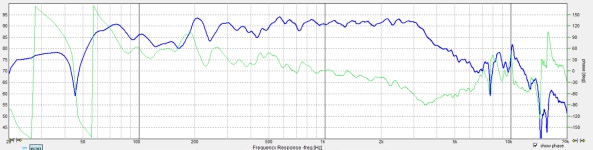
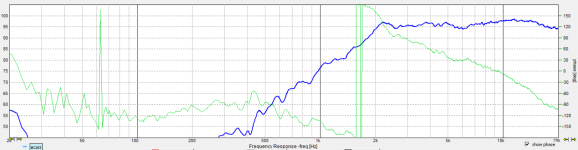
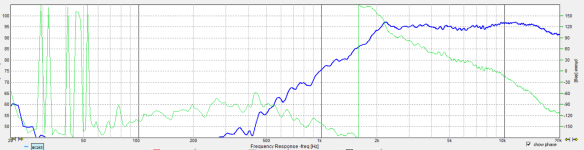
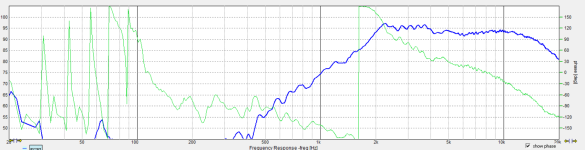
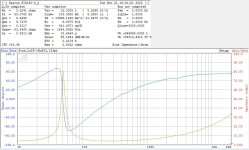
Measuring T/S of the SIG180 woofers, I had a Qms much higher than spec initially. I then remembered to remove the packaging plastic from the backplates and did it again. I still had Qms considerably higher than spec. Even so, the T/S was manageable in a modest box volume, and yielded an F3 that was low enough to be accepted. Doing an impedance sweep with tones for the most part was fine- until the breakup region hit. These drivers have had some lengths taken to try and minimize the magnitude of the aluminum cone breakup areas. As I believe I've read, the voice coil former helps to damp the cone due to the material used. Looking at the frequency response in the spec sheet, the plot rises to a very broad plateau and then dives like an expert in a swimming contest. Due to the assembly as designed, it is hard to tell where the underdamped breakup magnitude would be the strongest were it less well-treated. As the tones were increasing in frequency, 2kHz stuck out like a sore thumb. 3kHz came and went with less bravado. So- how to treat the breakup that doesn't measure or offend where you think it does? Since 2k was brash, I purposely placed a dip in the response there and started the woofer rolloff early. Then I tanked the response at 3k to both heavily damp where a typical breakup is before rolloff, and damp the knee of the total rolloff more heavily. The woofer also has a broad rise in 3rd order HD centered around 800-900Hz. While it looks worse than other supposed better or SOTA drivers, it is at a lower level than -40dB/1% from reference and is really truthfully of no concern.
Why did I need to damp the knee so heavily at the rolloff? Well- because as stated the woofer needed it is indeed one reason. The other is due to the AMT and how they tend to work. All tweeters using shallower slopes tend to want higher cutoff frequencies. This is a given. The lower you go, the steeper the slope that is required. Being an AMT, the HD measurements taken and how to best use them, they are limited to about 3kHz with a second order electrical slope. If going to the lowest plausible, the 2.2kHz point requires a 3rd order electrical network- which yields an LR6 acoustic rolloff slope. Due to how the drivers work, where they wanted to meld together automatically made this an LR6 summation.
The AMT also had a broad peak centered at 10kHz, which meant it needed suppressed.
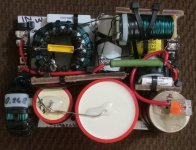
Then I put the tentative xovers together, and ran through the bunch of caps I happened to have in the values I modeled. I noticed that they all sounded a little different. Then increasing the first cap from 3.3uF to 4.7uF added the body in the music that was missing. Another round of trying caps in the new value ensued. Such is another benefit or curse of the AMT, as they are resolving enough to tell there are differences. One sounded shrill, one benign, one plucked hard, and 3 or 4 were fine save for some grit in the lower treble. When I finally stepped up to Clarity CMR, the grit disappeared and all was finally well, with nice detail and space of the recording.
Thus far, only a few cap brands/models have done this for me. Jantzen Superior and Silver, Northcreek Zen, Fostex Copper-Mylar, Clarity CMR and MR, Audyn Plus, ASC X386/X387, AuriCaps, and sometimes SoniCaps or MultiCaps. I haven't tried them all, but have more to try. In one of my previous builds called Nephila, the AMT sounded much better to me on the Zen caps over the industrial GE or Arcotronics style caps. The Zen yielded a massive soundstage while the GE/Arco was more focused and less expansive. I was hoping to find the right capacitors to allow lightning to strike twice for me in this build vs the previous of the same style.
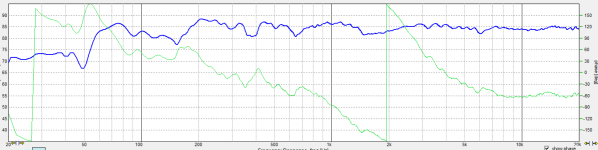
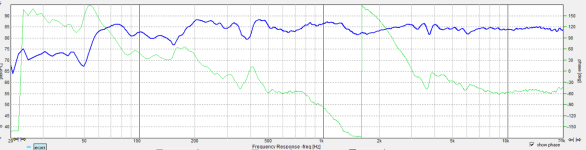
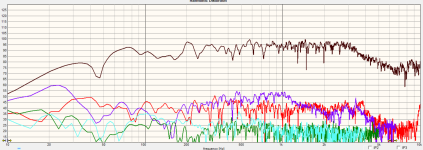
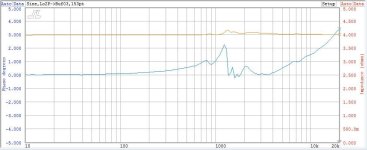
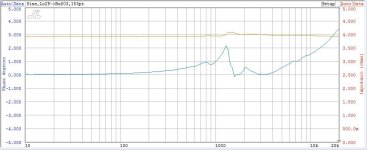
I wound the coils myself from 18AWG Blue (Dry-Oil) enameled wire. It was worth the cost to find a spool of it, as it looks really cool. I know 16 parts is rather high in count, but it was worth it for the results I achieved. As shown, at 1m distance measurement, the HD remains below the 1% threshold even at 100dB output. Zmin is about 4 ohms at 190Hz, and sensitivity is roughly between 86 and 87dB.
Thanks for reading, and additionally thanks to @hifijim for the nudge and push to get this build posted sooner than later...
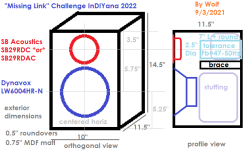
PS- the Missing Link was the first design in this box, so I included the drawing for that build....
Why the AMT?
The tweeter choice was from looking at the Dayton offerings and trying to decide what was the "unofficial best fit" as a Dayton Signature tweeter. The Reference Series have their own models, but the Sig woofers are left with them omitted. The Esoteric had one, Euro had one, and the Epique has one coming soon. Heck, even the Classics have the DC28 Silkie and the ND have several models. Since the Reference vs the Signature are 2 of the 3 current upper class sectors, I gathered the inexplicably unattached AMT line was the best direction to go as a different flavor from line to line. That meant the AMTHR-4 was likely the best unit to make an attempt at a 2way here. It doesn't rolloff the top-end like the AMT3-4 or AMT-Pro. It is the otherwise largest and most robust Dayton AMT currently offered that should allow the somewhat lower xover points required in a 7" 2way. Additionally, while I think it does have output to spare, an MTM is out of the cards in this case because the Signature line woofers are 4 ohm nominal impedance. Any thought of paralleling 2 woofers to increase sensitivity is a wash without a 2 ohm stable high current amplifier. Also of note- the resistor across the AMT added considerable damping to their operation, and that is substantial enough to recommend this kind of component addition wherever it is utilized.
About the VersaBox...
It's a fairly basic 15 liter vented box. There is a rear port with grey 2.5" electrical conduit. One solid shelf brace connects the rear and sides for about 2/3 of the cabinet depth, ending just below the inner port exit. Fb is fixed at 47Hz, yielding an F3 of 44Hz, and so far has been a really good place to tune these cabinets with good results in all of the builds used herein. The front baffle has a 3/4" deep inset mount for an interchangeable baffle which is secured with 6x 1/4-20 furniture style hex-drive bolts. All edges have a 3/4" roundover, and the port has a 1" roundover on the exit.
The baffles were originally going to be textured black/white cutting boards, backed to make up the thickness required. Upon looking for the backer pieces, I found a piece of 3/8" thick T111 tongue and groove plywood siding that I had forgotten I had. It had apparently been laid face down and used as a spray paint base or platform at some point. Since the Dayton drivers are purportedly 'Amazingly Affordable', I felt a well implemented piece of scrap wood would give these a very unique aesthetic against the gloss white the rest of the VersaBox cabinets bring to the table.
If you don't read these for woodworking information, skip this next long paragraph about woodworking....
This board had obviously seen better days, and wasn't thick enough for the 3/4" deep recess, but there was enough of it that I could use it with mirrored inherent grooves on left and right adjacent cabinets and have enough for both speakers. I used a piece of 3/4" ply as backer for both, resulting in 1.25" thick boards. Once that was glued, trimmed to width size, and deemed still usable, I gave it a light sanding and used the shop-vac to remove any dust debris or dirt. The board had a void that travelled from one side of the baffle to the other about 2-3 layers down from the face on one end. The middle was riddled with worm tunnels, which my thought was to save as much of at this point. Spalted/Wormy wood always costs more, and it provided a path for stark contrast against the tone of the pine plywood. I made my cut to separate the then conjoined twin boards and salvage the majority of their former pesty lunch travels. I then used West Systems epoxy and some tongue depressors to remedy the void, which involved applying tape prior the pour, and then applying tape on the face after poured because the epoxy was finding gaps and feathering through the surface. It came out okay luckily, just had more fill in some irregular areas. Then I applied a very light coat of the same epoxy to seal the board surfaces using a fake-advertising style fake-credit-card that came in the mail. It allowed a very thin coat and solidified all of the loose or soft fibers in this aged board, and only filled the worm channels minutely so they could still be filled with something else. Sanded and vacuumed yet again, followed by a small chamfer of the face perimeters, and then driver rebates and rear-side reliefs; I came upon a Youtube vid channel I had been watching periodically by Four Eyes Furniture. He was using black glue-sticks in a hot-glue gun to fill voids in a table, setting 321 aluminum blocks on them to cool, scraping off excess with a chisel, and then a light sand to finish it before his final resin coat or epoxy. I thought I could use this to enhance the spalted lines' visibility as contrast, and it worked rather well. I used an old heatsink and pressure since they weren't as heavy as the 321 blocks. I would recommend the low setting on the glue gun, as it is easier to use without drips or stringy problems. I got the glue sticks at Home Depot under the Ryobi brand. Another light sand, and that is where I have them at the moment. They are due to be 'epoxy-carded' one more time with sanding to follow in finale. I hope to be able to leave some texture to the boards as they have a good feel to the touch as they are.
The drivers' characteristics....
Measuring T/S of the SIG180 woofers, I had a Qms much higher than spec initially. I then remembered to remove the packaging plastic from the backplates and did it again. I still had Qms considerably higher than spec. Even so, the T/S was manageable in a modest box volume, and yielded an F3 that was low enough to be accepted. Doing an impedance sweep with tones for the most part was fine- until the breakup region hit. These drivers have had some lengths taken to try and minimize the magnitude of the aluminum cone breakup areas. As I believe I've read, the voice coil former helps to damp the cone due to the material used. Looking at the frequency response in the spec sheet, the plot rises to a very broad plateau and then dives like an expert in a swimming contest. Due to the assembly as designed, it is hard to tell where the underdamped breakup magnitude would be the strongest were it less well-treated. As the tones were increasing in frequency, 2kHz stuck out like a sore thumb. 3kHz came and went with less bravado. So- how to treat the breakup that doesn't measure or offend where you think it does? Since 2k was brash, I purposely placed a dip in the response there and started the woofer rolloff early. Then I tanked the response at 3k to both heavily damp where a typical breakup is before rolloff, and damp the knee of the total rolloff more heavily. The woofer also has a broad rise in 3rd order HD centered around 800-900Hz. While it looks worse than other supposed better or SOTA drivers, it is at a lower level than -40dB/1% from reference and is really truthfully of no concern.
Why did I need to damp the knee so heavily at the rolloff? Well- because as stated the woofer needed it is indeed one reason. The other is due to the AMT and how they tend to work. All tweeters using shallower slopes tend to want higher cutoff frequencies. This is a given. The lower you go, the steeper the slope that is required. Being an AMT, the HD measurements taken and how to best use them, they are limited to about 3kHz with a second order electrical slope. If going to the lowest plausible, the 2.2kHz point requires a 3rd order electrical network- which yields an LR6 acoustic rolloff slope. Due to how the drivers work, where they wanted to meld together automatically made this an LR6 summation.
The AMT also had a broad peak centered at 10kHz, which meant it needed suppressed.
Then I put the tentative xovers together, and ran through the bunch of caps I happened to have in the values I modeled. I noticed that they all sounded a little different. Then increasing the first cap from 3.3uF to 4.7uF added the body in the music that was missing. Another round of trying caps in the new value ensued. Such is another benefit or curse of the AMT, as they are resolving enough to tell there are differences. One sounded shrill, one benign, one plucked hard, and 3 or 4 were fine save for some grit in the lower treble. When I finally stepped up to Clarity CMR, the grit disappeared and all was finally well, with nice detail and space of the recording.
Thus far, only a few cap brands/models have done this for me. Jantzen Superior and Silver, Northcreek Zen, Fostex Copper-Mylar, Clarity CMR and MR, Audyn Plus, ASC X386/X387, AuriCaps, and sometimes SoniCaps or MultiCaps. I haven't tried them all, but have more to try. In one of my previous builds called Nephila, the AMT sounded much better to me on the Zen caps over the industrial GE or Arcotronics style caps. The Zen yielded a massive soundstage while the GE/Arco was more focused and less expansive. I was hoping to find the right capacitors to allow lightning to strike twice for me in this build vs the previous of the same style.
I wound the coils myself from 18AWG Blue (Dry-Oil) enameled wire. It was worth the cost to find a spool of it, as it looks really cool. I know 16 parts is rather high in count, but it was worth it for the results I achieved. As shown, at 1m distance measurement, the HD remains below the 1% threshold even at 100dB output. Zmin is about 4 ohms at 190Hz, and sensitivity is roughly between 86 and 87dB.
Thanks for reading, and additionally thanks to @hifijim for the nudge and push to get this build posted sooner than later...
PS- the Missing Link was the first design in this box, so I included the drawing for that build....
Attachments
-
 4xlrz1yq9evf.jpg66.8 KB · Views: 214
 -
 7ulpuhdatvn6.jpg125.4 KB · Views: 213
 -
 dvcne7r2o4mb.jpg75.2 KB · Views: 184
 -
 gkf85klv30gi.jpg105.3 KB · Views: 200
 -
 Hancocks_Right-Final_5-20-25.png188.5 KB · Views: 194
 -
 ima228o1ocsr.jpg90.1 KB · Views: 179
 -
 Hancocks_Right-Final_LevelAdj_0-45_5-20-25.png397.9 KB · Views: 174
 -
 Hancocks_Right-Final_HD_5-20-25.png329.8 KB · Views: 194
 -
 lt2f61rhbpvf.jpg230.5 KB · Views: 232
 -
 Hancocks_Schematic_Final1_Voiced.png170.2 KB · Views: 224
 -
 HancockSig180-4_2_measured.jpg212.7 KB · Views: 205
 -
 HancockLeftFinal.png185.5 KB · Views: 158
 -
 HancockRightHDFinal.png324.4 KB · Views: 147
 -
 HancockRightFinal.png195.5 KB · Views: 133
 -
 HancockLeftHDFinal.png317.3 KB · Views: 140
 -
 IMG_4747.JPG51.4 KB · Views: 124
 -
 IMG_4748.JPG38 KB · Views: 125
 -
 MissingLink2022.png27 KB · Views: 202
Last edited:

Raw driver FR/HD measurements....
Attachments
-
 SIG180-4_15HTweeterAxis_nosmoothing.png139.9 KB · Views: 38
 -
SIG180-4_30HTweeterAxis_nosmoothing.frd41.8 KB · Views: 21
-
 SIG180-4_30HTweeterAxis_nosmoothing.png141.3 KB · Views: 39
 -
SIG180-4_45HTweeterAxis_nosmoothing.frd41.6 KB · Views: 23
-
 SIG180-4_45HTweeterAxis_nosmoothing.png142 KB · Views: 40
 -
 SIG180-4_HDonTweeterAxis0_nosmoothing.png228.9 KB · Views: 45
 -
SIG180-4_onTweeterAxis0_nosmoothing.frd41.9 KB · Views: 22
-
 SIG180-4_onTweeterAxis0_nosmoothing.png138.7 KB · Views: 41
 -
SIG180-4_15HTweeterAxis_nosmoothing.frd41.7 KB · Views: 22
-
 Screenshot 2025-01-12 173436.png129.6 KB · Views: 42
 -
HancocksBOTH-AMTHR4+SIG180-4.frd42.2 KB · Views: 26
-
AMTHR-1_15Haxis_Nosmoothing.frd42.8 KB · Views: 32
-
 AMTHR-1_15Haxis_Nosmoothing.png132.9 KB · Views: 31
 -
AMTHR-1_30Haxis_Nosmoothing.frd42.7 KB · Views: 23
-
 AMTHR-1_30Haxis_Nosmoothing.png133.2 KB · Views: 32
 -
AMTHR-1_45Haxis_Nosmoothing.frd42.7 KB · Views: 23
-
 AMTHR-1_45Haxis_Nosmoothing.png134.8 KB · Views: 39
 -
 AMTHR-1_HDonaxis_Nosmoothing_40uF.png235.5 KB · Views: 35
 -
AMTHR-1_onaxis_Nosmoothing.frd42.7 KB · Views: 24
Raw impedances...
Attachments
-
Dayton Audio SIG180-4_1_pole open.zma6.7 KB · Views: 26
-
Dayton AMTHR-4_2.zma5.4 KB · Views: 26
-
Dayton AMTHR-4_1.zma5.4 KB · Views: 27
-
 AMTHR4_2Z.jpg52.3 KB · Views: 27
 -
 AMTHR4_1Z.jpg52.7 KB · Views: 27
 -
Dayton Audio SIG180-4_2_pole open.zma6.6 KB · Views: 20
-
 Sig180-1_TS_pole open.jpg94.8 KB · Views: 26
 -
 Sig180-2_TS_pole open.jpg92.7 KB · Views: 29
wolf_teeth,
A well planned and executed project - congratulations!
Is that your "Pangolin" loudspeaker in the background?
A well planned and executed project - congratulations!
Is that your "Pangolin" loudspeaker in the background?
Thanks for publishing your latest achievement. I am wondering how they perform at low volume given the alu woofer, say 65-70db at 2-3m listening distance?
65-70dB is not really very loud considering what these are capable of. I generally listen in that distance range, and television watching is typically within that output level range or below. I took a peak reading on a slow C weighted dB meter, and topping out at 66dB for television was all I got.
Music at this level is fine, and can yield a very pleasurable experience. Not sure what about the aluminum cone could be seen as a possible caveat.
Music at this level is fine, and can yield a very pleasurable experience. Not sure what about the aluminum cone could be seen as a possible caveat.
I noticed several things which stood out.
1) The high frequency balance was just right, natural and relaxed, and yet cymbals and hi-hats had a very realistic sparkle. This kind of balance is hard to achieve.
2) male and female vocals were natural and convincing.
3) deep bass performance was excellent for a single 180 mm woofer. Articulate, tight, and with good tone differentiation. Punchy when the music called for it.
I have never owned a speaker with aluminium cones and only heard them at audio shows at cinema-like volume levels or higher. My suspicion was that alu woofers need a bit of minimum gas in order to sound good due to their cone weight. But happy to be wrong. I usually listen at very moderate volume levels, but many speakers sound flat unless turned up.
I have the truncated "buy out" version of the Sig180 and it has a nice rich sound and goes pretty low (@45Hz) for a small 2-way. The aluminum the cone is made of is VERY thin and care must be made to avoid denting it.
@wolf_teeth, nice design and thanks for sharing it with us. Do you think the GRS PT2522 would pair well with this woofer?
@wolf_teeth, nice design and thanks for sharing it with us. Do you think the GRS PT2522 would pair well with this woofer?
Indeed, you did! And just after posting I remembered...I'm sure I posted that info in the Monoculus thread
I have the truncated "buy out" version of the Sig180 and it has a nice rich sound and goes pretty low (@45Hz) for a small 2-way. The aluminum the cone is made of is VERY thin and care must be made to avoid denting it.
@wolf_teethDo you think the GRS PT2522 would pair well with this woofer?
I'm not sure as I've not used the GRS tweeters. I have used the BG Neo3PDR, and felt it really was not my favorite among the planar/AMT/Ribbon type tweeters. The Neo3 was good down to 1.8kHz, not sure if the GRS is, but it appears there is no more output than needed at about 2.2kHz as the SIG180 plays and might be less than capable as power handling goes.
Since the rolloff of the SIG180 dictates 2.2kHz at the highest, the tweeter should play that low.
I think this is gold wrapped up in just a few words but I'm not sure I understand how you did it and what you mean with you use of "damping" (especially "damp the knee").Due to the assembly as designed, it is hard to tell where the underdamped breakup magnitude would be the strongest were it less well-treated. As the tones were increasing in frequency, 2kHz stuck out like a sore thumb. 3kHz came and went with less bravado. So- how to treat the breakup that doesn't measure or offend where you think it does? Since 2k was brash, I purposely placed a dip in the response there and started the woofer rolloff early. Then I tanked the response at 3k to both heavily damp where a typical breakup is before rolloff, and damp the knee of the total rolloff more heavily.
I think you're saying you stepped through frequencies using a generator and listened for the points that irritated you then notched (either directly or indirectly) those points out of the frequency response. Is that correct? Is there more to it?
I remember your build from last year's SDC sounding so so smooth and inviting. I'm thinking this is how you achieve it.
Impressive build!
Pretty complex crossover! 16 components -- 11 caps & coils. Does it reside in the box?
Pretty complex crossover! 16 components -- 11 caps & coils. Does it reside in the box?
Yeah, of course it fits inside the box. 4x6 board size. Did you notice I used 3 daughter boards to attach components? Thank you for the compliment.
@flipsnshyt-
When I take impedance and T/S, I still use the longer term sweep on my S&L Woofer Tester 2. This allows me to hear tones as it sweeps, and I can find blemishes this way some times. Any time you run sweeps, pink noise, etc, you can learn from the stimulus.
These SIG180 drivers have a plastic former to cone junction to damp the transition of resonances to the cone, and maybe other methods toward the same goal. Measuring the FR did not show a dominant peak or HD rise whereas the signal sweep sounded like a bad spot. Comparing this to other metal coned drivers should show a steep high Q resonance at the breakup frequency. In the SIG, it's just not shown in the graph as it was taken.
Typically, the rolloff above breakup is the main nosedive in the response of metal cone drivers. This is why on paper, the response would likely have a breakup at about 2.7-3k range. The cone just presuppresses it a little beforehand.
The "knee" is just like it sounds. The knee of the rolloff of a box model or xover is where the flat response takes the turn and heads south at whatever the intended slope is. To damp, suppress, or soften the knee means to reduce the sharpness or broaden the curve through the knee. Damp/Damping = suppress or minimize. (Dampen or dampening is the wrong word.)
Since 2k was brash, I rolled it off lower than that with more damping than usual to ease into the 6th order slope. Using a damped second order electrical lowpass (resistor added to the C component) and the notch at 3k for the other supposed possible breakup point further aligns the rolloff to complement the tweeter's acoustic rolloff.
Thanks for the clarification.
I'm used to damping being attenuation but especially related to time domain, like settling time, in the racecar world. I wanted to make sure there wasn't something flying way over my head electrically (very possible).
I'm used to damping being attenuation but especially related to time domain, like settling time, in the racecar world. I wanted to make sure there wasn't something flying way over my head electrically (very possible).
- Home
- Loudspeakers
- Multi-Way
- "Hancocks", another VersaBox build with Dayton SIG180-4 and AMTHR-4...