I have to make about 6 simple chassis's and was hoping for some hints
Chassis will be simple miter shadow box styles with front panel express alum tops. I have a table saw(crap but will do), router(no table), and miter saw. I can miter the 4 pieces, but is there a technique for keeping them at 90's when gluing since they are 5" deep and i cant use standard picture frame clamps? And for corner bracing, what should i use?
Chassis will be simple miter shadow box styles with front panel express alum tops. I have a table saw(crap but will do), router(no table), and miter saw. I can miter the 4 pieces, but is there a technique for keeping them at 90's when gluing since they are 5" deep and i cant use standard picture frame clamps? And for corner bracing, what should i use?
is there a technique for keeping them at 90's when gluing?
Use your mitre saw to cut the corners at a 45 degree angle. Lay the pieces out in a straight line with the cut side down. Tape the pieces together, then flip the whole thing over. Spread glue into the cuts, then fold the whole thing into a box. Tape the last corner, check it for squareness, then let it dry for a couple hours. When you take the tape off, you should have a fairly decent box.
If you want to cut a rebate into the top, be sure to do that before you glue the corners together. If you plan to mount any binding posts, input jacks, or switches into the wood, it might be easier to cut/drill those holes first too.


http://i69.photobucket.com/albums/i43/Ty_Bower/DirtCheapSE/P1140748.jpg
http://i69.photobucket.com/albums/i43/Ty_Bower/DirtCheapSE/P1140749.jpg
http://i69.photobucket.com/albums/i43/Ty_Bower/DirtCheapSE/P1140760.jpg
Woodworking aside....
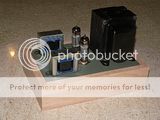
Aluminum top plate would be good. However it's still not as good as all metal chassis in heat dissipation. So, plan your layout well for the heat management in the first place. Don't under-estimate the heat of resistors, rectifier, SS parts... etc. A couple of watt can be very hot, too.
Holes on top plate and lifted base help in convection. It's good to have them, too.
Use your mitre saw to cut the corners at a 45 degree angle. Lay the pieces out in a straight line with the cut side down. Tape the pieces together, then flip the whole thing over. Spread glue into the cuts, then fold the whole thing into a box. Tape the last corner, check it for squareness, then let it dry for a couple hours. When you take the tape off, you should have a fairly decent box.
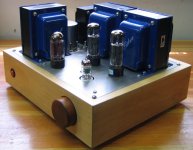
The first time I tried this I put way too much glue in the joints. If you tape the pieces end to end there isn't much room for glue so spread it thinly and try to work quickly. Titebond III works well here as it has more open assembly time than other glues and is very strong. I also like to double up on the tape on the joints as I don't want a piece of tape to split while working with the box. I suggest you do a trial assembly before committing to glue. This procedure works very well and gives nice tight joints. No clamps required, the tape provides more than enough pressure on the joint.
For corner bracing I just glue in square or triangular stock as appropriate for your project. Let the corners dry for at least 24 hours before glueing in the corner braces. As also suggest by Ty, you probably want to cut a rebate in the top for the plate so the weight is transferred directly to the box and not the corner braces.
In the image below you can see the nice tight joint and the corner screws into the corner brace.
Attachments
If you want to you can easily have a router table:
THE TABLE
get a bit of 1/2 ply
hole-saw out a hole, 1" minimum, really depends on what kind of bit you're using on the router.
screw the router base to the ply so it's bit will poke through the hole you've made
flip it over
get two saw horses, or bench or whatever and bradnail or finish nail or clamp your table on to them
that's the table
THE FENCE
This is a little bit of a trial and error fence but it works a treat and costs zero.
Get a nice (straight!!) bit of wood, preferably a heftier bit, 2x4 or something and place it along your hole in the ply.
Drill a hole at one end through the ply and the fence.
Pop one long machine screw with a washer at the end through from underneath, secure it with a washer and nut (wing nut for speed ideally) .
Now by pivoting the fence to and fro you vary the distance to the bit. Use a speed clamp to secure the free end.
This method is pretty quick and accurate once you get the swing of adjusting it.
I've done this on a few occasions for dadoes and rabbets and it's good enough for the girls I go with.
love the technique tip ty - thanks!
I'd just add that if you are going to rebate the timber for top plate, do it before everything else - a loooong straight run on the timber stock before you cut it into sections and mitre it. That way you are more likely to machine it exactly the same for all pieces.
Cheers!
I'd just add that if you are going to rebate the timber for top plate, do it before everything else - a loooong straight run on the timber stock before you cut it into sections and mitre it. That way you are more likely to machine it exactly the same for all pieces.
Cheers!
- Status
- Not open for further replies.