Freddi your Karlsonator looks cool, nice work! Glad to hear you like the way they sound. how did you get the angled cuts done?
Its good to know a karlson design that would work with 6'' drivers, the ones for big woofers were pretty famous here back in the day.
Also thanks for your take in the MLTL as it doesnt seems as big as my prior design. It really helps to get to know how to get a MLTL done in hornresp and i suck at that soft. Maybe i ll try later to modify it a little so its a little more boomy in the 80-200 region to compensate baffle step.
I've got the files for Leonard Audio Transmission Line software, he said we should feel free to share the files but that he wouldnt be hosting his web anymore. They are in the gigantic thread about that soft here in diyaudio but i will re upload them to save the trouble of finding them again, only bear in mind apparently stuffing isnt working well. Sidenote is he was on facebook in a diyaudio group and he said he was working or at least playing with the idea to get the soft with new capabilities in a web version, so hopefully we should see it online again soon enough.
Another soft that i been playing with is basta! from tolvan data, i love that it can show baffle difraction for your designed baffle summed with the driver response to get somewhere closer to the actual response. Jeff Bagby diffraction room and boundarie simulator helps here too (its an excell spreadsheet).
Just extract the zip file in your root directorie, usually C: open the app and it will install. If the Leonard app stops to open erase the appdata (this usually is a hidden folder) folder for the soft and reinstall and it will open again.
Attachments
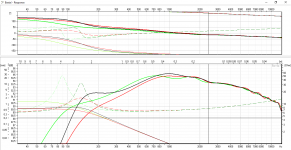
Well here are some curves to compare some closed and an aperiodic arrangement.
Response considering baffle step and room gain, displacement impedance and phase.
-Red line is for 8 litre and Qb of 3 to aproximate an aperiodic box. Less bass extension, less displacement around res (same Fs as for the same box without resistive vent) and better phase response overall. f10 = 120 Hz.
-Black line is for 8 litre sealed box, incredibly, such a high Q box seems to compensate baffle step better and doesnt end up with a bump before starting to fall. f10 = 90 Hz.
-Green line is for 33 litre sealed box. More low end at the expense of double displacement below 120Hz. As this are low excursion drivers, not sure exactly the mm, this most surely means higher distortion. f10 = 60 Hz.
If one would intend to get the best midrange (still listenable alone) possible and add a sub later wich would you choose?
The thing with the MLTLs o TL is that cone excursion may deteriorate performance way too much and potentially hurt the surround if its dried out. But still a possibility i guess.
Attachments
Finally Done. Thanks to everyone, those who posted here, those who posted elsewhere and helped me get the basics. Finally i opted to do the sealed enclousure, as apparently there are little full rangers intended to go sealed like these. Finally opted for 16 l sealed, as if i compared equal cone movement rather than equal voltaje, that cab had the more realtive efficency with same rolloff while keeping diffraction effects mannageable.
And i really enjoy the way they sound, the bass is just enough for me, and i dont miss it almost in any program, only those who have some real sub sounds of doubtfull pitch, but this is subjective. Using test tones at hearing level i can hear them until 50 hz (at that point they dont sound nice though), so theoretically i´m still losing some bass, but not critical at all, specially as i plan to add a sub later to wet my feets in crossover design.
The history went like this, i wanted to make a TL, as the distancee from speaker to ear is about 80cm, i wouldnt be needing big SPL so them shouldnt reach high excursion and add significat distortion to the sound. I cutted the wood with my dancing jigsaw and pulse to realise the contact between the panels was far from ideal. So after struggling with how to get over that, i decided i should have opted for a better contruction method having in consideration the tools i had.
So the idea was if i made lateral double thick, with the inner one smaller (-2xply thickness) as to let the others panels fit in to get double the area for the vinilic glue to work. So millimetrical differences between panels wouldnt result in a weak non stiff joint. Orginially i was planning to do double front and back panel because of troels recomendation on midrange mounting, but then i read in here about the BBC speakers, and Hardwood hipothesis that made me went the other way, specially beacause of less wood needed and easy of construction.
As i was having a double panel and casually i ended up in the CLD thread i decided i would put a little damping layer of about 1-2 mm between latearal panels. I located a half price acrilyc polimer intended to seal drywall panels, as that was the original purposse of green glue, called "Knauf Fugenditch". The difference was like hitting a hollow wall and a solid brick, or like getting out the resonances of a snare drum. The energy storage of plywood is higher than mdf so it is more likely to radiate sound i believe. I pressed the panels together in case the damping material would expand while curing. More than anything, this was done because construction favored it, and because i wanted to try a damped enclousure rather than a purely stiff one, as im not sure if the resonances could be taken out of a fullrange speaker, or at least get them to a pont where they dont radiate anymore. Overkill for such little sealed low excursion speakers? probably...
The drivers where meant to be inside mounted so i made a circle jig with wood, but as the blade of the jigsaw doesnt stand orthogonal to its metal base it didnt work, as the blade inclined and changed the diameter of the cut. So i marked a circle in the wood and proceed to cut by hand. Of course the circle where ok, but far from perfect, and also a little big, as the gasket is really thin i ended up with really little space for the screws. So i decided to make them front mounted and i proceed to make a bigger circle in the frontal face with a cutter, and then scraping layers of ply using a chissel. Again, far from ideal, but easier to mount, as the bottom panel is the removable one, it would have been really hard to put them from the inside with such little tolerance. Also, threaded inserts are kind of expensive and hard to get where i live, so the screws would have been to be cutted to no project its point to the outside. Also i putted a thin layer of suppodselly viscoelastic material in the recess so the driver would be supported there. A viscoelastic gasket would have been better choice, but that will have to wait.
So a proceeded to use the PVA glue and pressed the cabinets with stiff sticks mounted in threaded inserts with nuts to make the pressure, this way you avoid having to buy several clamps. The important thing here is that the sticks need to be really stiff, hopefully something like oak, otherwise as you take the nuts further, the stick will bend, making preassure only in the threaded rod side, and potentially moving the panels, happened to me. What helped me here was using sisal yarn, a tip a furniture maker gave me once. If you put two turns of sisal yarn around the cabinet and knot it as tense as you can, then, if you put something between the two parallel yarns and make it twist, it gets tenser, until it brakes. So you should try to twist the pairs of as many sides as posible and then lock the twister element for each side. Its rudimentary, in the corners the yarn do not twist, and gets to apply lots of preassure there, exactly where the preassure should be applied. This method was ussed originally to glue legs of furniture, press them, and also making the preassure maintain othogonal angles. Sadly i lost the photo i took so i hope its clear, it works like charm and costs you nothing, i had some in my house already... I ll post a pair of photos, and if i find the yarn method one i ll upload it later.
Fixed the drivers with wood screws and rubber washers, so now the cabinets were finished. I glued roof felt to the back panel to add some mass with contac glue (epoxy glue would be more permant). Proceeded to paint the outsides with some spair paint, line the interiors with some 1-2 cm thick dense poly foam i had left from a chairs restortation, and also stuff the interior with polyester fibres i had left from the same project. If i had to buy something i would have bought glass fiber as these are sealed... Also i ordered (following a comment by xrk971) 20 u of magic sponges to play with them for 0.01 euros with an aliexpress new customer discount, to play with them later.
To my surprise the cabinets where structurally non resonant, at least the impulse where put just under the driver hole, a little brace may help there. There where no noticeable inner resonaces in one of the cabinets, but the other had a nasty one around 650 Hz, peculiar thing what millimetrical changes can change in here. That will be work for the sponjes when they arrive. Also as you can see the recess wasnt perfect (not that much if you bear in mind the chissel xD), more so for the R speaker, and that resonance where going out through a little space down the driver. A little pressed piece of paper fitting there was enough to keep it in.
The terminals where two copper nails, i know they rust, but the solder protects the joint.
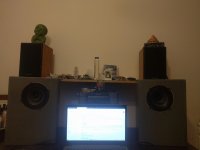
After applying eqAPO to reduce difraction effects and beaming i really like the results, they reach higher than the chinese two way nationally branded speaker that you see behind (that costed around five times more than finished product), and have a much more detailed and non boomy bass. Subjectively im amazed about the imaging (and im listening really close) and the live character these impose on the sound, i thought big dynamics where needed for this, but now i think that stands true only for the bass. Im hearing new little details and vocal arragements in songs i heard many times, so i´m pretty happy with the result. Not sure what is bringing out the details, maybe the light paper cone with fabric surround? or the "well" controlled cone by the inner constant air volume?
Also, is it okay to angle the cabinets a little to be more on-axis or that degrades the stereo image?
Hope this post helps another newbie overcome the issues of not having the right tools, nor being able to buy them and amortize them later. Using copper nails for terminals, going to the "suburbs" to buy the woods and construction oriented hardware stores really helped to keep the costs as little as possible.
(sorry for the mess in my room, everything on the desk went up 🙂 )
And i really enjoy the way they sound, the bass is just enough for me, and i dont miss it almost in any program, only those who have some real sub sounds of doubtfull pitch, but this is subjective. Using test tones at hearing level i can hear them until 50 hz (at that point they dont sound nice though), so theoretically i´m still losing some bass, but not critical at all, specially as i plan to add a sub later to wet my feets in crossover design.
The history went like this, i wanted to make a TL, as the distancee from speaker to ear is about 80cm, i wouldnt be needing big SPL so them shouldnt reach high excursion and add significat distortion to the sound. I cutted the wood with my dancing jigsaw and pulse to realise the contact between the panels was far from ideal. So after struggling with how to get over that, i decided i should have opted for a better contruction method having in consideration the tools i had.
So the idea was if i made lateral double thick, with the inner one smaller (-2xply thickness) as to let the others panels fit in to get double the area for the vinilic glue to work. So millimetrical differences between panels wouldnt result in a weak non stiff joint. Orginially i was planning to do double front and back panel because of troels recomendation on midrange mounting, but then i read in here about the BBC speakers, and Hardwood hipothesis that made me went the other way, specially beacause of less wood needed and easy of construction.
As i was having a double panel and casually i ended up in the CLD thread i decided i would put a little damping layer of about 1-2 mm between latearal panels. I located a half price acrilyc polimer intended to seal drywall panels, as that was the original purposse of green glue, called "Knauf Fugenditch". The difference was like hitting a hollow wall and a solid brick, or like getting out the resonances of a snare drum. The energy storage of plywood is higher than mdf so it is more likely to radiate sound i believe. I pressed the panels together in case the damping material would expand while curing. More than anything, this was done because construction favored it, and because i wanted to try a damped enclousure rather than a purely stiff one, as im not sure if the resonances could be taken out of a fullrange speaker, or at least get them to a pont where they dont radiate anymore. Overkill for such little sealed low excursion speakers? probably...
The drivers where meant to be inside mounted so i made a circle jig with wood, but as the blade of the jigsaw doesnt stand orthogonal to its metal base it didnt work, as the blade inclined and changed the diameter of the cut. So i marked a circle in the wood and proceed to cut by hand. Of course the circle where ok, but far from perfect, and also a little big, as the gasket is really thin i ended up with really little space for the screws. So i decided to make them front mounted and i proceed to make a bigger circle in the frontal face with a cutter, and then scraping layers of ply using a chissel. Again, far from ideal, but easier to mount, as the bottom panel is the removable one, it would have been really hard to put them from the inside with such little tolerance. Also, threaded inserts are kind of expensive and hard to get where i live, so the screws would have been to be cutted to no project its point to the outside. Also i putted a thin layer of suppodselly viscoelastic material in the recess so the driver would be supported there. A viscoelastic gasket would have been better choice, but that will have to wait.
So a proceeded to use the PVA glue and pressed the cabinets with stiff sticks mounted in threaded inserts with nuts to make the pressure, this way you avoid having to buy several clamps. The important thing here is that the sticks need to be really stiff, hopefully something like oak, otherwise as you take the nuts further, the stick will bend, making preassure only in the threaded rod side, and potentially moving the panels, happened to me. What helped me here was using sisal yarn, a tip a furniture maker gave me once. If you put two turns of sisal yarn around the cabinet and knot it as tense as you can, then, if you put something between the two parallel yarns and make it twist, it gets tenser, until it brakes. So you should try to twist the pairs of as many sides as posible and then lock the twister element for each side. Its rudimentary, in the corners the yarn do not twist, and gets to apply lots of preassure there, exactly where the preassure should be applied. This method was ussed originally to glue legs of furniture, press them, and also making the preassure maintain othogonal angles. Sadly i lost the photo i took so i hope its clear, it works like charm and costs you nothing, i had some in my house already... I ll post a pair of photos, and if i find the yarn method one i ll upload it later.
Fixed the drivers with wood screws and rubber washers, so now the cabinets were finished. I glued roof felt to the back panel to add some mass with contac glue (epoxy glue would be more permant). Proceeded to paint the outsides with some spair paint, line the interiors with some 1-2 cm thick dense poly foam i had left from a chairs restortation, and also stuff the interior with polyester fibres i had left from the same project. If i had to buy something i would have bought glass fiber as these are sealed... Also i ordered (following a comment by xrk971) 20 u of magic sponges to play with them for 0.01 euros with an aliexpress new customer discount, to play with them later.
To my surprise the cabinets where structurally non resonant, at least the impulse where put just under the driver hole, a little brace may help there. There where no noticeable inner resonaces in one of the cabinets, but the other had a nasty one around 650 Hz, peculiar thing what millimetrical changes can change in here. That will be work for the sponjes when they arrive. Also as you can see the recess wasnt perfect (not that much if you bear in mind the chissel xD), more so for the R speaker, and that resonance where going out through a little space down the driver. A little pressed piece of paper fitting there was enough to keep it in.
The terminals where two copper nails, i know they rust, but the solder protects the joint.
After applying eqAPO to reduce difraction effects and beaming i really like the results, they reach higher than the chinese two way nationally branded speaker that you see behind (that costed around five times more than finished product), and have a much more detailed and non boomy bass. Subjectively im amazed about the imaging (and im listening really close) and the live character these impose on the sound, i thought big dynamics where needed for this, but now i think that stands true only for the bass. Im hearing new little details and vocal arragements in songs i heard many times, so i´m pretty happy with the result. Not sure what is bringing out the details, maybe the light paper cone with fabric surround? or the "well" controlled cone by the inner constant air volume?
Also, is it okay to angle the cabinets a little to be more on-axis or that degrades the stereo image?
Hope this post helps another newbie overcome the issues of not having the right tools, nor being able to buy them and amortize them later. Using copper nails for terminals, going to the "suburbs" to buy the woods and construction oriented hardware stores really helped to keep the costs as little as possible.
(sorry for the mess in my room, everything on the desk went up 🙂 )
Attachments
Last edited:
I guess the live signature is because of close listening (reflections are kept at lower level relative tod irect sound) + nice FR imaging, despite subjective parameters, seems the way to go if your room sounds baaad.
Also, absolutely off topic, but there is a free carreer in Argentina in UNTREF called "sound engeneering". Its a real engeneering career so takes 7 years at minimum. The focus is mainly electronics, but has three DSP asignatures, 4 recording (1 mastering) in the best studios of the country, 3 acoustics and 2 electroacoustics, and last year is electronic and acoustic measurments (someday far from now i promess to make a good measuruments thread) and you need to do a thesis (first year is full of nonsense and calculus algebra physics). Dunno were i should post info, please tell me. Also PM me if any doubts.
The thing is, carreer is free, and dollars here are like gold, with 100US you get an apartment for a month, and for 1 US you eat steak, and meat here is hilarious (sorry vegans). So if you want to get into audio but there are little carreers around you and you would need to pay several hundreds a month just to be in the university it may be an option (or the only one) coming here, study and live some years like a millonaire and still save thousands of dollars.
Asignatures here: UNTREF
I'm reliving this.... Finally measured them... Awfull plot... even suspicious its almost a 1.5 db increase per octave from 200 to 20000 Hz... It seems non coeherent that there is no roll off in hi freq. Made it planar with eq apo, as the eq was much i still need to use rephase. What i can say is i still really enjoi the impulse response and the stereo image, i think its because of the close distance and being closed and no infinite bafle. What i cant understand is why i got such awfull response that also seems a little flawed, i suspet a little of the crossover of the amplifier wich is a home theatre one to be able to use a sub. I guess in movies it pays to have awfull amounts of treble for voices and fx and foley. This seems coherent with the perceived change in midbass in comparison to another amp, at which also the cone displacement was quite more noticeable for same SPL.
One day of one life i ll post some graphs of the measurements
One day of one life i ll post some graphs of the measurements