Looking to build my first set of speakers, and I've figured I'd go with the fe167e as the driver. Now, I really like the look of the JTM/2's from Carolina Audio. I'm curious as to how they setup the 3 folded TL design. Is there any diagrams available for this type of design?
Alternativey, could I simply make it a BR design, with only an empty box and single port?
Thanks for the help.
Alternativey, could I simply make it a BR design, with only an empty box and single port?
Thanks for the help.
167e
http://www.zillaspeak.com/ZillaSpeakBoxPlotFostex168-167.asp
People have built both 15 and 21 L boxes with good results using the 167e.
Others have built some neat pipes.
Peace,
Godzilla
http://www.zillaspeak.com/ZillaSpeakBoxPlotFostex168-167.asp
People have built both 15 and 21 L boxes with good results using the 167e.
Others have built some neat pipes.
Peace,
Godzilla
jwb009 said:could I simply make it a BR design, with only an empty box and single port?
I'd recommend Bob Brines' ML-TL. Works really well with these (and looks like a BR in the sense that it is a box with a port)
dave
I'm assuming Bob Brines' version is this?:
http://www.geocities.com/rbrines1/images/Proposals/FE164.gif
If so, will it become a problem if I change the dimensions so it is much less deep and much wider, as in the Carolina Audio. I'm thinking the diagonal piece inside wouldn't work then, am I correct? Sorry for the questions, I'm new to all this. Thanks!
jwb009: The pic you've posted is not BB Ft 1600's, which is essentially a tube with a slot port at the bottom. What Dave said!
I can't find the drawing he had up on his site.
45" internal height, driver down 11", with a 9" wide, 1.5" tall, 4.25" deep slot port at the bottom. Cross-section is 81 in^2.
He has detailed plans with all his tricks available for sale (FT1600)
dave
45" internal height, driver down 11", with a 9" wide, 1.5" tall, 4.25" deep slot port at the bottom. Cross-section is 81 in^2.
He has detailed plans with all his tricks available for sale (FT1600)
dave
Looks easy enough. So with a cross-section of 81 in^2, does it matter how you get those 81 inches, ie is 9x9 ideal, or will something like 5 x 16.5 work as well?
Question 2: What is the purpose of the 3 cross members in this picture? Is it simply for stability?
http://www.geocities.com/rbrines1/Pages/FT-1600_MkII/Cement_Board_Detail.jpg
Question 2: What is the purpose of the 3 cross members in this picture? Is it simply for stability?
http://www.geocities.com/rbrines1/Pages/FT-1600_MkII/Cement_Board_Detail.jpg
This is a tried and functional design.
Has any one tried anything else with this driver. I made the FT1600 and I love the sound and was thinking about a bipole or a bipole TQWP. I would love to see some discussion on that. It seems the CSS drivers are getting all the attention right now.
How about some discussion.
Has any one tried anything else with this driver. I made the FT1600 and I love the sound and was thinking about a bipole or a bipole TQWP. I would love to see some discussion on that. It seems the CSS drivers are getting all the attention right now.
How about some discussion.
jwb009 said:Looks easy enough. So with a cross-section of 81 in^2, does it matter how you get those 81 inches, ie is 9x9 ideal, or will something like 5 x 16.5 work as well?
In theory a ratio of width to depth that is an irrational number is best. Say we take the golden ratio 1:1.618... then internal dimensions would be 7" x 11 5/8"...
What is the purpose of the 3 cross members in this picture? Is it simply for stability?
Those are shelf bracing... IMO braces running up & down would be more effective (like in Scott's)
dave
Bob's is great. I used to have a pair of MK1s I built to his design.
Alternatively, Martin King's evergreen Project 2 ML TQWT for the FE164 (the FE167E is a direct replacement, and actually works better than the original drivers in this cabinet) is invariably a good bet. My top budget choice for the DIY types and capable of embarrassing most commercial speakers up to £2000 UK (no exaggeration there). Looks good too. I've built three pairs of these.
Scott
jwb009 said:
What is the purpose of the cement board? I am interesting in building one of those. It doesn't appear that cement board is readily available where I live.
Adi
The intent of the cement board is to get a mix of materials and reduce cabinet resonance. There is an article in the recent AxP that discusses cabinet resonance. The idea is to make the box rigid and reduce the amount of "colouration" caused by the box resonance. Vertical bracing works very well, try to divide into non equal units like Dave describes.
The cement board can be bought as Hardi backer or something similar. It will make the cabinet very heavy. Use a rubberized glue that will remain pliable over time. Something like liquid nails or subfloor adhesive should do the job.
Other questions
Good luck
The cement board can be bought as Hardi backer or something similar. It will make the cabinet very heavy. Use a rubberized glue that will remain pliable over time. Something like liquid nails or subfloor adhesive should do the job.
Other questions
Good luck
SCD said:Vertical bracing works very well, try to divide into non equal units like Dave describes.
I am having difficulties envisioning the vertical bracing, could you elaborate please?
Adi
oodi said:am having difficulties envisioning the vertical bracing, could you elaborate please?
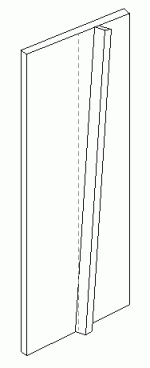
Take a piece of ~ 2" wide 3/4-1" plywood or hardwood. Use an appropriate length to divide the panel into 2 long skinny unequal trapezoids.
pictured below in its simpliest form -- if you can extend it to reach the other side (make it holey of course) then even better
dave
Attachments
Vertical Bracing:
Once you have your panels cut out. You need to attach a brace to the inside of the cabinet. I have cut a 3/4" wide by 1/4"deep stopped dado channel in the panel. divided the panel width by the root of 2 to determine the approx. location. Stop the dado before you get to the end so it will not show on the end. Cut a 2" by 3/4" strip of hardwood or 3/4" baltic birch ply. Cut the length to fit inside dimensions. insert and glue. Ta Da you made a vertical brace. Another way is to use a biscuit joiner and do the same but do not cut the dado channel. If you use the biscuit idea you do not have to keep the line vertical you can skew it off by a bit on one end. You need to use a good quality wood glue to secure and clamp tight.
That should help you understand the concept I hope
Dave is quicker than me on the response:
Dave also eludes to our favourite technique. If you extend the brace to the other side you can reinforce both at once. You can also cut out a place for the back of the driver to be braced as well. You have to drill a lot of random holes in the bracing pannel and acount for the approx volume change by the bracing pannel. I have used 3/8 or 1/2 inch plywood for that. I drilled 2.5, 2, 1.5, 1 holes though out the bracing pannel. The trick is to dry fit and cut out for the driver brace part to be pretty close to exact. It is better to be a bit ( ie less than 1/8") deeper than shallow. You can use good old duct seal to make up the differnce between the driver and the brace.
I hope this make sense
- Status
- Not open for further replies.
- Home
- Loudspeakers
- Full Range
- fe167e enclosure?