You can start.
The only change as far as I am concerned is already described in Part 1 of the description.
So you should use those revised values in the diff pairs.
There is ONE error in the PCB which you need to rectify first before soldering anything.
But that has also been described, and tried out by Nic.
If in doubt ask Nic, or Alexis.
Alexis promised me again to write the build and test section.
He deserves the chance as far as I am concerned.
Patrick
Someone asked by PM where to get Kerafol for 2SK1530 / 2SJ201.
As far as I know, only Zhou Fang stocks them.
Anyone knows an alternative source ?
Patrick
As far as I know, only Zhou Fang stocks them.
Anyone knows an alternative source ?
Patrick
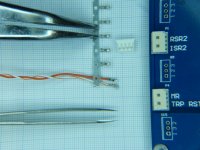
I am currently preparing for testing my first protection board and I am wondering how to handle the molex connectors. Soldering the headers on the board is not an issue at all but I am not sure how to handle the wire side. From all what I have found so far this microblade connector needs a quite expensive crimp tool to connect the wires
0638190100 Molex Inc | WM9020-ND | DigiKey
Could somebody give me a hint if I am wrong or if there are other/better alternatives?
Markus
0638190100 Molex Inc | WM9020-ND | DigiKey
Could somebody give me a hint if I am wrong or if there are other/better alternatives?
Markus
Last edited:
Someone asked by PM where to get Kerafol for 2SK1530 / 2SJ201.
As far as I know, only Zhou Fang stocks them.
Anyone knows an alternative source ?
Patrick
someone posted this link:
Warmtegeleidende folie Keratherm - Rood 86/82 Kerafol 86/82 (l x b) 100 mm x 100 mm Dikte 0,25 mm 6.5 W/mK in de Conrad online shop
Just crimp by hand (long nose pliers).
Patrick
Yes, long nose plier but with solder.
Mark
All, thanks for your hints.
The crimp terminals are really tiny and at the end they have to fit into the connector housing. So I guess the crimp has to be really "nice" otherwise it won´t fit.
But well, I´ll order the terminals and housings and give it a try.
I´ll keep you informed about the outcome
Markus
The crimp terminals are really tiny and at the end they have to fit into the connector housing. So I guess the crimp has to be really "nice" otherwise it won´t fit.
But well, I´ll order the terminals and housings and give it a try.
I´ll keep you informed about the outcome
Markus
Someone asked by PM where to get Kerafol for 2SK1530 / 2SJ201.
Anyone knows an alternative source ?
Patrick
Conrad - Ihr Online Shop für Elektronik, Computer, Multimedia, Modellbau & Technik
Someone asked by PM where to get Kerafol for 2SK1530 / 2SJ201.
As far as I know, only Zhou Fang stocks them.
Anyone knows an alternative source ?
Patrick
Just discovered in the diyaudio store:
Pack of 9 Keratherm® Insulators - Parts
Conrad has the 86/82 type only in big sheets.
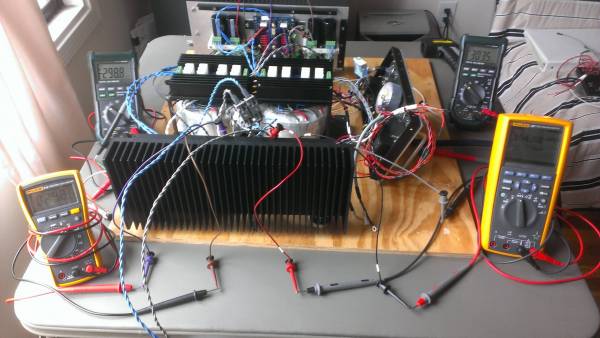
Been short on time thanks to work, but things are progressing slowly.
Two channels being biased. I could really use 8 meters!
Two channels being biased. I could really use 8 meters!
Do at least a square wave response 1kHz or 10kHz.
You can supply signal single ended and ground Vin-.
But best to generate balanced signal using e.g. a DRV134 and the like.
Patrick
You can supply signal single ended and ground Vin-.
But best to generate balanced signal using e.g. a DRV134 and the like.
Patrick
Today I received the Molex crimp terminals and housings and I tried "manual" crimping.
Here are my initial findings:
0) Yes, also in reality these terminals are really tiny, at least compared to my hands. Others might have an advantage here. 😉
1) A long nose plier is not suitable. On this scale it looks like a hammersmith tool and the result was accordingly.
2) A tweezer is closer to the required scale but still some excercising and patience was required to bend the straps around without completly twisting the hole thing
3) I did not manage to apply enough preloading force to the stramps such that isolation and wire were clamped reliably. It was always possible to pull the wire out easily.
4) Then I followed Mark´s recommendation for soldering. I applied a droplet of SMD soldering paste on the wire crimp zone and shortly heated it with the soldering iron. Since there is a lot of flux in the paste the solder easily wetted and the process result did not look that bad (at least from the zoom factor I had available)
5) The trail fit of the soldered crimp terminal into the connector housing was also successfull
So bending around the crimp straps with a tweezer and subsequent soldering could be a workable, though time consuming option. However, one should be aware of the risk, that in this case the isolation crimp is not effective as a strain relieve, as it is forseen by the connector desingers. As a matter of fact forces applied to the wires could lead to partial or full breakage of the litze wires. Since these connectors are relavant for amplifier safety (that´s the reason for drilling a bit on that subject) I would rather kick the connectors out and directly solder the wires on the board before I would compromise here.
But it´s to early to surrender.
I think as a next step I will give Heinz´recommendation a try. The web page he kindy made me aware of is indeed an interesting challange, even for native speakers. But the crimp tool offered there does not look that bad.
Markus
Attachments
Last edited:
Firstly I have not used this specific MOLEX connectors, but I have used MANY 2.5mm pitch connectors of similar size.
These are used almost universally in radio control models as connectors between servo motors and receivers.
I have no problem crimping them manually, after a bit of practice.
I did not have to solder, but one can solder as extra safety.
For the above mentioned 2.5mm pitch contacts, I use something similar to these :
ENGINEER INC. - PRECISION CONNECTOR CRIMPING PLIERS FOR NARROW-PITCH AND UNIVERSAL CRIMPING
Crimping Pliers (PA-08/09/15/21) - ENGINEER INC. (Formerly known as Futaba Tool)
How to crimp Molex JST HRS AMP RC servos using a UNIVERSAL crimping tool. - YouTube
http://www.amazon.com/Engineer-PA-0...&ie=UTF8&qid=1368475453&sr=1-1&keywords=pa-09
I am sure if you search harder, especially those sites for radio controlled models, I am sure you will find cheaper ones.
Crimpzange für Servo + BEC Stecker (inkl. Servo-Crimpeinsatz), 28,00 €
Voltmaster - Crimpzange, RC-Modellbau Shop
IF you do not fancy using crimped connectors, you can also get, e.g. from Mouser, 2.5mm pitch terminal blocks.
This only requires a solder iron and a small screwdriver.
1725669 Phoenix Contact | Mouser
https://www.distrelec.ch/pcb-termin...-connection/phoenix-contact/mpt-0-5-2-2-54/en
2.5mm pitch molex connectors have been around for decades.
They are not the smallest ones around.
Happy crimping, 🙂
Patrick
Last edited:
2.5mm pitch molex connectors have been around for decades.
They are not the smallest ones around.
Happy crimping, 🙂
Patrick
Patrick,
are you sure they are 2.5 mm pitch?
I recall them being 2 mm.
As I hoped that the control board would be an easy and permanent part of the amp I went for direct soldering and solid cobber cat5 cable.
Works a charm - the cable and direct soldering at least 🙂
Cheers,
Nic
No I am not sure.
This is the problem that you do not do everything yourself.
But it will not happen again.
Patrick
This is the problem that you do not do everything yourself.
But it will not happen again.
Patrick
You are right. WK confirmed that it is 2mm.
But the crimping tool I posted above should do.
It will go down to AWG32 (0.2mm copper).
And the smallest contact is I believe 1mm wide.
Also available in Germany :
pa-09 universal-crimpzange für molex jst hirose (hrs) amp tyco jae wurth: Amazon.de: Baumarkt
Of course soldering is the much better option.
Just seal it with hot melt glue afterwards as starin relief.
Patrick
- Home
- Amplifiers
- Pass Labs
- F5X -- the EUVL Approach - The Build Thread