This is a plea for some guidance from the DIY folks. I am new to building and successfully did two ACAs this winter and now am considering an F5 or F6. It seems like the supplies sold by the DIY Audio Store for this are not as neat a package as for the ACA. Notably the Power supply seems to be handled as a separate project and while I have found the BOM spreadsheet for populating the universal power supply circuit board it seems the parts are not available for purchase as a group from DIYAudio. In fact I'm not exactly sure where to purchase them. The BOM as I read it does not seem to include a transformer and I'm wondering if there are other parts missing.
It's getting a bit daunting for a newbie. Is this the way it is or am I missing something? It's ok to tell me I just have to suck it up and take the plunge but if someone else has already figured all this out and put it in a nice neat little package somewhere I would really appreciate knowing where it is.
It's getting a bit daunting for a newbie. Is this the way it is or am I missing something? It's ok to tell me I just have to suck it up and take the plunge but if someone else has already figured all this out and put it in a nice neat little package somewhere I would really appreciate knowing where it is.
You may want to look at the build guides for the F5 or the F6 as the power supply parts and transformer used can change depending on the application. In my F5 and F6 I used outboard bridge rectifiers. So the power supply BOM was reduced to the Caps, resistors, LED's and connectors. The transformer is shown in the build guide.
The small parts are the things that will stop your build in it's tracks. So go through the build guide and work out what you need. Neither amp is difficult but they are more complex than the ACA.
The small parts are the things that will stop your build in it's tracks. So go through the build guide and work out what you need. Neither amp is difficult but they are more complex than the ACA.
sndlvr,
You can order the parts from online component distributors. In which part of the world are you located in?
For a project like the DIY F5 or DIY F6, most people use a toroidal transformer with dual secondaries @ 18V AC, with an ampere rating of rating of 8.33 amps (300 VA) and above.
You will need to be very careful with the AC voltages involved with working with a power supply. The ACA is a beginners project, and uses power bricks, making it easy and safe for the novice DIYer.
The basics you will need as mentioned already is a toroid transformer. Here are two examples of what would work.
AS-3218 - 300VA 18V Transformer - AnTek Products Corp
Or
AS-4218 - 400VA 18V Transformer - AnTek Products Corp
And a universal power supply from the DIYAudio store as seen here.
Universal Power Supply – diyAudio Store
Regards,
Dan
AS-3218 - 300VA 18V Transformer - AnTek Products Corp
Or
AS-4218 - 400VA 18V Transformer - AnTek Products Corp
And a universal power supply from the DIYAudio store as seen here.
Universal Power Supply – diyAudio Store
Regards,
Dan
Thanks Signal, did you find the guidance for building the power supply complete or did you need outside knowledge to know what to do? My problem is I'm just a biologist by training and when Nelson writes about the multiple variations on his circuits it gets over my head really fast. I'm just barely able to read the finished schematic.....but this sure is a lot of fun and the sounds are great that result.
Zman01 I live in northwestern New Jersey. I guess I'm wondering why the DIY Store is missing the opportunity to package and sell these kits in a more complete fashion. With an amp like the F5 that can be configured with different amounts of power they could imaginably go so far as to sell complete kits in the different versions possible.
Dantwomey thanks for the links
and thanks to you all for helpful replys!
Any insights on the pluses and minuses of each amp that might help me choose are welcome.
You know what...I just found out that Antek and its sister company Par-Metal, that makes chassis are located 50 miles from me in NJ! I feel like I just won a lottery 🙂
In addition to transformers ANTEK sells complete power supplies:
Power Supplies - Page 1 - AnTek Products Corp
Is is possible one of these would be appropriate and of suitable quality for the F5 or F6?
It turns out that the Minnesota Audio society bought chassis from Par-metal
Par-Metal
for their group build of the F5. These look to be a less expensive option than the HIFI 2000 units from Italy.
I was able to build the amp using the instructions in the build guide and some common sense. The warnings about the AC voltages are very real. The power supply is the biggest variation from the ACA build that you have to deal with.
The deluxe chassis is helpful as there is a finishing kit at the store that contains Power inlet, RCA and speaker connectors. As well as standoffs for the boards and fasteners needed for the mosfets. You will need to order keratherm insulators from the store or elsewhere.
Build a dim bulb tester, build and test the power supply and then the amp boards. Stop and ask questions before doing something that you are unsure about and use only one hand in the chassis for safety.
I will let someone more experienced answer about the antek power supplies. You can build these amps if you break it into sub assemblies.
My favourite parts supplier is Mouser: Access to this page has been denied.
Another one I've used is Digikey: DigiKey Electronics - Electronic Components Distributor
As noted, walk through the BOM and search for the parts. Learning their search engine and filters gets you started down the path of understanding how parts are spec'ed.
Another one I've used is Digikey: DigiKey Electronics - Electronic Components Distributor
As noted, walk through the BOM and search for the parts. Learning their search engine and filters gets you started down the path of understanding how parts are spec'ed.
Last edited:
sndlvr,
Good to see that you are already on the path of discovery and learning new things. 🙂
On the Antek power supplies, I looked up one model and found that it was a single rail power supply; for F5 or F6 you will need a dual-rail power supply with + and - voltages. Also you will need more capacitor filtering vs the 2 caps that I could see with the Antek product.
On choice of chassis / casing, again the diyAudio Store offerings from HiFi2000 make like easier for the beginner. Specially if you opt for the pre-drilled heat-sinks - these make mounting the PCB and the MOSFETs on to the heat-sinks super easy. Otherwise you will have to drill and tap the threads by yourself, and that is quite a laborious process, and easy to mess up; practice however does make perfect. 🙂
Hi sndlvr,
I recently built the Aleph J more of a newbie than you- I haven't build the ACA. And you're right, the PSU feels like a separate project, made more complicated that it's designed to give lots of options. Lots of options for novices isn't helpful. It's very daunting (and I have an engineering background- not electrical tho'). I tried using the BOM and started trying to build a shopping cart in Mouser, but never felt I knew what I was doing. And some simple questions- like, types of connectors, etc., seemed elusive as well. So I agree, a nice step by step guide as the ACA and kit would be great just to get you going. 6L6's guides are fantastic, comprehensive. Like the reference. But I needed something just one step more basic. And for that, I highly recommend that you check out:
Aleph J build guide for noobs
and its final output, a blog (linked on the first page), that gives step by step instructions, as well a shopping cart at Mouser for everything you need. Now, the shopping cart includes the parts for the Aleph J (and is well annotated: PSU vs amp). So if you want to build the F5 or F6, you'll just modify the cart to keep only the PSU components. I was going to build the F6 just mainly because it had the fewest components which seemed ideal for a noob like myself (which in hindsight I don't think makes that much difference; whether you're stuffing 20 components vs 40 per board seems about the same); but I ended up with the Aleph J largely because of this beginner's build guide; and I read that the Aleph J was highly regarded (altho' some have called the F6 the "final" build...)
Hope that helps. I'm sure you'll do fine, esp if you've already got the ACA under your belt. The PSU isn't all that complicated when you look at it- just need your transformer, a way to mount it, you'll probably choose to use bridge rectifiers as nearly all of 6L6's guides use, and the rest of the PSU's modest component list. Also, there's a YouTube video of someone building the F6 and the Aleph J (search for Audio Implementors) and he has a bit on the PSU too, just to give another resource.
A thought: if I had to do it over again, I'd probably opt for higher capacitance. I chose 18,000uF caps, and I think I would've gone with 22,000. I have some slight hum I've been trying to banish away and the latest I've read is that it might be due to ripple from the PSU. But I really don't know. Remember- newbie here.
Last edited:
A thought: if I had to do it over again, I'd probably opt for higher capacitance. I chose 18,000uF caps, and I think I would've gone with 22,000. I have some slight hum I've been trying to banish away and the latest I've read is that it might be due to ripple from the PSU. But I really don't know. Remember- newbie here.
If you have an audible hum, then increasing the power caps‘ capacity wont change that with those values. Hum problems are nearly always introduced through non-optimal grounding or missing shielding of some sort in the signal path.
If you have an audible hum, then increasing the power caps‘ capacity wont change that with those values. Hum problems are nearly always introduced through non-optimal grounding or missing shielding of some sort in the signal path.
Thanks- I'm not surprised I got the lore wrong... so I've tried most of the standard things: all leads twisted and not too long; kept the speaker, input, and DC supply and mains lines as far from each other as possible; brought mains to the transformer under the floor of the chassis, bound the two rails of the PSU with additional leads (grounds); kept the distance to the star ground from the PSU via the CL-60, close to the ground in the IEC block. These have reduced the hum a little, but it's still there- not noticeable when in use. When nothing's plugged into the inputs, I get a hum, and it's worse when I touch the input lines. As far as I can tell, all the grounds are fine. Now, I don't know if this is indicative of anything, but when I test the resistance between two points that are grounded- such as the ground on the RCA input and say a ground on the PSU, I get a max of 14ohms resistance. I assume that's not enough to cause a problem?
https://www.diyaudio.com/forums/pass-labs/371008-f5-f6-power-supply-guidance.html#post6619309
+1 ^
@sndlvr - The gentleman that put together that guide did a wonderful job, IMO.
Those Antek PSUs are not suitable for this application.
Depending on your level of urgency, my WAG is that there will be a much simpler solution that is similar to the ACA PSU coming to a DIYAudio Store near you in the future. I truly don't know the timing or even IF it will happen, but if you can wait, and if mains voltages are not your bag, then holding off a bit might be worth your while. This particular PSU might be particularly advantageous for an F6 build. I've heard it also works wonderfully with an F5.
I am a horribly impatient DIYer myself, but I thought I'd put it out there.
Enjoy the build!
Edited to fix my reference to the post. Both of lonepine's posts are +1, but I was originally pointing to their recommendation to use the Noob guide as a reference for the parts and build for the PSU.
Last edited:
I remember feeling exactly the same as you after building an ACA and not being able to wrap my head around the PSU. It was by far the hardest part of doing my first non ACA build. I think I spent a good few months trying to figure it out, but I wanted to know how it worked, not just what parts to put in what holes.
There are some great guides and if you look through all of them you will be able to start figuring it out.
This is a new guide Build Guide for noobs
Assembling the PSU
More Recent build guide for F5
Any of 6l6’s guides
Most of this stuff is newish and I didn’t have access to it just a couple years ago.

Thanks- I'm not surprised I got the lore wrong... so I've tried most of the standard things: all leads twisted and not too long; kept the speaker, input, and DC supply and mains lines as far from each other as possible; brought mains to the transformer under the floor of the chassis, bound the two rails of the PSU with additional leads (grounds); kept the distance to the star ground from the PSU via the CL-60, close to the ground in the IEC block. These have reduced the hum a little, but it's still there- not noticeable when in use. When nothing's plugged into the inputs, I get a hum, and it's worse when I touch the input lines. As far as I can tell, all the grounds are fine. Now, I don't know if this is indicative of anything, but when I test the resistance between two points that are grounded- such as the ground on the RCA input and say a ground on the PSU, I get a max of 14ohms resistance. I assume that's not enough to cause a problem?
Getting a hum free amp in DIY is tough if one is not careful to the strict adherence of some key points.
Chassis ground/earth ground/mains ground are “dirty”. You want to never let your analog ground (0 volts ref from source and speaker and PSU “GND”) ever directly touch the “dirty” ground. They can be connected via a ground loop breaker (GLB). Usually a CL60 or 8D-20 NTC and optionally a 22nF MKP 400v film cap. Make sure you never inadvertently connect clean ground to dirty ground where the RCA jacks penetrate the panel. Some lower cost ones don’t have insulator bushings. Use star topology for tying your dirty grounds to a single point on the chassis. Use star topology to tie your 0v analog clean ground.
Tie the heatsinks to chassis ground. Keep your linear trafo as far from the input stage of the amp as possible. Use shielded coax from the RCA to the amp input. Twist all AC lines to reduce emission. Twist all signal lines to reduce pickup. Don’t run the signal wires near or next to the trafo or in parallel to wires from the mains switch.
One of the worst culprits is a mains switch on front panel that requires mains wire to traverse from IEC in back to front and exposing its EMI to all the sensitive low signal wires.
Hope that helps. There are many threads on this in the Solid State forum. Member Bonsai has really studied this and put together some nice guides. Here is one:
How to wire up an Amplifier
Ground Loops
Last edited:
This is a plea for some guidance from the DIY folks. I am new to building and successfully did two ACAs this winter and now am considering an F5 or F6. It seems like the supplies sold by the DIY Audio Store for this are not as neat a package as for the ACA. Notably the Power supply seems to be handled as a separate project and while I have found the BOM spreadsheet for populating the universal power supply circuit board it seems the parts are not available for purchase as a group from DIYAudio. In fact I'm not exactly sure where to purchase them. The BOM as I read it does not seem to include a transformer and I'm wondering if there are other parts missing.
It's getting a bit daunting for a newbie. Is this the way it is or am I missing something? It's ok to tell me I just have to suck it up and take the plunge but if someone else has already figured all this out and put it in a nice neat little package somewhere I would really appreciate knowing where it is.
sndlvr, you've gotten some great advice and pointer to info already. I'll just chime in and say I was recently in the same situation: I had built two ACAs and the nuTube B1 and was slightly intimidated by the less kit-like nature of building an F6.
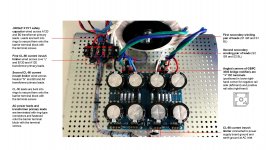
Some parts you will want that are not necessarily mentioned in BOMs.
Bridge Rectifiers to convert AC to DC (2 required, if you don't want to use the diode section of the diyaudio PSU board) I used these. Saves some chassis real estate over the diode board.
Euroblock connectors for the output connections from the PSU board. You could solder these, but I liked the option of screw terminals. Quantity: 4
Barrier terminal block for AC in connection (just like the one in 6L6's build guide!)
Blade connectors (male) to solder on to the input connections to the PSU board (from the outputs of your bridge rectifiers). 4 required.
Safety capacitor. 1 required.
NTC thermistors. 3 required.
Blade connectors (female) for connecting wires to aforementioned bridge rectifiers, the PSU board, speaker outputs, and the IEC AC connections. I would recommend soldering the connections of wires to these connectors rather than relying on crimping. You can always get these at your local hardware store and then pull off the plastic crimp part in order to solder them. The ones spec'd above were great for the speaker terminals and the rectifier. Had to be modified slightly for the IEC and PSU board connections. I'd get 20 or so.
Thermal interface for between MOSFETs and heat sink. 4 required. Buy a couple extra.
3.3k resistors to use with the higher voltage reference zeners that come with the parts kit. 4 required to replace R7 and R8 (see F6 build thread for more info).
My solution to vertically mounting the transformer.
Shrink tubing of various sizes. Dress those wires properly, soldier!
16awg stranded copper wire - green, red, black, and white. Fortunately my local hardware store sells this by the foot.
4" Type 21 cable ties
Misc screws, washers, and nuts for mounting stuff on the chassis - I went to the local hardware store as needed.
Light socket, 100 watt incandescent bulb and spare IEC cord to make a dim bulb tester for power on. The bulb may be the hardest to find part.
Note that these parts are not F6 specific, and the list does not include items mentioned on the diyaudiostore PSU BOM. I probably forgot at least one thing. I think I made a total of four Mouser orders over the course of the project and 3 or 4 trips to the hardware store.
Good luck. Stare at the schematics until you understand them (more or less). Don't be afraid to ask questions in the appropriate build thread. Move slowly and deliberately.
And be safe. Better to ask a question and be thought a fool than to burn your house down or electrocute yourself.
-- Thing
P.S. The F6 sounds amazing.
You know what...I just found out that Antek and its sister company Par-Metal, that makes chassis are located 50 miles from me in NJ! I feel like I just won a lottery 🙂
In addition to transformers ANTEK sells complete power supplies:
Power Supplies - Page 1 - AnTek Products Corp
Is is possible one of these would be appropriate and of suitable quality for the F5 or F6?
It turns out that the Minnesota Audio society bought chassis from Par-metal
Par-Metal
for their group build of the F5. These look to be a less expensive option than the HIFI 2000 units from Italy.
The beauty of the chassis from the diyaudiostore is that the heat sinks come with the necessary mounting holes drilled and tapped. If you can get the specs from the Minnesota Audio Society and get Par-Metal to make you them to spec, have at it. But if you're looking for kit-like, the 4U Deluxe with the backpanel kit is as close as you will get.
Fuses. Don't forget slow blow fuses. Particular rating and size will depend on the amp you choose and the fuseholder you choose. The IEC socket that comes with the backpanel kit takes size 5x20mm. For the F6, I used 2.5A fuses.
Wow, thanks folks for all this good info. I am bookmarking this thread in preparation for the day I actually decide to begin the build, with the nice weather coming to the Northeastern US that could be several months away. But one thing seems certain to me, I've now got the "bug" and its not likely to go away 🙂
- Home
- Amplifiers
- Pass Labs
- F5, F6 Power supply guidance