Hartono said:Thanks for the test result Soongsc , it brings better insight into EnabL potential.
This test result really come from using toothpaste ?? (Just want to make sure 😱 )
Kan Sa Ha Mi Da 😱
Yes. Applied by the same thing nurses use to give shots.
Using a syringe is a great idea... especially for those of us who are wondering how to make the smaller markings on our speakers.
Thanks!
😀
Thanks!
😀

LOWTHER
Here are the final whizzer and main cone pattern ring pics. Notice how close the pattern sits, to the top of the ring radiator triangles. The pattern guide will just sit on top of these points when properly aligned... breathe through a straw or something, and move the ring around with one of the fine pen points as a pick and place on the edge.
I used an A-4 pen tip for all three ring sets. The lower cone blocks might be able to take an A-3 but there will be less maneuvering room and I decided it would just make a bad job worse. You could use an A-5 on the lower whizzer pattern rings as it will be neater and provide slightly less impedance in this sensitive zone.
Remember to wash you pen after every ring set to keep it from getting clogged, run a finger nail between brass and steel pen tip layers to loosen this stringy paint.
The lower cone pattern is really not any fun at all. You MUST use the whizzer outside conic section, applied to the backside of the whizzer. It keeps paint off of the whizzer cone back side and you can actually use the blocks to show you where to drop the pen point
The pen point will need to be partially inserted into the holder to allow enough extension to reach these ring areas. Your blocks are going to be mostly blobs, not to worry, they will still function properly, but the neater they are the better. Keeping the rings concentric to the voice coil will be the real problem and using those printed blocks above and just dropping straight to the cone seemed the easiest way to assure this.
Make sure your eyes are clear, grip the basket and set the cone on an angle so you can see where you are going and proceed slowly. I took a break after each full half section and waited an hour between drivers. This is not fun.
Next comes some listening both in a simple box and out on the floor to see what high frequency and upper mid range patterns... lobing and shrieking peaks, along with dead areas due to too much impedance from the blocks. Then conformal coating to taste.
http://picasaweb.google.com/hpurvine/FinalLowtherPatternRings
Bud
BHD,
Please also consider using the lettering pens shown in the Lowther pictures. These will go a long distance towards allowing you to control the pattern block materials. While Soongsc is using toothpaste for a block material I suspect the qualitative results may be better with something not quite so tall in cross section. I strongly recommend the Poly S flat acrylic enamel paints. although, another person has had success with painter style acrylic paint..... and a syringe with fine tip. The pattern works even if it is not perfectly applied, may in fact work better if there is some deviation from perfection... don't know, I have never done a perfect pattern... but you do want to stay very close to 36 block pairs, in two rows of eighteen each, as large deviations, 10 or more in either direction, affects frequency response at the top end.
Bud
Soongsc,
Let me get this straight. You've used a different amp, room, measuring equipment, drive level and possibly driver for each graph? I don't doubt that the EnABL/ toothpaste treatment has some effect, however I doubt it can be uncovered from the pile of other variables at play here. Since the toothpaste can be easily removed, could you do so and take another measurement with the same test set up? I know it's more work on your part, but it would be for the greater good of proper scientific procedure.
Let me get this straight. You've used a different amp, room, measuring equipment, drive level and possibly driver for each graph? I don't doubt that the EnABL/ toothpaste treatment has some effect, however I doubt it can be uncovered from the pile of other variables at play here. Since the toothpaste can be easily removed, could you do so and take another measurement with the same test set up? I know it's more work on your part, but it would be for the greater good of proper scientific procedure.
maxro said:Soongsc,
Let me get this straight. You've used a different amp, room, measuring equipment, drive level and possibly driver for each graph? I don't doubt that the EnABL/ toothpaste treatment has some effect, however I doubt it can be uncovered from the pile of other variables at play here. Since the toothpaste can be easily removed, could you do so and take another measurement with the same test set up? I know it's more work on your part, but it would be for the greater good of proper scientific procedure.
That is what I will do last. First will be moving of the outter ring to the inner side to see what changes will occur. Then I will add a pattern to the cap to see what the changes are, finally remove all patterns and do a test.
I certainly hope others will also do some tests on different drivers so that we can all learn a bit.
OK, I've been looking at this thread from time to time, but have had trouble understanding the details of the project and process.
Let's see if this is right:
Mostly right? Corrections from Bud?
Question: If doing the treatment on a non circular surface, like a baffle edge - how many pairs of blocks? What size blocks?
Thanks for sharing this with us Bud. I just want to be sure I under stand the process before I try it.
Let's see if this is right:
- Blocks have 2:1 aspect ratio.
- 2 rows of 36 blocks.
- Blocks in 18 pairs per row.
- Block size scaled to fill circle circumference with 18 pairs.
- Gap between blocks in each pair = ??
- Gap between pairs equals length of one pair.
- Rows offset with gap in one row being aligned with block pair in other row. (see photos)
- Gap between rows equals ??
- Paint used is "Polly-S" acrylic paint for scale models. Polly Scale is now owned by Testor. Should be found in any hobby shop. Other acrylic model paints should work.
- Calligraphy pen tip used to apply paint. Choose tip size to correspond with needed block size.
- Treatment applied at edges and/or shape changes.
Mostly right? Corrections from Bud?
Question: If doing the treatment on a non circular surface, like a baffle edge - how many pairs of blocks? What size blocks?
Thanks for sharing this with us Bud. I just want to be sure I under stand the process before I try it.
Michael.
You have almost all of the needed information quite correct. Here are my comments, organized by your bullet points.
The aspect ratio per block is correct
Some times three rows, but only where there might instead need to be four rows. The junction between cone and center dome or dome and noticeable surround. The center row is placed right in the valley of that junction with an offset row on either side, mirroring each other. Otherwise two rows of 36 blocks total.
Blocks in 18 pairs per row, so a triple row would have 54 total blocks.
Blocks are scaled, a pair equals ten degrees, four degrees per block and two degrees for the space between each block in a pair. The block thickness equals this two degree space so the space between two blocks is roughly a square.
The space between rows is also equal to two degrees of space width at the block gap, of the lower pair.
The gap between pairs in a row equals one pair.
The Poly S paints have been my historic choice. The paint seems to stick to all materials and forms a hard surface without shrinkage. This can be very important on delicate woven domes. I use only flat paint because it has the highest solids content and flat clear because it has no pigment in it to soften it. From the activity of some people here on this forum it would appear that I do not have to take so conservative a stance, but it is what I know works.
The A series calligraphy pens work the best, held upside down as is shown in the Lowther treatment pictures, from the link embedded on page 13 of this thread.
Choice of calligraphy pen should be made based upon the pen tip that is narrower than the 1 degree width of the block you are going to draw. You do not need to change pen tips for blocks in different, adjacent rows.
Pattern rows should happen at or near every reflective interruption of a surface, that has transverse waves moving across it. You can do too much here and a surface that has been treated with a row, at one edge, does not need to be treated again till the far edge is reached. You may have treatments around specific discontinuities between these edge treatments, like driver bezels or design cracks but you may not be able to tell if it was really needed.
You need to be aware of some exceptions. For the center of a dome a two row ring should circle a center dot of paint. That dot should be small, 1/16" diameter for a 1 inch dome, up to 1/2 inch for a four inch dome. These two rows are comprised of no more than 12 block pairs total, six per ring and no fewer than six blocks total, or three per ring. Their purpose is to force the energy off of the dome before it can emit from the center point in a beam. I always place a small dot of PVA (Elmer's White Glue) here and put a single coating over the pattern, center dot and nub of PVA.
If you are treating irregular edges or rectangular edges treat them as if they were a diameter of a circle and determine the block size by dividing the edge length into 36 spaces and using the above relationships for block size and spacing. This works well until you get into very large surfaces. You can fake it when you get to corners that are difficult or did not align with the pattern lengths perfectly.
This is not a demanding pattern. You can make all maner of mistakes and pen blobs without causing any harm. Best to try out your hand skills on either plain paper or cheap cones. One interesting thing to do is to treat the dome and inner well of a small cone first. Then hook the driver up to a musical source and begin to draw the outer rings. As you get close to closing the rings listen carefully to the changes. When you do close the rings, the sound will "pop up" off of the cone surface with an almost holographic presentation, that you can hear down into quite easily. Just an amusing thing to do, but you can be certain that driver is properly treated.
Bud
You have almost all of the needed information quite correct. Here are my comments, organized by your bullet points.
Let's see if this is right:
* Blocks have 2:1 aspect ratio.
* 2 rows of 36 blocks.
* Blocks in 18 pairs per row.
* Block size scaled to fill circle circumference with 18 pairs.
* Gap between blocks in each pair = ??
* Gap between pairs equals length of one pair.
* Rows offset with gap in one row being aligned with block pair in other row. (see photos)
* Gap between rows equals ??
* Paint used is "Polly-S" acrylic paint for scale models. Polly Scale is now owned by Testor. Should be found in any hobby shop. Other acrylic model paints should work.
* Calligraphy pen tip used to apply paint. Choose tip size to correspond with needed block size.
* Treatment applied at edges and/or shape changes.
The aspect ratio per block is correct
Some times three rows, but only where there might instead need to be four rows. The junction between cone and center dome or dome and noticeable surround. The center row is placed right in the valley of that junction with an offset row on either side, mirroring each other. Otherwise two rows of 36 blocks total.
Blocks in 18 pairs per row, so a triple row would have 54 total blocks.
Blocks are scaled, a pair equals ten degrees, four degrees per block and two degrees for the space between each block in a pair. The block thickness equals this two degree space so the space between two blocks is roughly a square.
The space between rows is also equal to two degrees of space width at the block gap, of the lower pair.
The gap between pairs in a row equals one pair.
The Poly S paints have been my historic choice. The paint seems to stick to all materials and forms a hard surface without shrinkage. This can be very important on delicate woven domes. I use only flat paint because it has the highest solids content and flat clear because it has no pigment in it to soften it. From the activity of some people here on this forum it would appear that I do not have to take so conservative a stance, but it is what I know works.
The A series calligraphy pens work the best, held upside down as is shown in the Lowther treatment pictures, from the link embedded on page 13 of this thread.
Choice of calligraphy pen should be made based upon the pen tip that is narrower than the 1 degree width of the block you are going to draw. You do not need to change pen tips for blocks in different, adjacent rows.
Pattern rows should happen at or near every reflective interruption of a surface, that has transverse waves moving across it. You can do too much here and a surface that has been treated with a row, at one edge, does not need to be treated again till the far edge is reached. You may have treatments around specific discontinuities between these edge treatments, like driver bezels or design cracks but you may not be able to tell if it was really needed.
You need to be aware of some exceptions. For the center of a dome a two row ring should circle a center dot of paint. That dot should be small, 1/16" diameter for a 1 inch dome, up to 1/2 inch for a four inch dome. These two rows are comprised of no more than 12 block pairs total, six per ring and no fewer than six blocks total, or three per ring. Their purpose is to force the energy off of the dome before it can emit from the center point in a beam. I always place a small dot of PVA (Elmer's White Glue) here and put a single coating over the pattern, center dot and nub of PVA.
If you are treating irregular edges or rectangular edges treat them as if they were a diameter of a circle and determine the block size by dividing the edge length into 36 spaces and using the above relationships for block size and spacing. This works well until you get into very large surfaces. You can fake it when you get to corners that are difficult or did not align with the pattern lengths perfectly.
This is not a demanding pattern. You can make all maner of mistakes and pen blobs without causing any harm. Best to try out your hand skills on either plain paper or cheap cones. One interesting thing to do is to treat the dome and inner well of a small cone first. Then hook the driver up to a musical source and begin to draw the outer rings. As you get close to closing the rings listen carefully to the changes. When you do close the rings, the sound will "pop up" off of the cone surface with an almost holographic presentation, that you can hear down into quite easily. Just an amusing thing to do, but you can be certain that driver is properly treated.
Bud
Michael,
I find I was not entirely clear in one of my paragraphs. So, to keep from raising eyebrows and questions here is the paragraph and the correction.
You need to be aware of some exceptions. For the center of a dome a two row ring should circle a center dot of paint. That dot should be small, 1/16" diameter for a 1 inch dome, up to 1/2 inch for a four inch dome. These two rows are comprised of no more than 12 block pairs total, six pairs per ring and no fewer than six block pairs total, or three pairs per ring. Their purpose is to force the energy off of the dome before it can emit from the center point in a beam. I always place a small dot of PVA (Elmer's White Glue) here and put a single coating of Gloss Coat conformal coat over the pattern, center dot and nub of PVA.
Plus, you are entirely welcome to use this information to explore how speakers should sound. It really is just a removal of interferences that cloud and cover what, theoretically, the drivers should sound like. Once you have a treated pair and have become used to their clarity you will be amazed at how good or bad your other equipment is. Mostly good, by the way. The only real problem I have found with most commercial equipment is a lack of attention to ground side electrons and how plentiful they are on PCB's that are single side traces without poured ground planes. Once that detail is overcome almost everything sounds just as it should, like music.
Enjoy, I have been doing so for 30 plus years, so now it is your turn, and the turn of everyone else confident enough to try it. But please, on cheap speakers first, OK?
Bud
I find I was not entirely clear in one of my paragraphs. So, to keep from raising eyebrows and questions here is the paragraph and the correction.
You need to be aware of some exceptions. For the center of a dome a two row ring should circle a center dot of paint. That dot should be small, 1/16" diameter for a 1 inch dome, up to 1/2 inch for a four inch dome. These two rows are comprised of no more than 12 block pairs total, six per ring and no fewer than six blocks total, or three per ring. Their purpose is to force the energy off of the dome before it can emit from the center point in a beam. I always place a small dot of PVA (Elmer's White Glue) here and put a single coating over the pattern, center dot and nub of PVA.
You need to be aware of some exceptions. For the center of a dome a two row ring should circle a center dot of paint. That dot should be small, 1/16" diameter for a 1 inch dome, up to 1/2 inch for a four inch dome. These two rows are comprised of no more than 12 block pairs total, six pairs per ring and no fewer than six block pairs total, or three pairs per ring. Their purpose is to force the energy off of the dome before it can emit from the center point in a beam. I always place a small dot of PVA (Elmer's White Glue) here and put a single coating of Gloss Coat conformal coat over the pattern, center dot and nub of PVA.
Plus, you are entirely welcome to use this information to explore how speakers should sound. It really is just a removal of interferences that cloud and cover what, theoretically, the drivers should sound like. Once you have a treated pair and have become used to their clarity you will be amazed at how good or bad your other equipment is. Mostly good, by the way. The only real problem I have found with most commercial equipment is a lack of attention to ground side electrons and how plentiful they are on PCB's that are single side traces without poured ground planes. Once that detail is overcome almost everything sounds just as it should, like music.
Enjoy, I have been doing so for 30 plus years, so now it is your turn, and the turn of everyone else confident enough to try it. But please, on cheap speakers first, OK?
Bud
LOWTHER
Ok all 49 of you fanatics who have down loaded the pattern sheets and have or are planning to mangle your Lowthers, here is the real scoop.
The faces have all been EnABLed as shown and now a coat of Gloss Coat has been applied. The Whizzer received a fine brush coat of uncut Gloss Coat, over the lower rings, just above the triangles of the ring radiator and down the cone surface between the triangles, under strong lighting. Very little GC (Gloss Coat) spread up on the triangles, but their joint edges were coated.
Then an equally thin coat was applied over the upper whizzer and flange patterns.
This was left to dry and I used a 3/8" flat sable, area brush for water color washes, to coat the lower cone. Brush strokes for this, and all other surfaces were from the inner diameter straight out to the outer diameter. The flat area brush was tamped and squeeze drawn across the bottle lip on both sides before applying the GC onto the cone. The radial strokes do leave a little bubbled residue right at the suspension surround, so a little circular sopping up was done there. I did go over all areas three times with the same brush load (about 1/8 th of the cone per load) just to insure even coating. This is not a porous paper so the GC does glide on very easily.
After an hour of set up I listened. The driver set up is a very transparent one and the final amps are George Wrights new and sensational 7.5 watt 300B SE monoblocks. My transformers of course. These things really pour out musical beauty and have an extremely wide frequency response with uniform transients from top to bottom, so a good match for a full range driver.
After listening a bit, with the speakers open on the carpeted floor, I became convinced that the Whizzer was still a bit corrupted and applied a GC coat over the area from the bottom of the lower EnABL ring to the final edge of the cone. Again this was with the 3/8th's flat brush, very well drained on both sides so the build up was absolute minimum.
I left them overnight to dry and fully set up, takes 24 hours, and listened again this afternoon..... Oh my.
Absolute pin point precision location of everything in the sound field. Full frequency response, at least to 13k, across a 120 degrees with a slightly louder 4k and up region directly in front of the drivers. The Whizzer is just a tad brighter and ever so slightly faster than the cone, so the cone may need another coating, but I will listen further before applying this, as putting the, hot air balloon shaped, diffuser blocks in place did balance the sound very effectively.
The null skirt, remember these are still open on the carpet, is swept back to a 90 degree included angle across the back of the cone with exceptional frequency balance and clarity. Would make a VERY good open baffle driver, just as it is, for 800 hz and up.
Problems:
1. a slight IM distortion, primarily a time issue, at around 2 khz that causes a slight clouding of massed soprano voices. Either a cone speed issue or a combined issue with cone and the whizzer flange.
Does anyone have any materials experience with damping this flange edge on the back side? I am leaning toward rubber cement thinly applied and coated with GC here but am wide open to suggestions from those with experience.
2. Lots and Lots of very clear performance on a gently rising slope to 16 k and perhaps beyond. Is this the normal state of affairs? There are no peaks that cause shrillness, nor dropouts dulling stringed instruments. Right hand piano work is very correct, all of the edges and releases show up in the correct spots.
Overall I am quite impressed with these speakers. Without a center diffuser to balance out what sounds like a very thin peak at about 8 k they are slightly too bright, but not particularly directional. With the diffuser installed there is none of that and they are very flat and without lobing across a very wide included angle. At least 120 degrees before the lower midrange begins to fade. Again, no baffle to help out here, with nulling or helping the cone to couple with, and extend the lower mids to 180 degrees.
I do not think that an application of PVA and felt to the back of the cone or whizzer is warranted. Nor do I think a Gloss Coat on the back side of either is needed. Possibly another coat to the front side of the cone and remotely possible that a damping material applied to the back of just the whizzer flange would aid.
Basically a very young and lively sound with great depth of detail, excellent blending of massed choral groups, with the ability to clearly separate a group of soprano's from a nearby alto horn, while both are at fortissimo levels.
I will listen to jazz and orchestral works a bit later... transformers are calling and so is the grass.
Bud
LOWTHER
Now we get to the "treat to taste" part of this preaching. Those of you who have been following along and noted my rising high end comment? Well, that is what ALWAYS happens when you treat a cone driver and balance the thickness of the boundary layer coating on both cone and whizzer / dust cap. Remember, we are dealing with relative impedances here. The Lowther responds exactly as it should with a tilted high end and pinched and pretty colorless mids and who knows about the bass, these are still on the carpet.
Since we are dealing with impedance manipulation and we have more than enough high end, all we need to do is reduce the impedance on the large cone and "suck" energy from the whizzer. The goal will be to have a balanced hemisphere of sound that has the same amount of musical expression and color at 120 degrees off axis that it has directly on axis. I will leave the hot air balloon diffusers in place for this.
The second coat of Gloss should be done as follows. Dip the brush and tamp and drag drain both sides, just as you did on the first coating. Then, using a sinusoidal stroke, cover one half of the cone. About six to eight waves will do, then, go right back over the cone, after you have flipped the brush over. This will spread the rest of the GC on the cone and then you need to make some circular swipes around the entire half of the cone, maybe three different circumferences, to cross hatch the GC material and allow it to make a smooth coating.
Do this to the other half of the cone and leave it to dry. You have just applied approximately 1/4 the amount of material you applied on the first coat. You can also lightly apply an amount of GC on the beveled surface of the surround at this time, just at the junction of the cone and surround gluing surface and up on the angled portion of the surround, but not onto the suspension portion. Wait about 4 hours and listen. You will notice that while there is still a more expressive zone that is limited by the angles of the whizzer cones surface, and you had better be doing this all in stereo by the way, there is now quite a bit more information, sort of filling in behind and below the high frequencies..hmmmmm.
After an entire 24 hour setting up period apply a third coat of GC just as you did the second, except rotate the halves by a quarter circle to make sure the join from the second coat is covered smoothly. Again wait four hours and listen. Quite a bit more information is now available and the high frequencies are almost enveloped as just part of the musical event.
Again, this is typical of ALL cone speaker behavior, even if the single coated portion is just a dust cap, it works exactly like the whizzer and, before the impedance to the larger cone is dropped, most of the energy from the voice coil is going to attempt to exit from the whizzer / dust cap.
I now have three coats on the cone front face, one coat on the whizzer front face and nothing done to the back sides of either except some incidental GC applied to the base of the Whizzer cone backside, right where it joins the main cone. Ignore this.
The sound, lying on the rug pointing straight up, is very well balanced with just a small amount of "better" imaging from within the included angles of the whizzer cones. A slightly less colorful sound extends from main cone angle left to main cone angle righ and from the other two "sides" also. This is almost finished. When we have an almost imperceptible change, as we move our ears into the whizzer or dust cap zone, we will be finished.
Applying the speakers to a baffle of almost any size and type should do the rest of the blending needed. You will notice that, even on the floor, being directly in front of one cone does not present a "hot spot" any different from any other placement of your ears, within the included angle of the right and left whizzer cone angles.
You can aid and abet the sound stage width by VERY LIGHTLY coating the front side only of the outer suspension. Almost a "dry brush" technique here. The GC (Gloss Coat) is quite flexible in thin coats so you will not stiffen the surround with a single light coat that does a poor job of covering the material. You are just slightly decreasing the impedance here and giving the energy, still rising into the pressure wave being created in the air, a bit more time to do so.
I am sure that the last LOWTHER post will be tomorrow and I will have decided to apply a fourth coat of the Gloss Coat material on the cone front only, but wait before you push ahead and let me make sure that the full curing time doesn't quite provide all I am looking for. These are already pretty extraordinary sounding. Extremely accurate and even, with no apparent loss of information, at all, due to storage or nulling. I can see why people buy these devices and then wrestle with them, trying to get what they promise is available, out of them.
Bud
I'm getting the feeling that EnABL process id not giveing good measurement results and thus the changed subject?
soongsc,
No, actually your measurements are quite nice. They also show some encouraging trend lines, even if they are not the "last word" in scientific rigor...according to some of those who are on the side lines watching the game, anyway.
The just finished Lowther would have been a useful driver to test. Especially with off axis energy plots, through the one stage of EnABL and three stages of conformal coating treatment. The differences were among the most severe I have experienced.
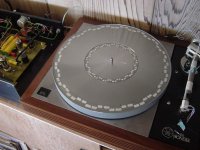
The Litz wire bit is more to fill time while you and I worked on differing portions of this growing body of knowledge. Speaking of which, ultrakaz has taken a next step and treated the platter of his Linn Sondek.
His comment is that, with a fiber mat and some sort of round paper pad with offset cork rings on both sides, between the metal platter and the records and, with an EnABL pattern where I mentioned it would do the most good, on the platter surface, he is experiencing a large reduction in motor and bearing noise translated to his cartridge and amplified by the phono preamp. A greater reduction of this noise than with any other sorbethane, hard rubber, soft foam or many other kinds of treatments, including the fiber mat and paper / cork without the EnABL pattern, on the platter. He is now asking about CD's, capacitors and is eying the windows, doors and walls.....
So there is still much to test, looking for influences that seem to appear from EnABL only. I do hopefully await your test series. It will be educational.
Bud
No, actually your measurements are quite nice. They also show some encouraging trend lines, even if they are not the "last word" in scientific rigor...according to some of those who are on the side lines watching the game, anyway.
The just finished Lowther would have been a useful driver to test. Especially with off axis energy plots, through the one stage of EnABL and three stages of conformal coating treatment. The differences were among the most severe I have experienced.
The Litz wire bit is more to fill time while you and I worked on differing portions of this growing body of knowledge. Speaking of which, ultrakaz has taken a next step and treated the platter of his Linn Sondek.
His comment is that, with a fiber mat and some sort of round paper pad with offset cork rings on both sides, between the metal platter and the records and, with an EnABL pattern where I mentioned it would do the most good, on the platter surface, he is experiencing a large reduction in motor and bearing noise translated to his cartridge and amplified by the phono preamp. A greater reduction of this noise than with any other sorbethane, hard rubber, soft foam or many other kinds of treatments, including the fiber mat and paper / cork without the EnABL pattern, on the platter. He is now asking about CD's, capacitors and is eying the windows, doors and walls.....
So there is still much to test, looking for influences that seem to appear from EnABL only. I do hopefully await your test series. It will be educational.
Bud
Attachments
Ahem
Bud ,
Remember that those are going into front 204 Hz Azura horns which will equalize low-mid and highs. Unfortunately without putting them in the horn nobody can tell how they will sound. Now I realize I should have sent the horns too , oh well 😉
best regrads
Bud ,
Remember that those are going into front 204 Hz Azura horns which will equalize low-mid and highs. Unfortunately without putting them in the horn nobody can tell how they will sound. Now I realize I should have sent the horns too , oh well 😉
best regrads
Hi Limono,
Glad to see you have come in from the shadows. This is the guy with enough courage to just send me a pair of DX4's, with the open ended instruction of "make them as good as you can" and charge him what it costs. Brave man.
I have concluded the Lowther process. Three coats on the large cone is perfectly adequate. This means that Lowther DX 4's fall right into the main stream for treatment steps.
I have to say though, these are pretty special devices. They have a sound exactly equivalent to an open, bare, ribbon, in transient characteristic, but it goes right down to 80 Hz or so. Piano is lush or scary vital. Individual key strokes are without loss, from strike to end of decay, regardless of what else is also happening and decaying.
Massed chorals are expansive and always effortless, complex orchestral work is equally effortless. Oddly, Jazz is interesting, fluid and almost clinical. Perhaps just a little too much high frequency information? I may use a Q tip and 99% alcohol and remove some of the Gloss Coat from over the first or lower ring on the whizzer to see how that affects balance. But, this clinical complaint isn't meant to indicate any lack of involvement or musical attractiveness, just the amount of information and it's clarity.
I am very interested in how they will sound in your Le Cleac'h horn so please let us know, after you get them set up and balanced.
This has been fun, I wonder what's next.... would be nice to work on something that the Mamboni treatment could be applied to also. I concluded that here, it could cause unknown problems, in the radiation pattern of an obviously sensitive device. Maybe, if I ever have a pair of Lowthers of my own, I will experiment, but not with other peoples toys.
Bud
OK
Now I know I should have stayed in the shadow .I will post my impressions but since my audio memory is very short term there won't be much before and after comparison .I have to say that I was worrying a little about the look of treated drivers after Bud had warned me but actually they look more than acceptable ,just like an art-deco design and should compliment the cab perfectly.
A word about litz wire. I have Bud's interconnect cable (witch cheap Rat-shack RCA's) and compared it to my friends $500 ribbon interconnect (I think it was Tara Labs but don't remember ).Litz had a very direct detailed midrange ,ribbons had a stage depth, voices and instruments "hanged in the distant air" -typical Hi-end presentation which i find very annoying but my friend likes. Regards

BudP said:soongsc,
No, actually your measurements are quite nice. They also show some encouraging trend lines, even if they are not the "last word" in scientific rigor...according to some of those who are on the side lines watching the game, anyway.
The just finished Lowther would have been a useful driver to test. Especially with off axis energy plots, through the one stage of EnABL and three stages of conformal coating treatment. The differences were among the most severe I have experienced.
The Litz wire bit is more to fill time while you and I worked on differing portions of this growing body of knowledge. Speaking of which, ultrakaz has taken a next step and treated the platter of his Linn Sondek.
His comment is that, with a fiber mat and some sort of round paper pad with offset cork rings on both sides, between the metal platter and the records and, with an EnABL pattern where I mentioned it would do the most good, on the platter surface, he is experiencing a large reduction in motor and bearing noise translated to his cartridge and amplified by the phono preamp. A greater reduction of this noise than with any other sorbethane, hard rubber, soft foam or many other kinds of treatments, including the fiber mat and paper / cork without the EnABL pattern, on the platter. He is now asking about CD's, capacitors and is eying the windows, doors and walls.....
So there is still much to test, looking for influences that seem to appear from EnABL only. I do hopefully await your test series. It will be educational.
Bud
The distance between the patterns rings are not the same. If this also works, I'm sure any broken pattern will work. Actually it looks more cosmetic and a chatting subject. But mat design is a much different beast. Soft mats don't provide the proper support to extract signal details from LPs. Treating a mat like that provides just a different sound balance due to change in the vibration modes.
- Status
- Not open for further replies.
- Home
- Loudspeakers
- Multi-Way
- EnABL Processes