Refurbishment Complete, building new oak encasement.
Hi guys,
The re-cap, refurb and clean-up is done.
Basically I've done:
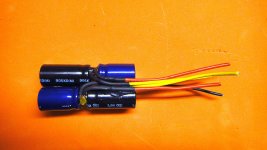
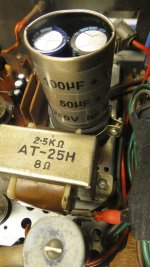
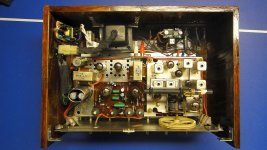
1. Recapping all electrolytic caps. I've made one new metal encasement made of nickel plated tube and use old bracket to hold it. I've put inside all 4 power filtering caps exactly as the original. Caps are 250V rated and made by Nichicon. Then have replaced the other ones. Good that I've done that - ALL of them were bone dry - even 100uF caps - when measured - meter showed less than 1 uf...😱
2. Cleaning up the pots, switches, connectors and tube sockets with heavy duty industrial contact cleaner. I've carefully cleaned up the residue, though. Now all pots move clean and no cracking noise anymore. 😛
3. Replaced the rectifier diode with nice Vish ay P600M (http://www.vishay.com/docs/88692/p600a.pdf ) 6A/1KV, low-noice with 0.00033/22KV ceramic cap in parallel (I'll replace it later with 10 nF/1500V, I just didn't find high-voltage one at my parts).
4. Replaced tow 6.3V AC bulbs with blue LED lights.
The result - now I have 100% functional receiver. Stereo-decoder STARTED WORKING (I guess the dry cap was the reason after all) The sound is crystal clear and well-settable with pots and definitely more powerful. It pumps the two BOSE 301 enough to fill my lab...
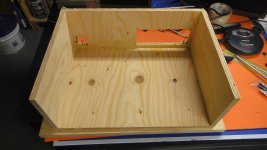
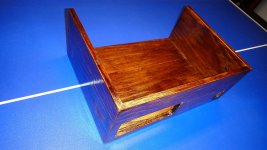
Now I am building the encasement - made of nice 1/2" plywood and covered with natural oak veneer. It's assembled, holes are made, cracks and connections - filled. It's drying out now and ready to get the unit in...
I have made photos of the process and will upload them when done.
Will keep in touch, thank you all for the support!...
Hi guys,
The re-cap, refurb and clean-up is done.
Basically I've done:
1. Recapping all electrolytic caps. I've made one new metal encasement made of nickel plated tube and use old bracket to hold it. I've put inside all 4 power filtering caps exactly as the original. Caps are 250V rated and made by Nichicon. Then have replaced the other ones. Good that I've done that - ALL of them were bone dry - even 100uF caps - when measured - meter showed less than 1 uf...😱
2. Cleaning up the pots, switches, connectors and tube sockets with heavy duty industrial contact cleaner. I've carefully cleaned up the residue, though. Now all pots move clean and no cracking noise anymore. 😛
3. Replaced the rectifier diode with nice Vish ay P600M (http://www.vishay.com/docs/88692/p600a.pdf ) 6A/1KV, low-noice with 0.00033/22KV ceramic cap in parallel (I'll replace it later with 10 nF/1500V, I just didn't find high-voltage one at my parts).
4. Replaced tow 6.3V AC bulbs with blue LED lights.
The result - now I have 100% functional receiver. Stereo-decoder STARTED WORKING (I guess the dry cap was the reason after all)
The sound is crystal clear and well-settable with pots and definitely more powerful. It pumps the two BOSE 301 enough to fill my lab... Now I am building the encasement - made of nice 1/2" plywood and covered with natural oak veneer. It's assembled, holes are made, cracks and connections - filled. It's drying out now and ready to get the unit in...
I have made photos of the process and will upload them when done.
Will keep in touch, thank you all for the support!...
The result - now I have 100% functional receiver.
Well done! An excellent result. Now, if only you'd kept the original lamps instead of using LEDs.... (personal taste, I know... 😉 )
Look forward to the photos.
Thanks, 12E1!Well done! An excellent result. Now, if only you'd kept the original lamps instead of using LEDs.... (personal taste, I know... 😉 )
Look forward to the photos.
Don't worry about the bulbs - they were gone anyways, I've just broke the glass and use the socket to make LED ones. I think you're right - blue color and warm dark oak don't go together well, I' think I'd set the LED to warm white and keep it this way.
BTW - I've already ordered two 1 1/2" x 1 1/2" old-fashioned VU-Meters, similar to this:
An externally hosted image should be here but it was not working when we last tested it.
but with warm-white backlight. I am thinking of installing them on the front panel, on left and right side where "FM / AM" labels are (there is exactly 1 1/2" space there).
I'll see how it'll fit first, of course, before start cutting... ;-)
Receiver System - Complete!
Hi folks,
Finally I've completed the initial receiver mods/restoration and it's enclosure.
Besides already described items I've completed all the mechanical work - finished enclosure with main unit mount, bezel mount, power transformer and 110V parts as well as connector module. The enclosure has been made by 1/2" plywood, filled with wood kit, then sanded and covered with natural oak veneer, sanded again and stained and lacquered.
I've also added 12V switched power supply and 12V-5V DC-to-DC switching converter. Having clean separate 12V and 5V allowed me to secure power for future LED lighting and add-ons, and 5V allowed me to have power for USB iPhone/Mobile dock and charger as well as Bluetooth receiver (connection provided through internal USB connector and internal 3.5mm jack).
The receiver now has full modern sets of inputs - Line In (RCA), Line In (3.5mm stereo jack), Bluetooth V2.0+EDR, supports A2DP V1.2 receiver and USB iPhone/Mobile dock.
Power - I've get rid of the "death-caps" and installed standard 15A grounded computer-type power connector. Original breaker and phone power outlet are kept and used for the 12V switch power module.
I kept the original design as much as I can and excluding the power transformer module I had to disassemble - everything else is original and whole receiver can be literally removed in two minutes... 😛
As I promised -I am attaching bunch of photos for the progress.
Two things (for now...) need to be done to complete the project:
1. Adding two VU-meters (if I decide they will go nice with the enclosure).
2. Top - I'd make probably nice stainless/aluminum frame with a big opening in the middle for cooling/observing the tubes, but details - later, when I figure them out... 🙄
Once again - thank you everybody for the help!...
Cheers!
Attachments
-
 Big Cap - Moded.jpg800.3 KB · Views: 137
 -
 Big Cap Closeup.jpg622.8 KB · Views: 125
 -
 Enclosure - Raw 1.jpg551.6 KB · Views: 123
 -
 Enclosure - Raw 2.jpg609.3 KB · Views: 121
 -
 Enclosure - Ready 2.jpg709.7 KB · Views: 79
 -
 Top View.jpg674.1 KB · Views: 97
 -
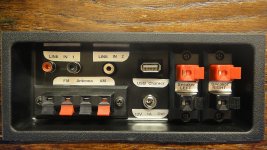 Connector Back Closeup.jpg747.9 KB · Views: 93
 -
 Front 1.jpg603.6 KB · Views: 95
 -
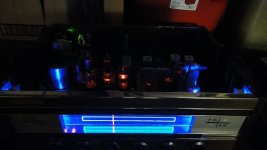 Night 1.jpg637.1 KB · Views: 97
 -
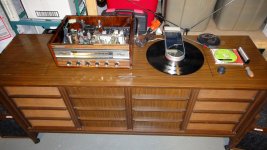 Whole System.jpg939.7 KB · Views: 94
Hi folks,
Finally I've completed the initial receiver mods/restoration and it's enclosure.
Nice!
You might just find that the AM reception is affected by that DC-DC converter. It will partly depend on its switching frequency, but it's quite common for them to operate within the AM band frequency range.
That aside, it looks very good. Well done.

12E1, thanks!
As usual - you're right. When the signal is strong - AM reception is OK, but for weak signals - it's really noisy...
Never though about the AM, mostly because I never use it. Noted, though, I'll either use good old 7805 instead of the switcher (with good old TO-3 package) or add small switch to turn off the DC-to-DC.
FM shows no difference.
Good catch! 🙂
Cheers!
As usual - you're right.
When the signal is strong - AM reception is OK, but for weak signals - it's really noisy...Never though about the AM, mostly because I never use it. Noted, though, I'll either use good old 7805 instead of the switcher (with good old TO-3 package) or add small switch to turn off the DC-to-DC.
FM shows no difference.
Good catch! 🙂
Cheers!
You may need to provide more ventilation in your cabinet you built. I would guess about 100W of heat to vent. Lots of 3/8 inch holes on the bottom plate, and on the back as well should help. I'm assuming you were going to have a top lid as well.
wa2ise, thanks for the note, but I already did some measurements with IR therm and I think I don't need extra cooling or holes.
I will have only decorative OPEN lid (some kind of metal net on a nice frame), so overall you can count it as open enclosure.
Original power transformer is rated for 80W, so you're dead-on the 100W mark (adding 12V/1.5A extra source). Practically 90% of internal "content" is well-contained in nice original metal chassis, which excellently dissipate heat.
Temperature measurements showed that temperatures of all the sides and bottom of wooded enclosure are just couple of degrees higher than ambient, meaning - all heat is naturally dissipated through the top.
🙂
- Status
- Not open for further replies.
- Home
- Amplifiers
- Tubes / Valves
- DuMont Stereo Tube Console late 50's - What to do?