Hi,
Structural acoustic use has nothing much to do with its use in a box.
I suspect it may be above the optimum stuffing density, and your
best off simply lining the box than filling a large chunk of it.
rgds, sreten.
Structural acoustic use has nothing much to do with its use in a box.
I suspect it may be above the optimum stuffing density, and your
best off simply lining the box than filling a large chunk of it.
rgds, sreten.
Alright 🙂 I'll try lining the walls and then have the option of adding the polyester kind before fastening the driver.Hi,
Structural acoustic use has nothing much to do with its use in a box.
I suspect it may be above the optimum stuffing density, and your
best off simply lining the box than filling a large chunk of it.
rgds, sreten.
/Anton
Some work has been done today:
1. Larger holes + new dust filter.
2. Simulation of flow with larger holes.
3. I removed some of the stone wool damping.
1. Larger holes + new dust filter.

All outlet holes are now connected to form slots (still angled though). Added two more holes as well to make the slot longer.

Added another row of inlet holes (half as many) and connected them using a sabre saw.
2. Simulation of flow with larger holes.
The flow is more than doubled to 27 m^3/h which corresponds to an air temperature at the outlet of 36 C at idle (100 W) and 69 C at full load (300 W). Acceptable I hope... Otherwise I'll get other fans 🙂 I have no heat losses in the model except airflow and some heat will be lost by conduction/convection through the wood, which will help.
3. I removed some of the stone wool damping.
Instead of solidly packing the entire compartment I have now only lined the walls:

Top and bottom is only lined in the back compartment to reduce restriction of airflow.

All panels are adhered to the walls by silicone for two reasons:
1. So they won't fall down.
2. Maybe the will add a little losses and thereby reduce panel vibrations.

The cables have been connected.
Tomorrow I will hopefully add the internal stiffening beams and then join everything together (thereby closing the subwoofer compartments).
/Anton
Edit: Oh, and I moved inside. Mainly because it was getting a bit crammed in the in the storage room, but also to make sure that the wood reaches correct temperature and moisture content before joining the different pieces together. It's however not very popular with the boss...
1. Larger holes + new dust filter.
2. Simulation of flow with larger holes.
3. I removed some of the stone wool damping.
1. Larger holes + new dust filter.
All outlet holes are now connected to form slots (still angled though). Added two more holes as well to make the slot longer.
Added another row of inlet holes (half as many) and connected them using a sabre saw.
2. Simulation of flow with larger holes.
The flow is more than doubled to 27 m^3/h which corresponds to an air temperature at the outlet of 36 C at idle (100 W) and 69 C at full load (300 W). Acceptable I hope... Otherwise I'll get other fans 🙂 I have no heat losses in the model except airflow and some heat will be lost by conduction/convection through the wood, which will help.
3. I removed some of the stone wool damping.
Instead of solidly packing the entire compartment I have now only lined the walls:
Top and bottom is only lined in the back compartment to reduce restriction of airflow.
All panels are adhered to the walls by silicone for two reasons:
1. So they won't fall down.
2. Maybe the will add a little losses and thereby reduce panel vibrations.
The cables have been connected.
Tomorrow I will hopefully add the internal stiffening beams and then join everything together (thereby closing the subwoofer compartments).
/Anton
Edit: Oh, and I moved inside. Mainly because it was getting a bit crammed in the in the storage room, but also to make sure that the wood reaches correct temperature and moisture content before joining the different pieces together. It's however not very popular with the boss...
Last edited:
Stiffening beams added. Main purpose is to make sure that the sheets don't sag, I want it to look straight.

I see why the boss wants me done ASAP...

Front beam is 27 mm thick oak, 57 mm high. Should be stiff enough.

Rear beam is only 19 mm thick fir, 30 mm high. Main purpose is to serve as an edge to attach the backside of the electronics enclosure. The space between the fir and the MDF will be used to route cables.
Not very interesting updates (sorry). They'll hopefully get better soon 🙂
/Anton
I see why the boss wants me done ASAP...
Front beam is 27 mm thick oak, 57 mm high. Should be stiff enough.
Rear beam is only 19 mm thick fir, 30 mm high. Main purpose is to serve as an edge to attach the backside of the electronics enclosure. The space between the fir and the MDF will be used to route cables.
Not very interesting updates (sorry). They'll hopefully get better soon 🙂
/Anton
The stiffening beams are a must! Our long entertainment center base is warped because the manufacturer didn't think to make the support beefy enough.
Glued!
The bottom oak sheet's been glued to the rest:


As you can see it looks a lot more brown than grey due to difference in light temperature (outside vs inside). The camera slightly exaggerates the red though, it was hard finding a white balance setting that captured it correctly.
Next step: routing the holes for 2 x Seas L26ROY.
/Anton
The bottom oak sheet's been glued to the rest:
As you can see it looks a lot more brown than grey due to difference in light temperature (outside vs inside). The camera slightly exaggerates the red though, it was hard finding a white balance setting that captured it correctly.
Next step: routing the holes for 2 x Seas L26ROY.
/Anton
Holes routed
Now I've routed the holes for the drivers.


Sorry for crappy phone pic.
I'm not sure how to chamfer the inside of the hole yet. Maybe it's easiest to just do it with a tilted sabre saw, the precision is not very important on the inside 🙂
/Anton
Now I've routed the holes for the drivers.
Sorry for crappy phone pic.
I'm not sure how to chamfer the inside of the hole yet. Maybe it's easiest to just do it with a tilted sabre saw, the precision is not very important on the inside 🙂
/Anton
Eigenfrequency analysis
I thought you might like this kind of dorkery...
To make sure that the panel vibrations of the subwoofer enclosures doesn't cause vibrations in the electronics compartment I did an eigenfrequency analysis.
First eigenfrequency:

Second:

Third:

Fourth:

Fifth:

Sixth:

...
Eleventh:

...
Seventeenth:

The first one that has clear bending of MDF-walls. They do however move together (same direction) which is not what happens when the over/under pressure flexes the walls.
...
Tjugonde:

First mode that has bending of MDF and that it is reasonable to believe that it is caused by a pressure load.
Conclusion: Vibrations that are due to pressure in the MDF compartment and might spread to the rest of the media console have frequencies above 800 Hz. The intended use is below 200 Hz -> ok.
/Anton
I thought you might like this kind of dorkery...
To make sure that the panel vibrations of the subwoofer enclosures doesn't cause vibrations in the electronics compartment I did an eigenfrequency analysis.
First eigenfrequency:
Second:
Third:
Fourth:
Fifth:
Sixth:
...
Eleventh:
...
Seventeenth:
The first one that has clear bending of MDF-walls. They do however move together (same direction) which is not what happens when the over/under pressure flexes the walls.
...
Tjugonde:
First mode that has bending of MDF and that it is reasonable to believe that it is caused by a pressure load.
Conclusion: Vibrations that are due to pressure in the MDF compartment and might spread to the rest of the media console have frequencies above 800 Hz. The intended use is below 200 Hz -> ok.
/Anton
First measurements!
I've done my first impedance measurements ever. Help me understand what it means!
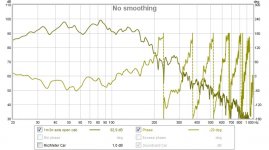
Left subwoofer:

Right subwoofer:

I followed this guide to use REW to make measurements:
Impedance Measurement
Does it look good? Why is there so much difference (40 vs 42 Hz)?
The speakers are not "run in" (never played).
/Anton
I've done my first impedance measurements ever. Help me understand what it means!
Left subwoofer:
Right subwoofer:
I followed this guide to use REW to make measurements:
Impedance Measurement
Does it look good? Why is there so much difference (40 vs 42 Hz)?
The speakers are not "run in" (never played).
/Anton
And a few pics
Now it's in the right position:


The colors in this pic is closest to the real thing.
I still haven't ordered an amplifier, so I'll connect a TPA3116 for testing.
/Anton
Now it's in the right position:
The colors in this pic is closest to the real thing.
I still haven't ordered an amplifier, so I'll connect a TPA3116 for testing.
/Anton
Measurements done with UMIK-1:

Near field (~15 cm) measurement of right speaker.

Comparison of left vs. right speaker. Left speaker is close to two boundaries (walls) which I assume is the reason for the difference in response.

Background noise in sofa.

The three seats in the sofa and in the chair with right speaker playing.
/Anton
Near field (~15 cm) measurement of right speaker.
Comparison of left vs. right speaker. Left speaker is close to two boundaries (walls) which I assume is the reason for the difference in response.
Background noise in sofa.
The three seats in the sofa and in the chair with right speaker playing.
/Anton
Very nice Onni!
Now after a while, what do you think about the result?
And also, did you finalize the LR "tube-speakers" as well? (those you thought of in another thread here)
//Znitz
Now after a while, what do you think about the result?
And also, did you finalize the LR "tube-speakers" as well? (those you thought of in another thread here)
//Znitz


I'm curious; do the subs make any of the equipment on, or the candles/flowers etc on top, rattle? Or is it not a problem?
I'm considering a similar concept, but I'm worried about the subs making the piece of furniture useless for other things like storage etc...
I'm considering a similar concept, but I'm worried about the subs making the piece of furniture useless for other things like storage etc...
Hi!I'm curious; do the subs make any of the equipment on, or the candles/flowers etc on top, rattle? Or is it not a problem?
I'm considering a similar concept, but I'm worried about the subs making the piece of furniture useless for other things like storage etc...
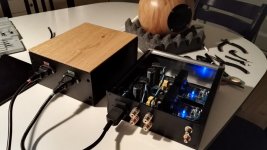
Sorry I didn't respond sooner... I didn't know as I had no amplifier with enough oumph. Today I finished a 2 x 300 W IRS2092 (L15D-PS):

The wooden box contains a 600 VA 40+40 V toroidal transformer, first time I'm making an amp using that. It's making a slight humming noise, is that something that needs to be adressed? I probably won't hear it when it's in the media console.
Hopefully I'll have time tomorrow to make some measurements at decent levels.
/Anton
Attachments
Measurements at high level
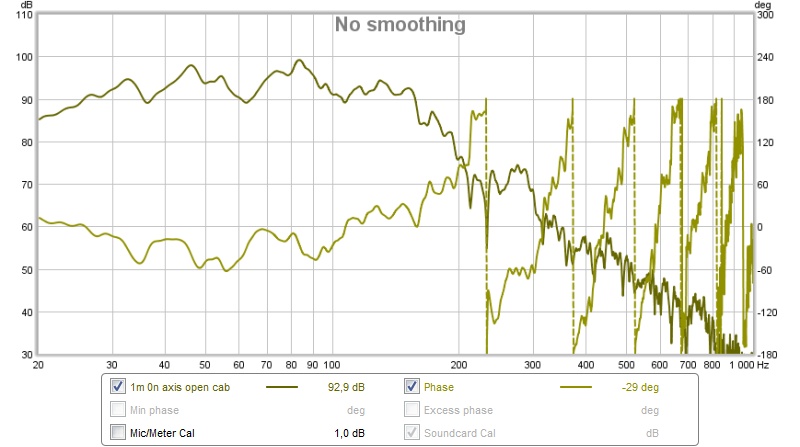
Finally some measurements that really say something! I've measured the right subwoofer at 1 m distance, with mic close to floor.
First I tested the vibrations, directly I had to move a sheet metal candle holder down as it was rattling. I put it on the floor 50 cm away but that didn't change anything (still rattling). So I moved it to another room. Now without things on the console I can't feel anything at 85 dB/1 m. At 95 dB/1 m it starts to get noticeable, but not more than the wall behind (there is a 2 cm gap between console and wall). This means that the vibrations might as well be caused by outside air pressure. There is however some point around 250 Hz where the nanoavr and the center channel starts to rattle slightly. I'm not going to use it that high though.
There is some serious rattle coming from a china cabinet 2 m away from the subwoofer and also from a sideboard (containing more china) 4 m away. They have discreet obvious audible peaks between 60 and 90 Hz and might be the reason for the broad hump in distortion in all measurements around those frequencies.
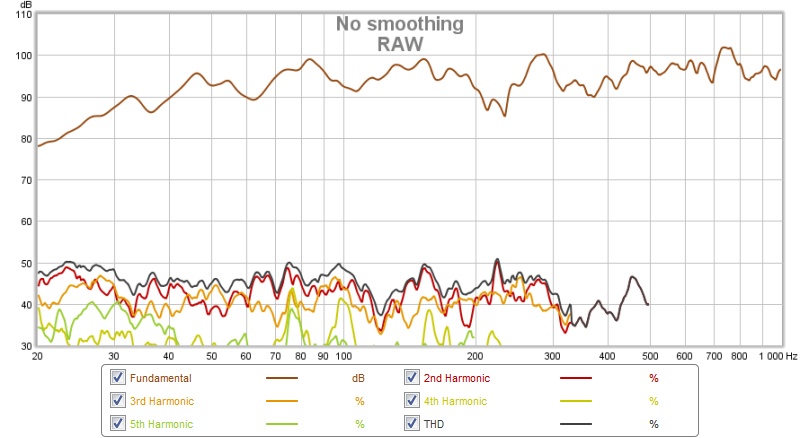
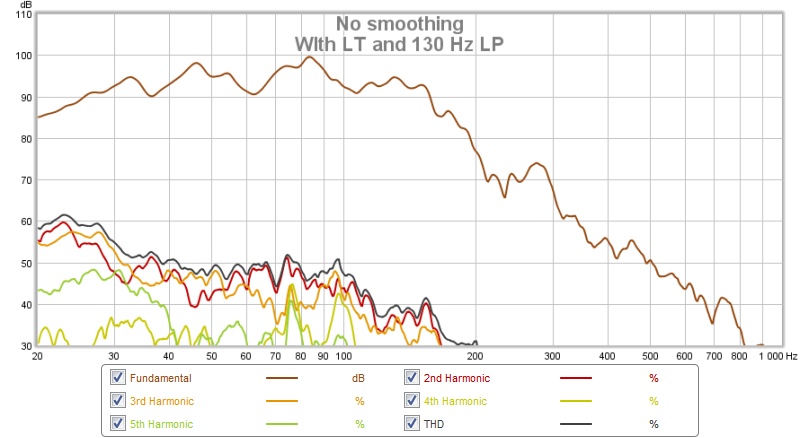
1 m, on axis 95 dB
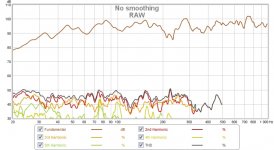
No EQ, LT or LP:
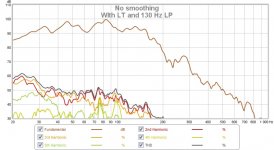
With LT and LP (130 Hz BW24):
Distortion:
Normalized:

Below 5 % distortion for all frequencies should be considered decent. How about at 100 dB?
1 m, on axis 100 dB
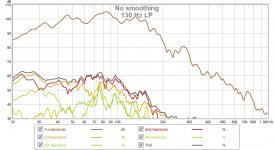
With LP:
Still below 5 %.
With LP and LT:
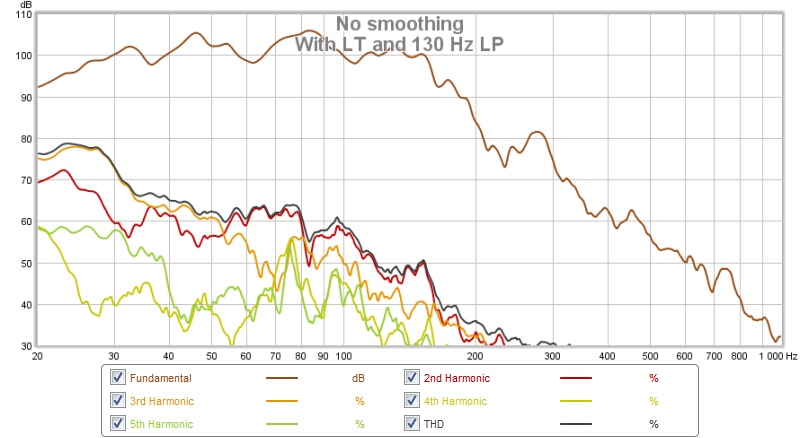
It looks like I've found the limit for this setup. 100 dB/1 m without LT and 95 dB/1 m with. This is for one subwoofer and I have a total of 3 (2 in console and one behind couch).
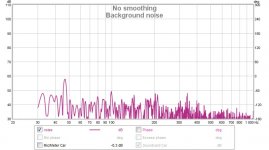
This is the background noise level in measuring position:

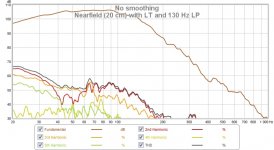
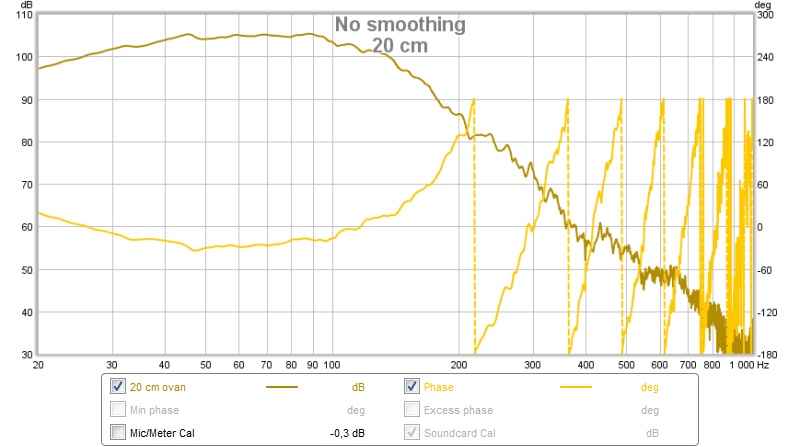
And this is what the near field (20 cm) measurement looks like with LT and LP:

This type of measuring is exhausting, above 90 dB is loud! Next time I'm wearing ear protection.
/Anton
Finally some measurements that really say something! I've measured the right subwoofer at 1 m distance, with mic close to floor.
First I tested the vibrations, directly I had to move a sheet metal candle holder down as it was rattling. I put it on the floor 50 cm away but that didn't change anything (still rattling). So I moved it to another room. Now without things on the console I can't feel anything at 85 dB/1 m. At 95 dB/1 m it starts to get noticeable, but not more than the wall behind (there is a 2 cm gap between console and wall). This means that the vibrations might as well be caused by outside air pressure. There is however some point around 250 Hz where the nanoavr and the center channel starts to rattle slightly. I'm not going to use it that high though.
There is some serious rattle coming from a china cabinet 2 m away from the subwoofer and also from a sideboard (containing more china) 4 m away. They have discreet obvious audible peaks between 60 and 90 Hz and might be the reason for the broad hump in distortion in all measurements around those frequencies.
1 m, on axis 95 dB
No EQ, LT or LP:
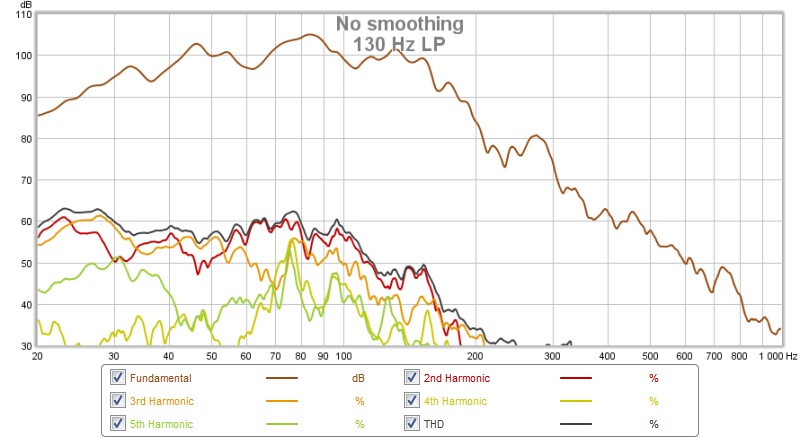
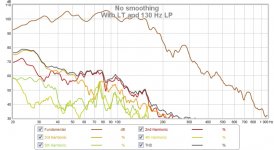
With LT and LP (130 Hz BW24):
Distortion:
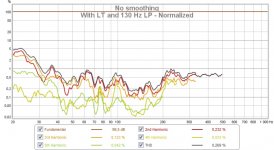
Normalized:
Below 5 % distortion for all frequencies should be considered decent. How about at 100 dB?
1 m, on axis 100 dB
With LP:
Still below 5 %.
With LP and LT:
It looks like I've found the limit for this setup. 100 dB/1 m without LT and 95 dB/1 m with. This is for one subwoofer and I have a total of 3 (2 in console and one behind couch).
This is the background noise level in measuring position:
And this is what the near field (20 cm) measurement looks like with LT and LP:
This type of measuring is exhausting, above 90 dB is loud! Next time I'm wearing ear protection.
/Anton
Attachments
Last edited:
- Status
- Not open for further replies.
- Home
- Loudspeakers
- Subwoofers
- Dual subwoofer/media console