"I also have to assume you haven't read the forum, if you had you would not have concieved the notion to "amp" a panel ...as this particular idea would do nothing more than toast a perfectly good panel."
There are also examples of me posting suggestions to other newbies to check out specific posts and examples made by other posters....so don't assume to hard.
Have i read every single post in the forum? Of course not. Do i remember every single post that i've read? Of course not. Do i use search on this forum often? Yes i do.
And as far as "Forcing" a guideline on people, this is not what i'm suggesting and it is obviously untenable.
A simple "guideline for helpful results posting" in the "Post your results" Thread would help in establishing some sort of standard though.
And like i've been saying, a standard that we can all work out, agree upon, and agree works best is what i'm looking for.
Property,
It would be nice if there was a way to compare setups, but that is completly IMPOSSIBLE.
No 2 camera's are the same, nor are 2 hands equally steady.
And dont forget the color of the walls in the PJ room. There are dozens of factors that would influence such a comparison.
And most important: no diy'er is posting results to satisfy your competitive nature. We built these things for OUR pleasure, not yours.
The pics are meant to give an INDICATION of the result, and are often posted to show what needs to be improved.
When you will built your own box you will get enuf experience to guesstimate the brightness of other setups just by looking at the specs.
WOW!!!!
i never thought this little point of property would be worth such an enormous number of posts... but lets try this. those who want to do it like property suggets should do it, others should leave it. how about that instead of arguing and forgetting to get new results in the forum...
by the way did you already see my projector?
http://www.andyrandy1st.de.vu
p.s. i will post projected pictures with a better camera soon. the pics look like undream's one in reality...
Rapsac,
Of course i understand there are innumerable factors...just like there are very very many factors differing from one projector to the next....I'm not saying there EXISTS a perfect way to do it...Just like there is no "perfect" projector that we can DIY build at the moment. But we can try to come up with a system which we can agree will give the best results we can come up with...
Sounds familiar doesn't it.
"And most important: no diy'er is posting results to satisfy your competitive nature. We built these things for OUR pleasure, not yours.
The pics are meant to give an INDICATION of the result, and are often posted to show what needs to be improved.
When you will built your own box you will get enuf experience to guesstimate the brightness of other setups just by looking at the specs."
I don't know where the competitive nature part comes from.
And again, alot of you are falling into the trap (as shown in the above quoted comment) of thinking that everything you know now is enough. Some forethought into the future of this Forum and the Future of DIY projectors is warranted.
Forget it, no one will invest any $ to get a good camera/screen etc. just for anyone to compare results.
A diy'er is happy with the results or he isnt. When an improvement is made new pics will be posted to show the difference.
If you or any other need more info after seeing pics you could ask them and I bet he/she would be more than willing to elaborate.
And again: this isnt a competition! We enjoy ourselves building/learning things and watching video on our BIG screens 🙂
When ppl like yourself need acurate specs then go buy a PJ, you'll know what you will get then.
If the specs are not important (but the result and $$ is) then built your own. You will end up with a satisfactory result either way.
The idea of .... "A simple "guideline for helpful results posting" in the "Post your results" Thread would help in establishing some sort of standard though." Is valid...your method...
... IS NOT "SIMPLE"!
Simple would be ...room is to be dark..no light other than the projector...show daytime and nightime shots from a title we all recognize IE: LOTR, Harry Potter... one "cartoon" shot (as mentioned just about any PJ will show a toon well)....indicate the throw and the projected image size. ( I threw those last 2 in because you left them out...they are of PRIME importance...far more important than the ambient light IMHO....)
No further coment from me on this topic, I for one will continue to post my pics as I allways have (some tonight...shot in a dark room@ 12 ft throw...image size TBA ).
The next time I post on this particular topic will be because members have felt "hounded" and have called for moderator intervention, if such proves to be the case I will ask one of the other moderators to handle the complaint as I have lost patience.
Don't take offence...just don't bother responding to ME in regards to this particular idea of yours. I'm certain that you have plenty to offer this forum...trust me ...this idea isn't the one that makes us notice your brilliance.
zardoz
I bet a reply is already in the making so I'll start mine to end my contribution to this discussion:
It is not possible to compare setups when both are not tested under the exact same conditions. This will never happen as it is impossible to re-create conditions when you dont compare the setups in the same room.
It is usefull to know the conditions when you see a pic. If they are not specified you can ask the poster. But even then; the pic will mean %#@%#%# because of the camera used.
The only evaluation worth a dime is the impression of the person that has seen the PJ in action, eg the poster of the pic.
He/she will not lie about the results but will give a discription of the result as good as possible.
If that isnt enough, then buy a PJ or go visit the person who's results you cant 'trust'.
And your statement about ppl not wanting to learn anymore:
I started a couple of months ago with this and I've learned masses about all aspects of diy PJ building. I dont need to built every possible setup to see the pitfalls, my knowledge is sufficient to see them in advance. Obviously you dont know what you are talking about. That in itself is not a problem, we all started with little/no knowledge. But you might want to
- listen to more experienced ppl when asking for feedback on ideas
- do some more research b4 posting
When you are going to built a PJ I wish you a lot of success. If you have any questions then post them (pref. in a new topic) and you will get help.
But PLEASE stop this discussion here (and in any other thread! The board is polluted enough already).
Chilling Out

Hi there, posted a few times before and i really need to start adding pictures as it's kinda coming together i guess...
Got a question though, i currently have two 6cm 12v fans spinning away one at the back drawing air in and one at the front sucking it out...
Is this the best way or should i have two sucking in or two sucking out, beasically looking for the best way to get the hot air out of it....
Thanks in advance...
peace.
100' TV in your Bathroom
Man those "put a fresnel in front of your TV for a 100' TV" guys on ebay are still racking in the dough!! It's a damn shame to make so much money so easily.
And the feedbacks are so funny! Every single one of them is "Product as described" LOL.
Man those "put a fresnel in front of your TV for a 100' TV" guys on ebay are still racking in the dough!! It's a damn shame to make so much money so easily.
And the feedbacks are so funny! Every single one of them is "Product as described" LOL.
zardoz
heya zardoz i have a few older pics of the constrution of my diy projector, i have done alot more now and finnished the construction part now just the paint job to go but i have a couple of older pics of what i did wioth the mini lcd tv like layout, do u wana have a look at them or should i post them else where?
heya zardoz i have a few older pics of the constrution of my diy projector, i have done alot more now and finnished the construction part now just the paint job to go but i have a couple of older pics of what i did wioth the mini lcd tv like layout, do u wana have a look at them or should i post them else where?
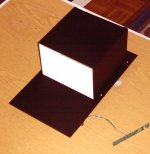
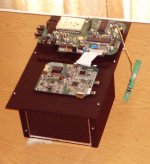
the first part of my projector construction
ok this is a couple of pics of the first part i built of my lcd projector, im using a 6inch lcd with reso of 960x240 from memory anyway as u can see i made a light box behind the lcd, all boards are under neith the floor that the light box, lcd and light sits on, by the way the light sits at the back where it is bare and is all black, these pics are about 2 months old now and i have done alot more since, im just doing the painting now and in this pic it doesnt show u the main box but just the section that the lcd, light, and electronics is mounted too, anyway have a squize and i hope u will get some ideas from this design i made.
Trev
Attachments
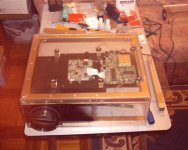
pic 3
in this pic u can see the lens and the board in pic 1 and 2 mounted to the main floor in the main box, this is when it was far from complete and its totaly made out of perspex and aluminium, i had also made aa light box for the lens and mirror that fits nice and snugly agains the front of the lcd light box, it is not glued or screwed because if i want to make a repair or upgrade all i have to do is remove the screws for the floor and the whole lcd, light and electronics comes out in one hit. Although now that ive completed the main box(not in this pic) some of the other electronic stays in the main box ie relays, balast, power suply, but all wires are made so i can disconect them whenever i want to remover the bottom or light for bulb change. The light box is not in this pic either but if u care to look at the lounge to the right at the back of the pic u can see abit of the back of it sitting on the couch. The way i will change my bulbs is just take the top off the main housing and undo 2 screws, the light is out ready to change, also this main box pic is upside down so u are looking at the bottom.
Trev
Attachments
ace3000-1
Nice compact little setup! Looking forward to seeing your progress to completion. Good overall size on the PJ.
..mines so damn big it could use a drink holder and a steering wheel
zardoz
Nice compact little setup! Looking forward to seeing your progress to completion. Good overall size on the PJ.
..mines so damn big it could use a drink holder and a steering wheel
zardoz
zardoz
not a kia is it zardoz? lol anyway bud thanks for the nice note, when i do finnaly finnish this thing i plan to try and help others out in trying to make a projector more compact, maybe i could take a look at yours and work somthing out with it.
Happy diy
Trev
not a kia is it zardoz? lol anyway bud thanks for the nice note, when i do finnaly finnish this thing i plan to try and help others out in trying to make a projector more compact, maybe i could take a look at yours and work somthing out with it.
Happy diy
Trev
Nice setup
Very nice. Espescially the different modules/boxes idea. Could you maybe post a quick schematic to show orientation and arrangement in boxes and main box.
Very nice. Espescially the different modules/boxes idea. Could you maybe post a quick schematic to show orientation and arrangement in boxes and main box.
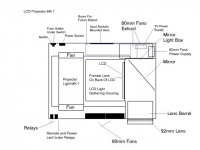
schamatic
ok this is just a quick drawing not to scale obviously but u can see atleats where the main components go, the fan power supply is a multi voltage that is varable from 1.5-12volts, i chose it because if it is too noisy i can aways run the fans at a slower speed, i have tried the fans in the case at 12v and its not noisy at all, u can just hear the air sucking and evacuating. the fans at the back are at the top of the box to suck the hot air out while the ones in the front push cold air in,the fans over the light suck from front to back so in a way the box has a natural flow of air. I have placed an area for a future ballast for the light i am going to get so i dont get caught out with room and the tv power supply i may not place in the place i have shown, u can also see the light box how it is part of the box and separate from the lcd,light,electronic's unit enabling me to get the lcd unit free from the rest of the box for a future upgrade in lcd,light or electronics. Also in this pic i didnt put a sleeve i madfe for the lens barrel to keep it square and strong and u can also see this projector couldnt be anymore compact, just ask my hands lol
Trev
Attachments
- Home
- General Interest
- Everything Else
- The Moving Image
- DIY Projectors
- DIY Video Projector Part II