Hey,
A while back i built a 'lumenlab style' projector, over the years I have swapped out parts and fiddled with it. However I'm ready to redesign it from the ground up for optimal proformance. Tomorrow I will be taking a trip to the hardware store to get materials for the new enclosure. My goal is to get the best quality image with out purchasing any new internal parts. And yes, I have that beast 400watt MH. My current set-up was originaly designed for a 15" however the 15" broke and I replaced It with the hami 8". Anyone who has any suggestions; there input would be greatly appreciated.
Parts I have now include:
400w ballast
400w MH lamp
8" Hami LCD
2 lumenlab fresnels (220mm and 317mm fl) I think
Norpro reflector
320mm fl triplet (projection lens)
Various fans.
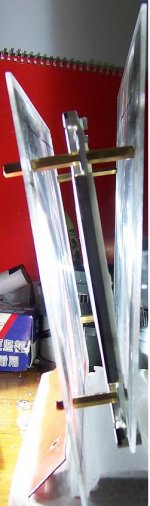
My current setup/box minus the fresnels.
A while back i built a 'lumenlab style' projector, over the years I have swapped out parts and fiddled with it. However I'm ready to redesign it from the ground up for optimal proformance. Tomorrow I will be taking a trip to the hardware store to get materials for the new enclosure. My goal is to get the best quality image with out purchasing any new internal parts. And yes, I have that beast 400watt MH. My current set-up was originaly designed for a 15" however the 15" broke and I replaced It with the hami 8". Anyone who has any suggestions; there input would be greatly appreciated.
Parts I have now include:
400w ballast
400w MH lamp
8" Hami LCD
2 lumenlab fresnels (220mm and 317mm fl) I think
Norpro reflector
320mm fl triplet (projection lens)
Various fans.
My current setup/box minus the fresnels.
An externally hosted image should be here but it was not working when we last tested it.
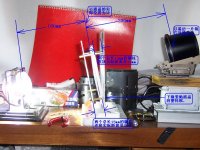
Here is the room that I will be installing the projector in.
The striped Hami A/G removed
Frame for theLCD
Im going to go with split fresnel becasue contrast issues unsplit caused.
An externally hosted image should be here but it was not working when we last tested it.
The striped Hami A/G removed
An externally hosted image should be here but it was not working when we last tested it.
Frame for theLCD
An externally hosted image should be here but it was not working when we last tested it.
Im going to go with split fresnel becasue contrast issues unsplit caused.
Test fitting the cut fresnels with the LCD frame
An externally hosted image should be here but it was not working when we last tested it.
After figuring out the LCD assembly I went to work on the box
I just rested the fan in there. Do you guys think having the fan this close to the bulb would cause the plastic on the fan to melt?
An externally hosted image should be here but it was not working when we last tested it.
I just rested the fan in there. Do you guys think having the fan this close to the bulb would cause the plastic on the fan to melt?
I'm in the middle of making a smaller projector using the hami too, the 15" design just takes up way too much room in my living room and after several years of use has seen better days!
I've struggled to get my early mock ups to focus well and I suspect that it's due to trying to focus on to the anti-glare (which I'm planning to remove fairly soon). If you're not using a mirror design then you shouldn't have any problems as it will be on the light side, however I'll be very interested to see your results.
I too went with the threaded rod approach although I left my lcd in the original frame (with back cut away) so am only using M3, it's useful to be able to bolt L brackets to the side of the lcd though (for holding the circuit board in place).
Great job so far, am looking forward to seeing your end results 🙂
The anti-glare on mine is removed. I mainly decided to remove it becasue I read claims stating it provided better contrast and brightness. I highly recomend the wet paper towel approach for removing ithe anti-glare; it came off very easy.
As for focusing, what method did use for adjusting focus? As you can see i originaly used the box-inside-a-box method. It was porly constructed and didnt slide smoothly. Im trying to figure out what to use for my new enclosure. I have debated PVC but have ulimatly decided against it fearing the PVC could interfear with the light path. So as of now i'm not really sure what im going to do for focus.
As for focusing, what method did use for adjusting focus? As you can see i originaly used the box-inside-a-box method. It was porly constructed and didnt slide smoothly. Im trying to figure out what to use for my new enclosure. I have debated PVC but have ulimatly decided against it fearing the PVC could interfear with the light path. So as of now i'm not really sure what im going to do for focus.
Stunning, I've been putting off the anti-glare removal for over a week but your post has given me a lot more confidence to do it! How long did you have to soak it for? I've seen varying times from a few hours to half a day depending on panel...
I'm still at an early stage with my small build and most of my testing so far has involved holding the projection lens in place by hand (my 15" also uses the box inside a box method). I'm planning on allowing vertical movement of the projection lens (which is suitable for a 15" monitor) - that way I can adjust the position of the projected image without introducing keystone in a similar fashion to commercial units, however it will increase the complexity a lot.
I'm currently envisioning a larger than lens circular hole cut in the box with the lens mounted internally and blackout cloth between the two (hopefully no stray light and it will also hide the workings!). I've been considering mounting the lens on a couple of axis driven by stepper motors rather than trying to adjust it by hand (I recently made an xyz table for a cnc machine so am thinking along similar lines but with 2 axis) however this seems somewhat overly complicated.
Basically, until now it had always been a case of rough ideas along with cross that bridge when it arrives. It's too late to think of more detail now but I'll allocate some of my daydream time at work tomorrow to the task.
To remove it get a very wet paper towel... 2-3 layers. place it on the side of the LCD with the antiglare on it. Cover the towels with plastic wrap. I let mine sit over night and it came off nice and easy the next morning. Its a bit tough to get it started but once you get it its pretty easy. Just be careful that you are only removing the anti-glare, not the polorizers.
My accomplishments for today.
The rear panel
and
Inside
The rear panel
An externally hosted image should be here but it was not working when we last tested it.
and
Inside
An externally hosted image should be here but it was not working when we last tested it.
bottom attached with alignments traced on the bottom. my box is alittle to short but I am going to build a rugged "box-within-a-box" focusing mechanism that will make up for the missing length.
It's nice and light now, I'm dreading the addition of the ballast. That thing weighs a ton. maby one day i will get an electronic one.
An externally hosted image should be here but it was not working when we last tested it.
It's nice and light now, I'm dreading the addition of the ballast. That thing weighs a ton. maby one day i will get an electronic one.
Ok i installed the ballast and fired up the lamp. I placed the LCD unit in and projected a test. I have a couple questions Im hoping someone will be able to answer.
1. In my original design I used Unsplit fresnels but the contrast on the half of the screen became gradualy less. I have read other post were people have had the same issues with both fresnels behind the LCD.
Is there any reason for this? and Would the contrast problome be fixed in thiis new design because of better alligned optics?
2. What is the best way to clean the LCD panel & fresnels for the sharpest projection?
I really want to do an unsplit design, becasue of clarity, but i dont want to sacrifice contrast.
The light chamber is peaking at about 150 degrees Farenheit Hope this isnt too hot.. The rest of the Pj.. only gets to 100 maximum. I'm hoping to finish tonight so i can post some screenshots.
Heres a shot of my first image... basement lights are on and it's still light outside but it proves that I have something going.
An externally hosted image should be here but it was not working when we last tested it.
Here's the inside of the box.
I was getting items inside the box such as wires being projected so I added some alluminum flashing (that i will be painting black). Around the LCD in such a way that will aloow for cooling.
I did decided to go with the box-inside-a-box method and here is the framed slot for the focusing.
An externally hosted image should be here but it was not working when we last tested it.
I was getting items inside the box such as wires being projected so I added some alluminum flashing (that i will be painting black). Around the LCD in such a way that will aloow for cooling.
An externally hosted image should be here but it was not working when we last tested it.
I did decided to go with the box-inside-a-box method and here is the framed slot for the focusing.
An externally hosted image should be here but it was not working when we last tested it.
An externally hosted image should be here but it was not working when we last tested it.
fisrt "finished" projector shot. I just need to figure out the best way to mount it so that its centered.
- Status
- Not open for further replies.
- Home
- General Interest
- Everything Else
- The Moving Image
- DIY Projectors
- DIY Projector Based on The 8" Hami