Here is a simple way of making a nice aluminium surface.
The method is widely used for treating the surface on
aluboats, and is remarkably strong against oxydation.
It results in a silky smooth surface, that is very easy to
keep clean and nice. Here we go:
The piece of alu must firstly be brushed so the surface is
absolutely smooth and homogen to look at. The easiest
way to "brush" is actually with sandingpaper. You need
good quality sandingpaper for this. The cheap stuff won't do.
Also it has to be a little coarser than you would think.
120 grid is a good starting point. You have to be very
meticulous at this point. Your sanding strokes must
be even, in the hole length of your piece. The surface will be a little rough, but this will go in the next step.
A serious warning: You really need a pair of rubbergloves for the
next step, as this stuff eats your skin for breakfast! No kidding.
Dont get it on bare skin or into your eyes.
Your piece of alu must be washed with a solution of NaOH
dissolved in water. I have used about 3 good spoonfull's
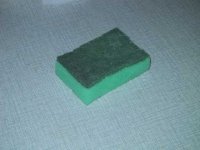
for 2 cups of water.(NaOH= Caustic soda). It is done in much the same way as when sanding, only I use a Regular kitchen sponge
for the job. The rough green side of it . Just soak it often, as you stroke back and forth. Keep stroking for about 5 minutes.
The solution is not allowed to dry up on the piece of alu, as this
will get very stained. When done, rinse the piece very well
under tap water. Dry the piece and you are done!
If you are not satisfied with the result, work at it again.
There you have it. It is not excactly Anodizing, but it looks
very good. In all cases it looks way better than raw alu🙂
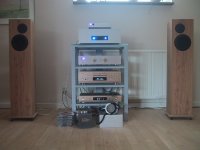
I attached a pic of my stereo, the preamp (BosoZ) is fitted with a faceplate made in this manner. It is about a year old now and looks like the day it was made.
Hope this will be useful for all you DIY'ers.
Steen.
The method is widely used for treating the surface on
aluboats, and is remarkably strong against oxydation.
It results in a silky smooth surface, that is very easy to
keep clean and nice. Here we go:
The piece of alu must firstly be brushed so the surface is
absolutely smooth and homogen to look at. The easiest
way to "brush" is actually with sandingpaper. You need
good quality sandingpaper for this. The cheap stuff won't do.
Also it has to be a little coarser than you would think.
120 grid is a good starting point. You have to be very
meticulous at this point. Your sanding strokes must
be even, in the hole length of your piece. The surface will be a little rough, but this will go in the next step.
A serious warning: You really need a pair of rubbergloves for the
next step, as this stuff eats your skin for breakfast! No kidding.
Dont get it on bare skin or into your eyes.
Your piece of alu must be washed with a solution of NaOH
dissolved in water. I have used about 3 good spoonfull's
for 2 cups of water.(NaOH= Caustic soda). It is done in much the same way as when sanding, only I use a Regular kitchen sponge
for the job. The rough green side of it . Just soak it often, as you stroke back and forth. Keep stroking for about 5 minutes.
The solution is not allowed to dry up on the piece of alu, as this
will get very stained. When done, rinse the piece very well
under tap water. Dry the piece and you are done!
If you are not satisfied with the result, work at it again.
There you have it. It is not excactly Anodizing, but it looks
very good. In all cases it looks way better than raw alu🙂
I attached a pic of my stereo, the preamp (BosoZ) is fitted with a faceplate made in this manner. It is about a year old now and looks like the day it was made.
Hope this will be useful for all you DIY'ers.
Steen.
Attachments

I can't stress your safety warning enough- sodium hydroxide will turn you into soap and can be deadly if not handled properly. Thick, alkali-resistant gloves, safety glasses, and proper chemical disposal are MANDATORY.
Yep, neutralize with vinegar...
FYI, this process is NOT anodizing, AT ALL. It is chemical etching of the aluminum.
Can also be done by soaking in a tub of lye solution, no rubbing or sponge needed.
BTW, I'm suprised the average sponge isn't eaten alive by lye..?
Tim
FYI, this process is NOT anodizing, AT ALL. It is chemical etching of the aluminum.
Can also be done by soaking in a tub of lye solution, no rubbing or sponge needed.
BTW, I'm suprised the average sponge isn't eaten alive by lye..?
Tim
Depends on whether or not it's a natural sponge. Some synthetics do very well in alkaline solutions. Natural sponges do less well.
There's a spongeworthy joke in there somewhere for all you Seinfeld fans.
There's a spongeworthy joke in there somewhere for all you Seinfeld fans.
For some black (well, black/blue) anodizing, try a tube of "Cold gun blue" from a gun store. It's original use is for "blueing" of untreated (like, where you sanded the rust off) spots on your guns, but works on many other metals.
The warnings on the tube are minimal, but it is selenium based and should be treated as any other selenium/asbestos product....well ventilated room, rubber gloves, goggles and dispose of rags in an approved way.
The warnings on the tube are minimal, but it is selenium based and should be treated as any other selenium/asbestos product....well ventilated room, rubber gloves, goggles and dispose of rags in an approved way.


Nice..
I will experiment a little I think... Might just be the right treatment for my current project...
I will experiment a little I think... Might just be the right treatment for my current project...
Nice! Too bad I just used up all the NaOH I had to create silicate PCB developper... I guess I'll have to buy some more 🙂.
Does this change the outer layer of the alu so that fingerprints don't stick on it so easy? Because I just cleaned some raw aluminium with ether and half of it is already greasy again...
Does this change the outer layer of the alu so that fingerprints don't stick on it so easy? Because I just cleaned some raw aluminium with ether and half of it is already greasy again...
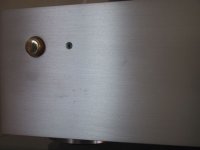
Bill, what you see is my greasy fingers on the panel,
The small black spots are imperfections on the material.
Meaning that I was not persistent enough when sanding
Devil, the surface is etched by the process and it is easy to
keep clean. Fingerprints doesnt attack the surface. Mine is
about a year old now and there is no trace of tarnish or
miscoloration. In all cases, the surface is far better than
raw alu. I think it is a great alternativ to doing nothing
about the surface. If you dont get it anodized for real, that is.
After all, this is DIY isn't it 😉
Steen.
Safer Alternative - Plating kits
A safer alternative is to get a plating kit. You can plate nickel, aluminum, silver, gold, copper, and use it on all kinds of components. May be a little more expensive though.
http://www.caswellplating.com/kits/index.html
A safer alternative is to get a plating kit. You can plate nickel, aluminum, silver, gold, copper, and use it on all kinds of components. May be a little more expensive though.
http://www.caswellplating.com/kits/index.html
The anodzing are many steps process. If you have not time to do that but you want diy case with anodized (like hi-end amplifier) go to visit at.......
http://www.atiresearch-anodized.com
http://www.atiresearch-anodized.com
Sch3mat1c said:Yep, neutralize with vinegar...
FYI, this process is NOT anodizing, AT ALL. It is chemical etching of the aluminum.
Can also be done by soaking in a tub of lye solution, no rubbing or sponge needed.
BTW, I'm suprised the average sponge isn't eaten alive by lye..?
Tim
Yeap, no anodizing.
DIY anodizing is relatively easy, you need some sulfuric acid and dc current source.(car battery charger should do fine) +some dye for coloring. Dyes for textiles work rather well. You just better do this on your backyard as it produce some hydrogen. 🙂
I've had experience in some "anodizing" and "coloring" of aluminum angle stock for heatsinks. Drano is an easy item to attain for the caustic soda (lye) and it tends to work a tad faster
when the item is soaking in a warm solution. I took mine outside to be safe. If you look closely, you can see the patina precipitate (at least I thought I could at the time). The aluminum is actually being etched away during this process and will leave a rough surface for the coloring process, which is nothing more than boiling the part in clothes dye, just like you would a tie-dye shirt(remember those?). Black or dark Navy blue was my color of choice. However, it doesn't seem to be totally colorfast cause your fingers tend to get colored just handling the item when working with it. I never went beyond that point, but the item could probably be lightly coated with a polyurathane or the like for protection.
The aluminum should be very, very clean,..or the finishing process will show it up loud and clear. Plastic tongs are nice. Acetone is a wonderful metal cleaner and I've heard TSP is one too although I have never tried it.
Sanding is a tedious process, but it does make the part like good. Drum sanders are great for this process if doing sheet metal.
I have pretty sensitive sinuses so I invested in a good face mask filtering system which helps alot,..I use it when doing anything at all with chemicals or spray paint. You definitely should take the time and trouble to set yourself up a safe place to work when doing this stuff even if you have to go into a cold garage.
Bill Fitzpatrick said:what is the source of those flaws on the panel?
steenoe said:Bill, what you see is my greasy fingers on the panel.
The small black spots are imperfections on the material.
Meaning that I was not persistent enough when sanding.
Steen.
Not always we can keep all our 5-10 fingers clean 😀
Can we

Very Nice Amplifier Chassis!
Good DIY work, steenoe
lineup
- Status
- Not open for further replies.
- Home
- Design & Build
- Parts
- DIY "Anodizing"