Thanks, I did another temporary setup and the angles are pretty close to what I got the previous time. I also read back a few pages in the thread and realized there are some easier ways I can do a temporary setup with the PJ in its permanent spot, so I'll give that a go.
I will have a challenge building a more permanent enclosure as I have a low (drop) ceiling and the PJ is pretty much flush mounted. I may have to relocate it to make room for an enclosure and any kind of slide mechanism.
I will have a challenge building a more permanent enclosure as I have a low (drop) ceiling and the PJ is pretty much flush mounted. I may have to relocate it to make room for an enclosure and any kind of slide mechanism.
stevodude said:working on a curved screen for my setup... go the jump to check it out, let me know what you think.
An externally hosted image should be here but it was not working when we last tested it.
Pretty much how I curved mine 🙂
Is that side masking a hinged "wing thing" like I was using a few months back?
Mark
Yes, it is a hinged wing thing 🙂
thought I would either:
a: use a hinged wing thing with velvet/felt wraped board closed for 16:9 Digital TV viewing, and open for movies. not sure how it's going to go in the real world build stage.
or
b: curtains, with curtains dropping to floor
but probably start whipping up the hardware for the screen this weekend.
stevodude said:Yes, it is a hinged wing thing 🙂
thought I would either:
a: use a hinged wing thing with velvet/felt wraped board closed for 16:9 Digital TV viewing, and open for movies. not sure how it's going to go in the real world build stage.
or
b: curtains, with curtains dropping to floor
but probably start whipping up the hardware for the screen this weekend.
I'll be doing the hinged "wing thing" again soon. Not sure where I posted photos of the system, but I had two taken with a tri pod -
1. closed for 16:9
2. open for scope.
It was really cool to see just how wide that screen is when the masking is open...
I just used painted MDF. I never bothered to treat it as I figured the screen would have been pretty reflective when open, so why bother threating it when it was closed.
When I get my AT screen up and running, I will have to treat the wings....
Mark
"wings" make sense with an AT screen but could be troublesome if you have speakers flanking the screen... 😉
Great idea though, I've not seen this before.
C
Great idea though, I've not seen this before.
C
cjd said:"wings" make sense with an AT screen but could be troublesome if you have speakers flanking the screen... 😉
Great idea though, I've not seen this before.
C
You could always make the wings out of frames and stretch GOM or grill cloth over them. Not as good as a solid panel for masking, but should be better than no masking at all for an AT screen.
What I am doing in moving the L and R speakers in slightly as well so my masking won't cover the speakers.
So often you see HT with the L and R speakers wide (often wider than the screen) carried over from 2CH music practice where wider is often considered better. But it is a different set of rules when the sound is used with an image. Check out my BLOG under the "Going AT" post to see what I am doing and why...
Mark
mmmkam said:
You could always make the wings out of frames and stretch GOM or grill cloth over them. Not as good as a solid panel for masking, but should be better than no masking at all for an AT screen.
Oh goodness no, once you've used proper velvet (I've used Fidelio black velvet for "super black" in photography going back to '92) GOM just won't cut it. At all. 🙂
I've been looking at wrapping my speakers in the stuff. Which is easy because I'm currently doing a completely new speaker design for my HT, so it wouldn't be just wrapping existing speakers.
I may do 3 speakers to sit under the screen vs. to the sides, and I'm still pondering going AT - I can't move the screen out into the room (11'6" deep, 9' wide) but I do have about 3 feet on the other side of the screen wall I have access to so I could do really good custom in-walls quite easily. Already have an IB sub poking through. 🙂
C
Has anyone tried a setup that allows for four way adjustment of both prisms. I was reading one of Mark's post and he stated that he thought in order to get the pincussion out of the roght side he would have to adjust the tilt in only the back prism. Would this type setup offer any benefit at all?
Bruce Wayne said:Has anyone tried a setup that allows for four way adjustment of both prisms. I was reading one of Mark's post and he stated that he thought in order to get the pincussion out of the roght side he would have to adjust the tilt in only the back prism. Would this type setup offer any benefit at all?
Yup--this is what I am doing. Basically, I have the prisms with a bolt on top, a pivot point on the bottom, which is disposed within a short well, and the bolt on top goes through a hole in the top of the housing that is about 2 inches in diameter. I am using large plastic washers above the 2 inch hole, so when I get the housing up in front of the projector, I can not only rotate the prisms (the yaw, in aeronautical terms), but I can adjust the "pitch" and "roll" of the prisms as well. This helps with the geometery corrections tremendously, and allows me to zero in on the perfect position of both prisms. Once I get the prisms in the right spot, I tighten down the wingnut over the large plastic washer.
Steve Scherrer said:
Yup--this is what I am doing. Basically, I have the prisms with a bolt on top, a pivot point on the bottom, which is disposed within a short well, and the bolt on top goes through a hole in the top of the housing that is about 2 inches in diameter. I am using large plastic washers above the 2 inch hole, so when I get the housing up in front of the projector, I can not only rotate the prisms (the yaw, in aeronautical terms), but I can adjust the "pitch" and "roll" of the prisms as well. This helps with the geometery corrections tremendously, and allows me to zero in on the perfect position of both prisms. Once I get the prisms in the right spot, I tighten down the wingnut over the large plastic washer.
Ingenius Steve 🙂
Mark
Steve Scherrer said:
Yup--this is what I am doing. Basically, I have the prisms with a bolt on top, a pivot point on the bottom, which is disposed within a short well, and the bolt on top goes through a hole in the top of the housing that is about 2 inches in diameter. I am using large plastic washers above the 2 inch hole, so when I get the housing up in front of the projector, I can not only rotate the prisms (the yaw, in aeronautical terms), but I can adjust the "pitch" and "roll" of the prisms as well. This helps with the geometery corrections tremendously, and allows me to zero in on the perfect position of both prisms. Once I get the prisms in the right spot, I tighten down the wingnut over the large plastic washer.
That sounds like a fantastic solution. If this corrects the l/r focus issues would be even better, think maybe you could post some pics of your setup and the results?
Steve, sounds like an interesting idea, I may consider that as well. Got a "prototype" enclosure set up last night and noticed a 2" vertical offset. I was able to correct that by tilting the far prism, so having that control seems to be a necessity. It may go away for me since my setup was far from ideal, but more flexibility is a good thing.
I watched my first film last night with the temp setup, maybe just a "placebo effect" but it sure seemed a lot better than my "poor man's CH" using zoom. 😀
I watched my first film last night with the temp setup, maybe just a "placebo effect" but it sure seemed a lot better than my "poor man's CH" using zoom. 😀
Bruce Wayne said:
That sounds like a fantastic solution. If this corrects the l/r focus issues would be even better, think maybe you could post some pics of your setup and the results?
I will try to get some pictures of the setup. As it stands right now, I have had some difficulty (mostly with time) to get everything set up the way I would like with the ceiling mount, but as I said, hopefully with a large block of time to get everything together, I will be able to do this (maybe this weekend).
As it is, I have used the housing with my projector table mounted, and I can show how it helps with the geometry issues.
I should be able to take some pictures of the housing tonight--such as it is. It is definitely a work in progress, and the housing is basically a box of MDF, but in my iterations, has gone through some changes (in other words, it's not pretty), but it should be able to show how to achieve what I am trying to accomplish.
My projector
f=450mm lens
15 LCD
f=450mm lens
An externally hosted image should be here but it was not working when we last tested it.
An externally hosted image should be here but it was not working when we last tested it.
15 LCD
An externally hosted image should be here but it was not working when we last tested it.
An externally hosted image should be here but it was not working when we last tested it.
I think you got the wrong thread Liuwzen - it should have gone into the DIY projector thread...
Mark
Mark
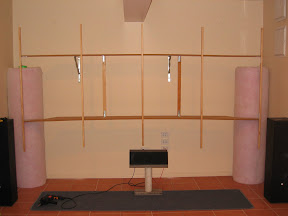
Not exactly to do with the lenses, but from building the lense I find I needed a curve screen, so I'm building one.
built the frame work today...
not bad effort considering I had my 3 year old getting into everything, Plus having broken a couple of ribs on Thursday... damn it hurts to lift stuff and breath...
Anyway, click on image to see the build stages, from templates, to cutouts, to screwing the brackets, then coach bolt brackets and hang frame for test size, before fitting the screen.
If since fitted the lower brackets to the wall, and if I have time later on in the week, fit the screen material and re-hang, then work out the masking once I get the projector & lenses back up on the ceiling.
An externally hosted image should be here but it was not working when we last tested it.
Not much of a diy'er
Typically in the past I have not been much of a DIY kind of guy. Sure I change my oil, brakes and sometimes a little more then that on my cars. I have also built several computer (that is kind of my job anyway) but I have never really thought I would consider doing this type of stuff. However, I am really interested in doing a CIH setup for HT with my first projector. I have read some of this thread. Is someone putting together an instruction sheet of sorts on how to build a horizontal expansion type of anamorphic lens? I was just curious if I was going to have to read this whole thread to figure everything out or if someone was going to have step by step instructions that someone could follow? If they have been done and I just didn't find that post I apologize. If I have to read the whole thread I will start working on it now.
Thanks
Oh yeah, stevodude, that looks like a very interesting screen design. I too would like to know what material you are using for the screen itself. I think a DIY screen seem like a very good option to save some money especially with my frist projector setup. Then again, how do you figure out the correct amount of curve to put on it?
- Home
- General Interest
- Everything Else
- The Moving Image
- Optics
- DIY anamorphic lens