Hello all
This will be my first and hopefully not the last post to this great forum
Im fairly new to this concept considering my brother pointed me to diy project on tom's hardware website about a month ago. i was immediately hooked and maybe a little to enthusiastic considering i bought, stripped and setup a 3m 9550 and a benq fp557s v2 in a month(steps follow later).
This is me putting my two cents in.....
Following is a step by step guide of my setup and would greatly appreciate any feedback or comments
Before i start i would like to apologize for the quality of pics (especially the latter ones). I took em using my nokia 3650 cam phone in absence of a digi cam that i didn't have at the time of build.
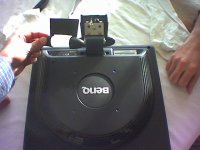
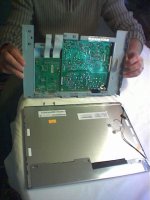
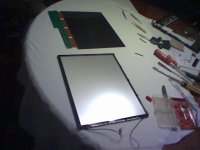
first off unscrew the three screws in the bottom of the rear of the lcd plus the two screws on the stand. Then carefully remove the back side by prying it off starting from the bottom. I used butter knife, flat-head screw driver with electric tape on it as to not scratch the surface.
This part probably was the toughest for me since i was trying not to damage the exterior of the lcd.
Note: in the picture you see a small piece being removed from the stand. This wasNOT necessary. When the back part comes off, the stand comes of with it.
This part probably was the toughest for me since i was trying not to damage the exterior of the lcd.
Note: in the picture you see a small piece being removed from the stand. This wasNOT necessary. When the back part comes off, the stand comes of with it.
Attachments
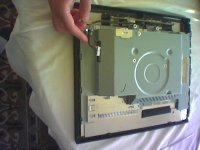
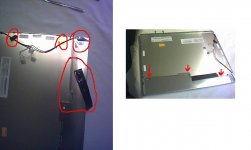
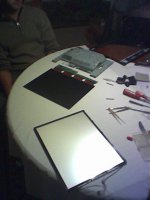
this should expose:
1. two wires going into the side of the metal frame. These wires are connecting the back light to the circuit boards. remove them.
2. These two tape wires (dont know what they are called) are removed by lifting the black stripe of plastic and pulling. BE GENTLE. these babies are extremely delicate. anyone who has modded an xbox nows what i'm talking about.
Attachments
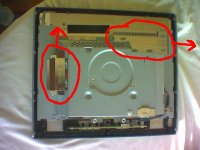
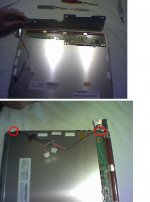
Now remove the metal part you just untaped and unscrewed which exposes the pcb's
next:
There are two screws that need to be removed before you can uncover the back light and screen. This part probably took some time because the wires that connect the backlight were in the way. There is an upside down hook that holds the wires in place, so what i did is with the help of another person, i gently lifted up the hooks and slid the wires thru. Remove the two screws
Attachments
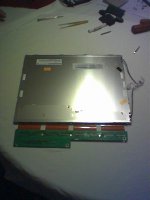
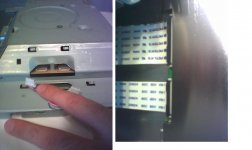
Ouch those flat wires between the lcd glass and pcb looks like they will break very easy, be very careful with the next step. Save all parts if you want to reassamble the screen sometime in the future.
3.......2...........1.............Action
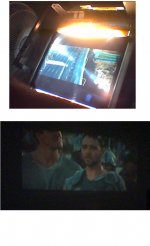
used a pedestal fan from my room for now. At medium speed you can't even hear it running
that is gladiator being projected on a off-white wall. Haven't adjusted the settings yet and my graphing card is like 3 years old, geforce2 i think
used a pedestal fan from my room for now. At medium speed you can't even hear it running
that is gladiator being projected on a off-white wall. Haven't adjusted the settings yet and my graphing card is like 3 years old, geforce2 i think
Attachments

You need to put something on the lcd so you don´t get alot of extra light shining through, maybe a metal plate with a hole cut just for the picture viewing area, would be something to secure the pcb in too.
thx for the suggestion tekko. i have tapped the metal frame to the ohp for now. i have given the wires enough slack so that they are bending naturally.
i have a question tho, a few actually:
1. can those flat wires get damaged from heat from ohp. i have got spacers under the screen but parts of the flat wires are exposed completely.
2. i have substantial light coming from the ohp. how do i reduce that? i was thinking of using black cotton cloth to cover up the fan vents where the bulk of the light seems to be coming from but not sure if that will overheat the ohp.
3. if you look at text, the right half seems to be "blurrier" then the left half of the projected image ????
Great post. I am thinking about buying the same LCD but I
am leaning towards the 3M 9800 projector. I believe it is similiar
to the 9550 except for higher lumens. How large is your projected
image? How far away from the screen can you place the projector
to get say an 80" screen?
am leaning towards the 3M 9800 projector. I believe it is similiar
to the 9550 except for higher lumens. How large is your projected
image? How far away from the screen can you place the projector
to get say an 80" screen?
Got it at tigerdirect.com for $230.where did you find that monitor and howmuch you pay for it?
How large is your projected
image? How far away from the screen can you place the projector
to get say an 80" screen?
do u mean 80" diagonal? because the setup is around 7 ft away and its well over 100" diag
- Status
- Not open for further replies.
- Home
- General Interest
- Everything Else
- The Moving Image
- LCD
- Dismantling Benq FP557s v2