Well, I don't need a super accurate finish, I'll just sand it smooth.Peter Daniel said:Cutting aluminum with with a cutting wheel is not easy and the finish is very rough. You should also wear a face shield when doing this.
If you have a circular saw, attaching metal blade to it (or maybe even a regular wood blade with reasonable amount of teeth) would be probably a better choice. I'm not mentioniing a jig saw, which although won't provide best finish on a cut, is the safest approach.
So, a Dremel's a bad choice. How many teeth on a wood blade do you consider a minimum for aluminium cutting? I have no knowledge about any of this stuff.
I think I might use a jig saw. I suppose there are special blades for cutting aluminium available just about anywhere?
I don't even think if dremel has enough power to do the task.
On 10" blade 60 or 80 teeth seems like a good number. On smaller blade it will be accordinglt less, probably 40 teeth would be fine.
On 10" blade 60 or 80 teeth seems like a good number. On smaller blade it will be accordinglt less, probably 40 teeth would be fine.
a dremel just wont cut it.
i have a dewalt cutout tool (dremel on steroids). its like a 12amp tool, and i had a REALLY hard time cutting metal with it. it took forever and the cut was horrible. would have take hours to sand it down.
i use a scroll saw with a metal blade, works like a charm on thin and thicker metals.
i have a dewalt cutout tool (dremel on steroids). its like a 12amp tool, and i had a REALLY hard time cutting metal with it. it took forever and the cut was horrible. would have take hours to sand it down.
i use a scroll saw with a metal blade, works like a charm on thin and thicker metals.
A sixpack and a walk to the local workshop will sort you out with high precision in less than 5 minutes. They got a machine most places that looks like a guillotine, just for cutting sheet metal. Just make sure you made a drawing with dimensions on it. The cut will be nice and most important straight.
Magura🙂
Magura🙂
One six pack of premium beer and then find the guy in town that does the heating/ventilation/AC stuff. He has a shear. Scribe the marks on the plate before you go. He will be happy to do the work ~ tell him about your hobby. Then on the next visit you can see the stuff they throw away...it may well be better, more interesting, or fancier than the stuff you are buying. Your job will be to make a new friend!
Hehe, OK, I'll try to take advantage of someone else's gear 😉. There must be someone here who can do it.
I know for sure that they do it at the place I bought the metal at. I think they charge €3 for cutting. I just wasn't sure if they would be able to do accurate/small cuts. If I were to get it done there, how much clearance would you guys suggest between the marked dimensions and the real dimensions?
I know for sure that they do it at the place I bought the metal at. I think they charge €3 for cutting. I just wasn't sure if they would be able to do accurate/small cuts. If I were to get it done there, how much clearance would you guys suggest between the marked dimensions and the real dimensions?
You might want to mark the parts to cut with a black marker, then go over the marker with a scribe (very sharp point) to mark the exact location of the cut lines. In this matter, at least your marks will be very accurate. If the shear opertor can cut the parts 0.5 mm oversize, you can bring the parts to exact size with a file and finish with wet/dry paper silicon carbide paper.
Thanks for the info!
Now I have to find some site that teaches me some basic design skills. Do you guys know any good tutorials on how to do this stuff? (I mean basic things, like how to connect panels to eachother, etc.)
Now I have to find some site that teaches me some basic design skills. Do you guys know any good tutorials on how to do this stuff? (I mean basic things, like how to connect panels to eachother, etc.)
Well, it's just that I don't know anything about designing a case. I've got an idea in mind (check the JLH section of my website for renders, dimensions, especially width, are probably wrong though), but I don't know how to attach pannels & heatsink together.
I'd also like my top & bottom plate to be over the heatsinks, but I fear that might reduce cooling a lot. Or wouldn't it?
And then there's the power button problem. As you can see on my website, I've got a good idea about what I want, but I fear it will be quite impossible to do it. I basically want a start button surrounded by a ring of plexi. If possible, 2 little semi circles would protude from the side of that plexi ring and they would light up if the amp starts clipping. Even if I'd be able to make the shape out of plexi, I still don't know how to cut the shape out of the 4mm thick aluminium and how to attach everthing together.
Cases are the fun part!
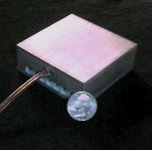
Just about finished my smallest GC, and I think this is about it for down sizing. Any smaller, and the case would need a lot of machine work to bring back the required surface area.
It's 3" x 3" x 1.125". The two parts fit together with a light press by hand (then clamped with four 0-80 countersunk allen screws). This makes the top take up it's half of the heat load.
What do you think?
E
Attachments
Hey Ed!
You must have been lost for a week making that baby amp. Where did you find the giant dime? Good to see you're back.
Very nice... that might be the record. Go over and check out LM4780 thread. Take a flack jacket and some brass knuckles.
You must have been lost for a week making that baby amp. Where did you find the giant dime? Good to see you're back.
Very nice... that might be the record. Go over and check out LM4780 thread. Take a flack jacket and some brass knuckles.
Devil H@ck.. It looks like you have a great start. You have some thinking to do on the plexi/aluminum clip indicator. Better sleep on that one... then find a friend with a lathe for the center aluminum disk. I think before I started cutting that nice big aluminum plate, I might make the case components in cardboard as a prototype.
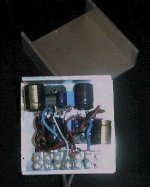
I noticed this piece in your thread. (I visited to steal ideas.)
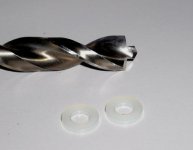
You would most likely get better results with different drills. I suggest you look at drills with a point shown in the figure below (split point). They won't wander like the hardware store variety.
I noticed this piece in your thread. (I visited to steal ideas.)
The holes are quite a bit off center, so I'll drill them out a bit, that should fix the problem.
You would most likely get better results with different drills. I suggest you look at drills with a point shown in the figure below (split point). They won't wander like the hardware store variety.
Attachments

peter how much would one of those bits put me back
price that is
can i pick em up at any hardware store?
thats one of the problems i was have with my old bits keeps it on the mark
price that is
can i pick em up at any hardware store?
thats one of the problems i was have with my old bits keeps it on the mark
They used to carry them at Home Depot, and you may still check for them there, but at my location, they don't cary them anymore.
There are still Black and Decker factory stores on some plazas, and this is where you can get them. Depending on the size, they are around $5/pc.
There are still Black and Decker factory stores on some plazas, and this is where you can get them. Depending on the size, they are around $5/pc.
they are pretty cheap. i have seen them at home depot as well, many of the smaller local hardware stores have them. i have one, and they are nice. i didnt really know that different bits can perform better, but now i know!
- Status
- Not open for further replies.
- Home
- General Interest
- Everything Else
- Cutting, drilling, mounting etc. for the absolute beginner