The tubes in transformer space area are damped already by Great Stuff expanding foam. I used window and door type for softer application.
After many years and many tests @ Boeing aerospace i use silicone for all potting and cab damping.(if you can stand the smell for several days)
ron
ron
Black stuff
Hi Pete,
Nice work again, wished you lived in my neck of the world!
Whats the black stuff your'e using?
Hi Pete,
Nice work again, wished you lived in my neck of the world!
Whats the black stuff your'e using?
Peter Daniel said:
I tried in my monoblocks wooden blocks of that type as a foot at one end and also I tried that white stuff I'm using (teflon like, is it polycarbonate?) and definitely the white material sounded better.
Looks like Delrin. If it's the stuff cutting boards are made of, it's Delrin.
I'm thinking about Corian tounter top material from Dupont. very dense, and it comes in many colors/patterns. Can be cemented into a seamless monolithic piece, and the sizes needed can be mooched for free from countertop/cabinte makers.

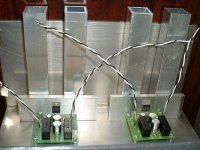
Here's the beginning of mine
It's all aluminum, but I'm soldering it togther with a neat item called lumaweld. Works well, but it there is too much surface area, you have to have an acetylene torch. My propane jobbie wont heat it up enough to melt the lumaweld rods.
This is a clamshell type chassis, with the front-bottom-sides made of a single peice of .090" 6061 bent up on a sheet metal press. I have access to a huge scrap pile at my cousin's very large sign company .
.
The cover will be a 1/2" shell of maple, with slots cut in the front and back edges to slide down snugly over the front and back. The aluminum stacks will be chamfered and polished, and will stick up above the maple about 3/4-1"". The bottom of each stack will sit about 1/2" above the bottom of the amp to keep air moving. The plate that the chips are atached to is 1/4" aluminum as well
The amps are $9 GainClone kits, but with parts upgrades and no PS Cap bypassing. Next attempt will be P2P wiring, but I wanted to do the first one on a PCB for ruggedness so I won't worry about damaging it until I get a good chassis designed.
What finish would one recommend for the aluminum front panel? I don't really like tha natural aluminum look, but would love to anodize, if it didn't cost an arm and a leg.
Cheers,
Nik
It's all aluminum, but I'm soldering it togther with a neat item called lumaweld. Works well, but it there is too much surface area, you have to have an acetylene torch. My propane jobbie wont heat it up enough to melt the lumaweld rods.
This is a clamshell type chassis, with the front-bottom-sides made of a single peice of .090" 6061 bent up on a sheet metal press. I have access to a huge scrap pile at my cousin's very large sign company
.The cover will be a 1/2" shell of maple, with slots cut in the front and back edges to slide down snugly over the front and back. The aluminum stacks will be chamfered and polished, and will stick up above the maple about 3/4-1"". The bottom of each stack will sit about 1/2" above the bottom of the amp to keep air moving. The plate that the chips are atached to is 1/4" aluminum as well
The amps are $9 GainClone kits, but with parts upgrades and no PS Cap bypassing. Next attempt will be P2P wiring, but I wanted to do the first one on a PCB for ruggedness so I won't worry about damaging it until I get a good chassis designed.
What finish would one recommend for the aluminum front panel? I don't really like tha natural aluminum look, but would love to anodize, if it didn't cost an arm and a leg.
Cheers,
Nik
Attachments
I have access to a huge scrap pile at my cousin's very large sign company .
You guys might be able to make a few bucks selling the scrap to the DIY community on the trading post.
Vellaman kits?
Very nice. I’ve used a palm sander in aluminum and been happy with the finish. A belt sander would likely do better.
-Dave
If anodizing is expensive, you might try alodine and there is enough info about it on the forum.
MAP gas vs. Acetylene?
Would MAP gas be get hot enough for the Lumiweld? It might be cheaper than acetylene.
Would MAP gas be get hot enough for the Lumiweld? It might be cheaper than acetylene.
Da5id4Vz said:
You guys might be able to make a few bucks selling the scrap to the DIY community on the trading post.
Vellaman kits?
Very nice. I’ve used a palm sander in aluminum and been happy with the finish. A belt sander would likely do better.
-Dave
Not Velleman, but a KitsRUs.com Kit 50. It's ok, but I question the designers' values that were chosen. It looks like inverting parts on an non-inverting configuration.
The front is just out of view, but I used a fine grit on a very high speed random orbit sander. Looks ok, but not really into the bbrushed aluminum techie look.
Re: MAP gas vs. Acetylene?
That is my next attempt. Going to get a can this afternoon at HD.
Da5id4Vz said:Would MAP gas be get hot enough for the Lumiweld? It might be cheaper than acetylene.
That is my next attempt. Going to get a can this afternoon at HD.
Is this what you are talking about KYW?
this is my prototype from the silver mica thread.
its a brass bar lacqured with damar...
have a look...
regards
this is my prototype from the silver mica thread.
An externally hosted image should be here but it was not working when we last tested it.
An externally hosted image should be here but it was not working when we last tested it.
its a brass bar lacqured with damar...
have a look...
regards
Re: Re: MAP gas vs. Acetylene?
The MAPP gas worked fine, but it still took a few minutes to get it hot enough for the Lumaweld to melt (750 F). Pictures to follow.
MantramAudio said:
That is my next attempt. Going to get a can this afternoon at HD.
The MAPP gas worked fine, but it still took a few minutes to get it hot enough for the Lumaweld to melt (750 F). Pictures to follow.
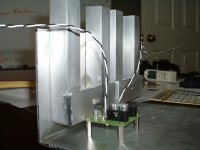
Here's my aluminum stacks, installed. I attached them to the chassis with metal epoxy, similar to JBWeld. The chip mounting holes are drilled, as are the PCB standoffs. Not much room for error there, and not a real easy thing to do either.
The polishing will begin today with Mother's Aluminum Wheel polish, by hand.
I have great expectation for this chassis, with inspiration from Peter Daniel.
The polishing will begin today with Mother's Aluminum Wheel polish, by hand.
I have great expectation for this chassis, with inspiration from Peter Daniel.
Attachments
travis said:is that a LM1875? you have a white-board?
Yes, that is an LM1875, and yes I have a whiteboard. Doesn't every engineer's office?
tbla said:i suggest even better cooling....ala jeff rowland...
Which amp? I've only ever seen big Aleph style sinks on his amps.
- Status
- Not open for further replies.
- Home
- Amplifiers
- Chip Amps
- Convection cooling in a GC amp