After a few years of researching different designs, including the monkey box classic 3-way, "cornscala" builds, and the beyond the Ariel design, I decided to try building a synergy horn. With the help of the excellent synergy calc spreadsheet by Bwalso, I got the confidence I could actually build these. There are many others to thank for their contributions to the other various synergy threads such as Weltersys, xkr971, Patrick Bateman, Mark100 and others. And I can't forget Tom Danley for sharing his insight on his brilliant design.
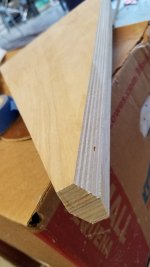
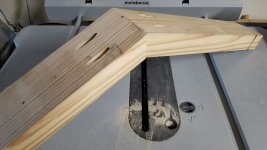
The start of much sawdust making...
The start of much sawdust making...
Attachments

Spreadsheet figures
I went with a compromise between the SH50 and other builds with 60 x 90 and used 44 x 74. With the 390 Hz cut-off and the ratio of the final expansion to horiz. width at .6512, I ended up with an overall height to width ratio of 1:1.618. I know it's not critical to have it exactly at the golden ratio, but it came out real close so I just needed to tweak my figures a little to get the 1.618. If nothing else it should look pretty good.
I went with a compromise between the SH50 and other builds with 60 x 90 and used 44 x 74. With the 390 Hz cut-off and the ratio of the final expansion to horiz. width at .6512, I ended up with an overall height to width ratio of 1:1.618. I know it's not critical to have it exactly at the golden ratio, but it came out real close so I just needed to tweak my figures a little to get the 1.618. If nothing else it should look pretty good.
Attachments

I wish you success on your project. I was fortunate enough to buy a battered pair of Yorkville U15 which is sort of a poor man's Synergy 🙂
"Beyond the Ariel", that is an epic read, did they ever actually settle on a design? 😀
"Beyond the Ariel", that is an epic read, did they ever actually settle on a design? 😀
Hi Heathkit, good luck with your project,
and glad if any of my posts have helped....
Bwaslo keeps getting my "couldn't have done it without you" vote.......
..... because as much as I've learned synergy theory from the posts, patents, etc from all the guys,
building a synergy would still have been a non-starter for me if Bill hadn't gifted us with his fine speadsheet
+1 on the “I couldn’t have done it without Bwaslo”. Also same goes for his XSim crossover simulator program. He has done so much for the DIYA community.
Good luck on your project! A couple of things to think about is maybe look into seeing if 3D printing can help you fabricate small custom parts like driver adapters, throats, volume filler plugs, etc.
Other thing is that a secondary expansion is optional. I am not sure how important it is - you can achieve 90% of the sound quality I think without it.
Final word - the smoothness of the compression driver throat to horn wall is critical. It must be perfect and only way is to either 3D print or use auto body filler like Bondo or putty if some sort.
Subscribed. The more details you can post about your process the better. I’m at the stage that I’ve looked at and read a lot of those threads by XRK and others, and I would really like to try this, but it is really a lot to take in and intimidating.
I’m currently trying to build a conical adapter for a pair of Oris 200 tractrix horns to be able to mount a B&C 8pe21 to try as a midbass with a pair of Edgar 350Hz horns that I have Radian 760pb neo and Dynaudio D54 to try in. The question occurred to me “Could I try to make the adapter multi entry?” I’ve got two pair of the B&C.
What drivers are you using with this project?
Other thing is that a secondary expansion is optional. I am not sure how important it is - you can achieve 90% of the sound quality I think without it.
Final word - the smoothness of the compression driver throat to horn wall is critical. It must be perfect and only way is to either 3D print or use auto body filler like Bondo or putty if some sort.
I have experienced the same thing with regard to the secondary flare being optional. I think it depends on your goals.
For home use, I'd call it more optional.
For a large install or live, it appears more necessary to get even audience coverage
Ok, now I'm about to become a true heretic....😛
I've played with carefully matching CD to throat, and throat to horn, more than I like to admit.
And as of yet I haven't found that a really good match vs an almost crappy match, makes much difference.
I can't remember measuring any significant frequency response difference, or any impulse response difference. (even using short FFTs for high time-domain resolution.)
So many folks I respect say how much matching matters....so I dunno...just sharing my experiences.......
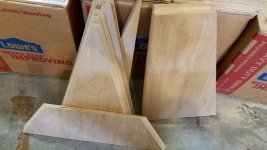
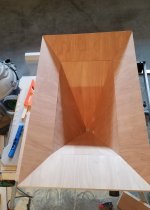
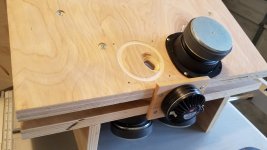
Some progress... I decided to go with the secondary expansion. All 16 pieces for 2 horns are cut. Yes there were a few mistakes even after double and triple checking measurements, but I managed to get it done with 1 - 4 x 8 sheet of 18mm birch plywood. Started routing the ports for the mids
@Soldermizer Yes Beyond the Ariel is epic. I am still reading it, but last I read he decided on a large Onken enclousure with an Altec 15", a LeCleac'h horn with 1.4" Radian 745Neo Be driver, and a Raal ribbon for super tweeter. Would have been a very expensive build.
@Soldermizer Yes Beyond the Ariel is epic. I am still reading it, but last I read he decided on a large Onken enclousure with an Altec 15", a LeCleac'h horn with 1.4" Radian 745Neo Be driver, and a Raal ribbon for super tweeter. Would have been a very expensive build.
Attachments

Last edited:
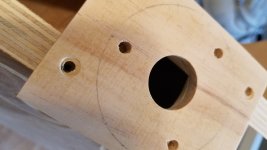
I was wondering what kind of clamping contraption I would have to make to be able to assemble these pieces into a horn. That was before I read the excellent .pdf guide of Bwaslo. Really not too tricky, the key I think are the extra pieces you glue to the inner horn sides that the top and bottom screw into. Then the simple jig you make to help put together the outer expansion pieces like a picture frame using a Kreg pocket hole jig.
Attachments

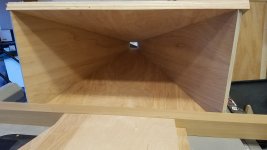
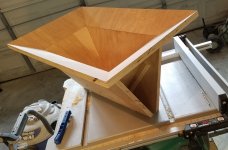
Test fitting the outer expansion before gluing. I wasn't sure how well it would fit or if it even would fit. It actually fit pretty close, yay! There were some small gaps but not that bad and easily filled with some wood putty.
Attachments
Very nice, great progress 🙂
Was the Kreg jig easy enough?
I have one but still feel like I'm groping with it....
Was the Kreg jig easy enough?
I have one but still feel like I'm groping with it....
@mark100
Thanks! Yes the Kreg worked great. I was in the dark about how to set it up and use it, so I had to break down and actually read the instructions. Once you have it set up to drill the correct depth for the thickness of wood you're using, then it works great. Also, the drill guide needs to be clamped very securely before drilling. I also used the Kreg in my tapped horn build, and it really helped that project come together.
Thanks! Yes the Kreg worked great. I was in the dark about how to set it up and use it, so I had to break down and actually read the instructions. Once you have it set up to drill the correct depth for the thickness of wood you're using, then it works great. Also, the drill guide needs to be clamped very securely before drilling. I also used the Kreg in my tapped horn build, and it really helped that project come together.
Me too!
I have also recently started building Synergy-type horns using the great work from bwaslo. I chose to skip the second flare to reduce complexity and size. I'm using mine in a fixed listening position, so I don't notice the waistbanding.
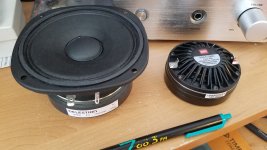
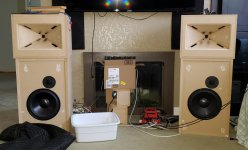
I used the Celestion CDX1-1445 compression driver and Gento midranges, but chose the Dayton DC130 woofers since the Auras are NLA. I'm thrilled with how mine sound, despite the simple passive crossover. I've never heard anything quite like it and I've built a lot of speakers. I'll definitely be doing more experimenting with this technology. I'm in the process of building a pair of 15" ported boxes that will be more in line with the Synergy's efficiency than the cludged together setup in the picture. I'm hooked!
BIG thank you to Tom Danley and bwaslo for their work developing and describing the technology (Tom) and making it reachable for those of us with interest, but limited time (bwaslo).
I have also recently started building Synergy-type horns using the great work from bwaslo. I chose to skip the second flare to reduce complexity and size. I'm using mine in a fixed listening position, so I don't notice the waistbanding.
I used the Celestion CDX1-1445 compression driver and Gento midranges, but chose the Dayton DC130 woofers since the Auras are NLA. I'm thrilled with how mine sound, despite the simple passive crossover. I've never heard anything quite like it and I've built a lot of speakers. I'll definitely be doing more experimenting with this technology. I'm in the process of building a pair of 15" ported boxes that will be more in line with the Synergy's efficiency than the cludged together setup in the picture. I'm hooked!
BIG thank you to Tom Danley and bwaslo for their work developing and describing the technology (Tom) and making it reachable for those of us with interest, but limited time (bwaslo).
Attachments
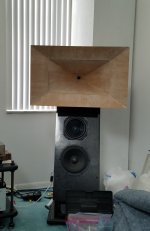

Of course you know there was no way I was going to work on putting the second horn together, before giving this thing a listen.
...waiting on a listening report. I remembered my jaw dropping the first time I heard one of these things.
That's a really pretty horn, by the way. Yours fit together better than the one I did with hardwood veneer, I was using a really cheap table saw at the time which still worked pretty well. But there's nothing quite like a table saw that has a good fence!
I have also recently started building Synergy-type horns ....
That's also a nice looking one. But if you do another one, I'd still suggest using the 2nd expansion part, besides waistbanding it also is a way to get control down to lower frequencies without too much added depth to the contraption! And not as hard as it seems to make. There have been some people here who have done 2nd expansions using lighter materials like foamboard, which I imagine works pretty well -- not a lot of vibration likely gets onto the expansion.
- Home
- Loudspeakers
- Multi-Way
- Contracted synergy fever