Using silkaflex for constrained layer construction - I know it never gets truely hard. For smaller jobs and prototypes getting the CNC is expensive so I was wondering if a constrained layer can be cut on a table saw without gumming up blades and ruining everything.
The first issue that comes to mind is that it will be difficult to be consistent in the thickness of a layer of sealant which would effect accuracy. Second issue would be the potential, even if subtle, of movement between pieces when cutting, fitting, etc. Third, and I believe you're correct, it would make a mess of your saw blade.
I was lead to believe - perhaps incorrectly - that the advantage with a constrained layer was the change in vibration/frequency at the junction of two layers. If that's correct, I wonder if it might be better to make a sandwich of two outer layers of (for example) 1/2" baltic birch plywood with a middle layer of low density mdf bonded by any good woodworking adhesive.
I was lead to believe - perhaps incorrectly - that the advantage with a constrained layer was the change in vibration/frequency at the junction of two layers. If that's correct, I wonder if it might be better to make a sandwich of two outer layers of (for example) 1/2" baltic birch plywood with a middle layer of low density mdf bonded by any good woodworking adhesive.
Another option for CLC is "rubber ply" as an intermediary layer, glued with a thick coat of sprayed contact cement. When several layers are vacuum bagged with hard curing PVA or epoxy adhesives, rubber ply can be fairly rigid, but by itself the material is quite flexible and relatively easy to work with. Not a suitable face for direct finishing.
Rubber ply is comprised of 2 layers of very soft Luan or Meranti veneer (grain in both layers run the same direction) with thin internal layer of synthetic rubber.
Rubber ply is comprised of 2 layers of very soft Luan or Meranti veneer (grain in both layers run the same direction) with thin internal layer of synthetic rubber.
I don't have the proper equipment for vaccum sealing construction. I guess the best thing for me to do is make some kind of stand off or something similar. I have used wonder board in the past behind w 2x2 battons as the frame work and it working nice - it was almost like a break your knuckle test. When you put the silkaflex down and apply pressure it's hard to guess the actual thickness. Would I be best off with a blind dado joint, sand square then hit the edge w the quarter rounder but to make it nice and neat? I am thinking of using MDF for the inside at .75 front 2x .75 exterior a hardwood.
Another option for CLC is "rubber ply" as an intermediary layer, glued with a thick coat of sprayed contact cement. When several layers are vacuum bagged with hard curing PVA or epoxy adhesives, rubber ply can be fairly rigid, but by itself the material is quite flexible and relatively easy to work with. Not a suitable face for direct finishing.
Rubber ply is comprised of 2 layers of very soft Luan or Meranti veneer (grain in both layers run the same direction) with thin internal layer of synthetic rubber.
Interesting sounding - sorry 'bout that - stuff. I've never heard of it, but that comes from living in the hinterland.
Jared - I mentioned vacuum bagging only to highlight the versatility and relative ease of working with the product. I think that you'd definitely want to avoid using that much pressure when using non curing elastomeric adhesives for a constrained layer fabrication.
An extra thick layer of solvent based contact cement sprayed with an air powered pot gun works great.
prairieboy - the product is also known as wacky board, bending plywood - lots of colloquial trade names.
Note that the faces of this material are hopelessly unsuitable for direct finishing, so at the very least a thin layer of hardboard, 1/8" MDF or plywood top layer is required - contact cement again.
Bendyply and Flexiply come to mind.lots of colloquial trade names.
Another option is to use maybe 6mm MDF or ply with 5-6mm foam board, then another 6mm MDF/ply. Managing that without dissolving the foam board is one question.... Though there are insulation boards in 1/4" which might be more resistant than standard paper covered FCB. (When using spray contact adhesive).
Corners and edges would need mitre joints or peripheral framing.
Corners and edges would need mitre joints or peripheral framing.
Ok thanks for the advise so far. From what I gather it's almost like doing sound treatment where it has to be pretty much totally decoupled except for the front baffle connection. After a friend recommended Sikaflex I went to Home Depot to see what I can find. They offer a self leveling option in tubes but covering a 7 foot tower would be crazy expensive and time consuming where spraying or spreading with a trowel would be perfect. They also have self leveling polyurethane type stuff in variaing thicknesses 7mm I believe the thickest. I can get it in big buckets and is used typically in flooring applications. I'm going to call a friend who's seen it and done it all for his recommendation as well as Sika tomorrow to see what they recommend. The internal box will be MDF and I want to use a nice exotic hardwood for the outside so it looks like I'm going to have to be super careful with my second layer so it fits like a glove and airtight and basically use a rubber mallet to smash it in - not really finesse. I wouldn't mind filling it and have some spill over to clean. I'll have to use some kind of mitered joints on the outside and be precise w my cuts as well so no slinging wood and unless I go super thick a nice 1/2in round over will be hard. Evan on the forums is somewhat local and knows his sh17 with slinging wood and I'll call him tomorrow also. That rubber ply approach sounds nice and neat/clean and obviously there's a million ways to skin a cat. I believe Wilson was using neoprene... Based off reading it seems Sika is the way to go...if done correctly but adding something to it can make it better and easier to work with - I haven't seen or heard of anything being done w the rubber ply before but it sound promising. Do you know of any studies or data with it being used? Like everything there's always a point of deminishing returns also. Which being audio, is quite high 🙂 and don't mind shelling out the guac if noticeable performance is there. Audible is always questionable w placebo effects. From building studios and theaters, I'm going to have to rely on the methodology if it's waterproof and its air proof it is sound proof and as much decoupling between the layers with something that never really gets truly solid would be ideal. I have used flexseal in the past to make sure things are waterproof and airproof. If I can find a mixable and self level version of the Sika like (they make a ton of products) I can pour the first layer on the bottom and then when it's firm place the inside box and square it up and then pour the rest of the materials in there. Come to think of it some of those self expanding spray foams mixed w sand and something like flexseal would be probably pretty nice but mixing the expanding spray foam w anything is pretty laughable. A new bottle clogged an first shot went all over the place and I was lucky it didn't get in my eyes. Getting it off hands is a time consuming process and took days. u figure after playing w metal and almost going blind from multiple shards going in both eyes the largest narrowly missing my retina and having surgery to all the nonsense w wood like kickbacks and stuff shooting nails thru my hands etc I would be more careful but not me. Even took a few lung infections before realizing the warning on packages are for a reason and I suit up now when I am working w stuff that can be dangerous. Excuse me while I pour this etching solution on my neighbors lawn. 🙂. If I have time tomorrow I'll report back with my findings. Any info on testing w the rubber ply would be cool. Wondering if spray foam acting as the buffer between the 2 would be nice and clams can be set to the exact thickness you need after expansion. Anything to slow the curing process would be awesome to add more mass and the excess can be easily trimmed w a razor.
Our 1st experiment in such:
dave
What kind of foam did you use and how did you vaccum bag it?
I saw another material that seems to be sorta common. Have the name written down but can't remeber it. It's used as the binder for asphalt and used in roofing. It looks like it would possibly the best for the layer between MDF and hardwood. I can brush it on thick and heavy and any excess can be remove when it seems out. Use Liquid nails or my favorite for its expansion gorilla glue for the wonder board on the inside (or whatever they call that material you use before tiling walls and stuff) on the inside and seal with acoustic caulking. Line the inside with foam and insulation for the sealed cabs and poly batting for the vented ones and with the braceing and fork lift you can move it around.
jared - sorry for the delay - the interweb gremlins stole my previous reply
The only foam used in the Ellipses was in the vent openings - closed cell foam, I think - recycled from computer parts packing via Dave.
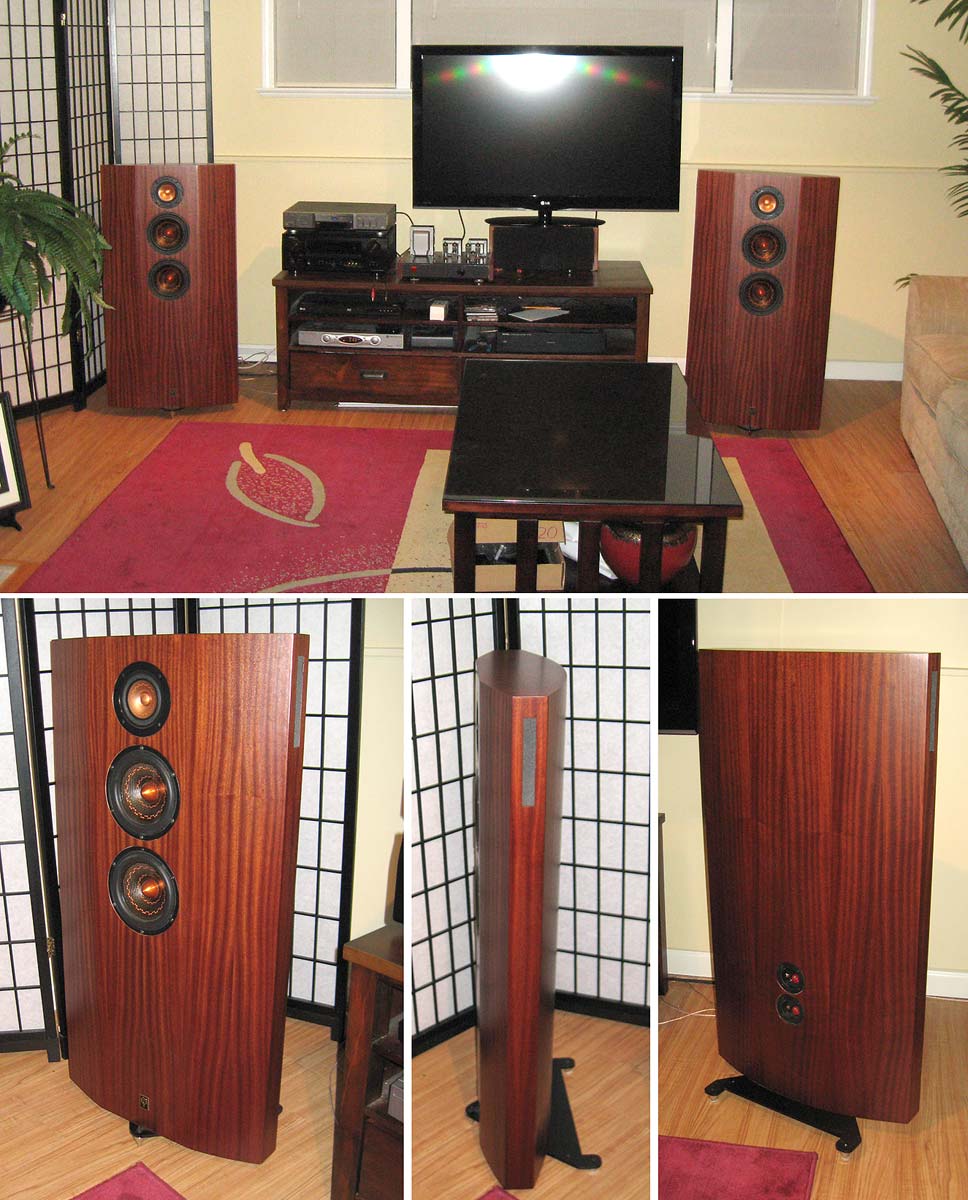
The vacuum bagging was for the curved panels, and was done separately. Almost as much time is required to make a sturdy enough form as for the first couple of layups. Three layers of rubber ply were laid up with yellow carpenters' glue ( Titebond I ), and pressed for approx 4 hrs each. It's the yellow glue that makes the curved panels very rigid, but perhaps the constitution of individual layers would qualify this as a type of constrained layer . Rubber ply itself is very floppy - two layers of soft meranti or equivalent veneer, with grain running the same direction, and an internal layer of synthetic rubber.
The curved panels were then trimmed and glued/clamped/nailed to plywood skeletal frame. An 1/8" layer of MDF was contact cemented to the rubber ply panels to provide smooth surface for finishing. Quarter Cut Sapele veneer with 3 coats of ML Campbell Krystal post catalyzed laquer.
All internal fill was Ultratouch recycled denim insulation, 1/2" in the isolated TL for the Alpair7, and 2" in the sealed compartment for SDX7. IIRC, there was also some loose Dacron / Acousti-stuff fibre in the TL - "tuned by ear".
Including the fabrication of the bagging form, skeletal frame, veneering, etc, there was at least 100 hrs in these babies.
The only foam used in the Ellipses was in the vent openings - closed cell foam, I think - recycled from computer parts packing via Dave.
The vacuum bagging was for the curved panels, and was done separately. Almost as much time is required to make a sturdy enough form as for the first couple of layups. Three layers of rubber ply were laid up with yellow carpenters' glue ( Titebond I ), and pressed for approx 4 hrs each. It's the yellow glue that makes the curved panels very rigid, but perhaps the constitution of individual layers would qualify this as a type of constrained layer . Rubber ply itself is very floppy - two layers of soft meranti or equivalent veneer, with grain running the same direction, and an internal layer of synthetic rubber.
The curved panels were then trimmed and glued/clamped/nailed to plywood skeletal frame. An 1/8" layer of MDF was contact cemented to the rubber ply panels to provide smooth surface for finishing. Quarter Cut Sapele veneer with 3 coats of ML Campbell Krystal post catalyzed laquer.
All internal fill was Ultratouch recycled denim insulation, 1/2" in the isolated TL for the Alpair7, and 2" in the sealed compartment for SDX7. IIRC, there was also some loose Dacron / Acousti-stuff fibre in the TL - "tuned by ear".
Including the fabrication of the bagging form, skeletal frame, veneering, etc, there was at least 100 hrs in these babies.
Attachments

Last edited:
Hi,
The theory for constrained layer damping and restrained
layer damping indicated for boxes restrained is better.
Restrained works best in the centre of a panel, whilst
constrained works best at the edges of a panel. But
corner joints stop constrained working effectively
whilst having no effect on restrained damping.
Hence nearly all damping in speaker boxes is the
restrained type, inside damping panels on the walls.
Constrained has been used in commercial boxes,
History of the Signature speaker | Qln, note the mention
of Q board for the initial version, but how little they
actually mention it, because it doesn't well at all.
Constrained for a dual layer OB, now your talking.
But you must leave the edges of the two layers free.
rgds, sreten.
jared - sorry for the delay - the interweb gremlins stole my previous reply
The only foam used in the Ellipses was in the vent openings - closed cell foam, I think - recycled from computer parts packing via Dave.
The vacuum bagging was for the curved panels, and was done separately. Almost as much time is required to make a sturdy enough form as for the first couple of layups. Three layers of rubber ply were laid up with yellow carpenters' glue ( Titebond I ), and pressed for approx 4 hrs each. It's the yellow glue that makes the curved panels very rigid, but perhaps the constitution of individual layers would qualify this as a type of constrained layer . Rubber ply itself is very floppy - two layers of soft meranti or equivalent veneer, with grain running the same direction, and an internal layer of synthetic rubber.
The curved panels were then trimmed and glued/clamped/nailed to plywood skeletal frame. An 1/8" layer of MDF was contact cemented to the rubber ply panels to provide smooth surface for finishing. Quarter Cut Sapele veneer with 3 coats of ML Campbell Krystal post catalyzed laquer.
All internal fill was Ultratouch recycled denim insulation, 1/2" in the isolated TL for the Alpair7, and 2" in the sealed compartment for SDX7. IIRC, there was also some loose Dacron / Acousti-stuff fibre in the TL - "tuned by ear".
Including the fabrication of the bagging form, skeletal frame, veneering, etc, there was at least 100 hrs in these babies.
i like the concept of using the vacuum bagging and can see a number of uses for it. with the process you mentioned tho, i am a little concerned about the actual amount of decoupling achieves as it seems like they are bonded and solidified. Not saying its a bag thing at all and if something sounds good, it sounds good. But from my research and talking to people the material between the constrained layers for what i am asking about must never become fully solid. gummy spongy, tacky,you name it but it seems like it should more or less float like a box in a box with the only connection being the front baffle because well anything else is impossible. i have a number of solid designs and want to get into bending however kerf cuts make me nervous about the durability where something like your method would seem ideal for stiffening up any potential weak areas from a kerf. any triangle shaped voids can be filled with sand or some other dense material. tuning by ear is always the way to go you hear people quote half lb to every sqft but thats nonsensical. only other way i can think of making something with a curved back the way i would like would be running a number of horse shoe shaped cuts on mfd then use dowel joints to align them and god old fashioned elmers yellow and some clamps...then sands and finish. i have a love hate relationship with mdf and getting burnt on BB or RB 2 times has me jaded about it. i paid a premium for void free, i stated over and over must be void free and as soon as i routed some circles sure enough i found a few pockets. at least here its not cheap and refuse to pay the piper again for something that potentially yields no gains especially after layering. ill layer all my cabs one way or another but i think this one is going to be floated as best as possible with an exterior of .75 mahogany ply and that thick black stuff i spoke about earlier as the sika guys have almost no clue what i am talking about. great build btw and would love to hear them.
correct it will be 100% contained with the exception of the front baffle, i would have to mitre the external box and the internal can be done basically anyway. i figured out 2 ways to make sure the material "sits" correctly at 3mm first has a margin of error due to cure times where it can sink or shift. the second would be a jig, easyiest way if your DGAF about the finish would be to put a temporary shim in w a drill and then remove it, add some more of the goop and then seal w a plastic wood or that stuff in the red and yellow can with the guy flexing. i can't remember the name but i get it all the time and my god its a rock solid. using a hardwood or ply where you want to preserve the grain it isn't ideal tho...so back to brainstorming. I started making sub boxes by framing the exterior first with 2x2s then i would use eventually 2 layers of thinner materials for 5 side and 2 of .75in for the front because having the additional surfaces added to its strength. i then started adding the wonder board or whatever they call it by you and recently saw something online for like 6x the price was basically the same just thicker. well i would use a similar approach for this however the the 2x2s will allow anchoring points to jig and clamp the box into position while the medium cures to a point that the internal box would not sink or shift, then the front baffle will be added. its a shame i have to mitre it and i have a friend who does fine wood working and knows every trick in the book. i am hoping that i can figure out a way to use the mahogany ply and do a half round on the corners or at least a quarter round on it. i could get tricky and do some dovetail joints which would be nice and firm locking but being the same colors no-one will know. BTW for staining and poly...Old Masters w a lamb skin all the way around and you will look like a god who's been doing it for years. i can't believe the finishes i have got with this stuff.Hi,
The theory for constrained layer damping and restrained
layer damping indicated for boxes restrained is better.
Restrained works best in the centre of a panel, whilst
constrained works best at the edges of a panel. But
corner joints stop constrained working effectively
whilst having no effect on restrained damping.
Hence nearly all damping in speaker boxes is the
restrained type, inside damping panels on the walls.
Constrained has been used in commercial boxes,
History of the Signature speaker | Qln, note the mention
of Q board for the initial version, but how little they
actually mention it, because it doesn't well at all.
Constrained for a dual layer OB, now your talking.
But you must leave the edges of the two layers free.
rgds, sreten.
Hi,
You don't seem to have understood my post at all.
Your "wonder" board cabinets will have next to
no damping for the reasons that I have outlined.
rgds, sreten.
You don't seem to have understood my post at all.
Your "wonder" board cabinets will have next to
no damping for the reasons that I have outlined.
rgds, sreten.
Last edited:
Hi,
You don't seem to have understood my post at all.
Your "wonder" board cabinets will have next to
no damping for the reasons that I have outlined.
rgds, sreten.
The "wonder" board is used to add more weight and density. It's porous in nature. I use the 3M matting they use under hardwood floors on top of it and then the egg crate or prymid foam on top. You think I should just ditch the wonder board? People talk about using tiles and I'd imagine that having higher reflections points and a lot harder to dampen.
- Status
- Not open for further replies.
- Home
- Design & Build
- Construction Tips
- Constrained layer construction