This is the next step from the plastic horn I made as the very first prototype: https://www.diyaudio.com/community/...-neile-alo-horn-by-sphericalhorns-net.390581/
In this thread, I would like to show the workflow. I really enjoy watching other people's work, so I hope you will enjoy this thread as well. First, some overall data. The horn is ca 64 cm wide, 47 cm deep and 29 cm high. Each is made of 16 layers of 18 mm birch plywood and weights around 20 kg (estimate, did not weigh one). One horn needs two 1500 x 1500 mm sheets with a bit of leftovers. In total, the plywood bought was over 120 kg of material.
The workflow need to fit my hobby CNC. First, I cut all the single layers and rough the 3D parts. This was done by a 1/8" milling bit. Then, the layers are glued by two together and machined with the finishing pass with 6 mm bit. Glue up of the dual slices follows, during the project a friend of mine developed a unique press using water pressure to clamp the curved surfaces perfectly together. Then it is sanding, sanding and more sanding, gluing the two halves together, fitting the driver flange and more sanding.

Ready to start round one.

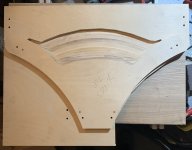
The slices are arranged to minimize waste.

Another layer cut.

Glue the two roughed layers together.
In this thread, I would like to show the workflow. I really enjoy watching other people's work, so I hope you will enjoy this thread as well. First, some overall data. The horn is ca 64 cm wide, 47 cm deep and 29 cm high. Each is made of 16 layers of 18 mm birch plywood and weights around 20 kg (estimate, did not weigh one). One horn needs two 1500 x 1500 mm sheets with a bit of leftovers. In total, the plywood bought was over 120 kg of material.
The workflow need to fit my hobby CNC. First, I cut all the single layers and rough the 3D parts. This was done by a 1/8" milling bit. Then, the layers are glued by two together and machined with the finishing pass with 6 mm bit. Glue up of the dual slices follows, during the project a friend of mine developed a unique press using water pressure to clamp the curved surfaces perfectly together. Then it is sanding, sanding and more sanding, gluing the two halves together, fitting the driver flange and more sanding.
Ready to start round one.
The slices are arranged to minimize waste.
Another layer cut.
Glue the two roughed layers together.

How do they sound? Awesome. All the other components of the system are top notch and the listening room is acoustically treated, which is a big part of the great sound, but in my opinion, there is nothing like a great large horn with perfectly controlled dispersion and absolutely zero resonances. And that is what WN300ALO is.
It is this one with brushless spindle upgrade: https://lupa-cnc.com/lupa-v-2-7-rozsirena/ Only in Czech, though.
@pelanj Now that my horn is complete I finally have the time to gloat over all the bookmarks I had created to read threads of interest. Thanks for sharing pictures of your workflow, and goodness me, that is a press of dreams!
Did you apply any sort of sealer/wax after sanding?
Did you apply any sort of sealer/wax after sanding?

- Home
- Loudspeakers
- Multi-Way
- CNC made WN300ALO horns (picture heavy thread)