External Epoxy coating
If you can get the external epoxy smooth enough that will be a great base to paint on.
If you are hand layering its going to be tricky... Maybe spraying on a few coats of epoxy or polymer based material will be easier?
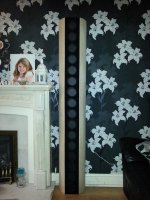
By the way all my Overkill Encore pics are from about 8 years ago. The attached La 16 and LA 8 use 16 and 8 BMR's per side in a full range line array, ( back on topic!) and are my latest designs.
I now mount them tight against the wall using rebated metal Keyhole inserts. This makes a really big difference as it gives the speakers the effective mass of the wall they are fixed too...Nice Mms to cabinet ratio!!
I will take some more pics tomorrow and show the LA 16's wall mounted.
Cheers
Derek.
If you can get the external epoxy smooth enough that will be a great base to paint on.
If you are hand layering its going to be tricky... Maybe spraying on a few coats of epoxy or polymer based material will be easier?
By the way all my Overkill Encore pics are from about 8 years ago. The attached La 16 and LA 8 use 16 and 8 BMR's per side in a full range line array, ( back on topic!) and are my latest designs.
I now mount them tight against the wall using rebated metal Keyhole inserts. This makes a really big difference as it gives the speakers the effective mass of the wall they are fixed too...Nice Mms to cabinet ratio!!
I will take some more pics tomorrow and show the LA 16's wall mounted.
Cheers
Derek.
Attachments

Just showing that I'm still at it:

I'm thinking of lining the cabinet walls with wool felt, about 5 mm thickness. Good idea or not?
If I need damping in the midrange I'll use Twaron angel hair. I already have that.
The angel hair is even thinner than real wool and from a test I have read it's more effective with less material needed.
Sealed, no vents...
My inspiration: http://www.troelsgravesen.dk/cabinet-damping.htm
The idea is they play full range and I'd like to absorb/diffract as much of the backwave as possible.
Hence the cabinet construction and the damping materials. Basically trying to minimise backwave traveling
back trough the cone...
My inspiration: http://www.troelsgravesen.dk/cabinet-damping.htm
The idea is they play full range and I'd like to absorb/diffract as much of the backwave as possible.
Hence the cabinet construction and the damping materials. Basically trying to minimise backwave traveling
back trough the cone...
Last edited:
Hi Wesayso
I think the felt is a good idea, but I would only use it on the dividing walls, as they are parallel. The chaotic reflections from the sidewalls are better damped by loose damping material (Twaron).
IMHO.
Koldby
I think the felt is a good idea, but I would only use it on the dividing walls, as they are parallel. The chaotic reflections from the sidewalls are better damped by loose damping material (Twaron).
IMHO.
Koldby
Hi Wesayso
I think the felt is a good idea, but I would only use it on the dividing walls, as they are parallel. The chaotic reflections from the sidewalls are better damped by loose damping material (Twaron).
IMHO.
Koldby
Thanks Koldby,
But it couldn't hurt if I did the walls too right? More diffusion... I think the wave shapes are too small in size to have a really noticeable effect in the midrange and the felt will be just about invisible to the lower frequencies.
As I am going to coat the outside with epoxy I'm still wondering what to do on the inside. Should I seal all the walls? And with what.
Here's a size reference, still 7 more chambers to go:

(my almost 7 year old posing beside the stack)
It's just a loose stack with m6 rods to prevent it from falling. As soon as I have the aluminium I'll start gluing.
Last edited:
Wesayo,
Looks very nice (and good looking kid too)! The tower is huge - I like it! A lot. 😀 I think the felt will definitely be good to have on side walls as well as divider walls, but you have holes in divider walls - would you cut holes in felt to match? I think that just a dense stuffing polyfill (pillow stuffing) in each chamber may do the trick. The shape is already non rectangular so you won't set up any standing waves except for horizontal divider walls, but those have holes so it all looks good. One thing that you may want to do to save yourself work x 50 units is to build up say a stack of 3 or 4 modules with drivers and put test stuffing material inside. Make some measurements with a mic and Holmimpulse or equivalent program to check for frequency response and reflections/resonances. Whatever works best, apply en masse to the remaining units and you don't have to worry about having a massive job. Another option is to stuff with grey acoustical foam. I hear the best is genuine wool fiber in bulk - get it from a place that makes yarn, stuff that in place of the polyfill. It's a sealed system so you don't have to worry about moths eating it!
Nice work and I can't wait to see it finished.
Wesayo,
Looks very nice (and good looking kid too)! The tower is huge - I like it! A lot. 😀 I think the felt will definitely be good to have on side walls as well as divider walls, but you have holes in divider walls - would you cut holes in felt to match? I think that just a dense stuffing polyfill (pillow stuffing) in each chamber may do the trick. The shape is already non rectangular so you won't set up any standing waves except for horizontal divider walls, but those have holes so it all looks good. One thing that you may want to do to save yourself work x 50 units is to build up say a stack of 3 or 4 modules with drivers and put test stuffing material inside. Make some measurements with a mic and Holmimpulse or equivalent program to check for frequency response and reflections/resonances. Whatever works best, apply en masse to the remaining units and you don't have to worry about having a massive job. Another option is to stuff with grey acoustical foam. I hear the best is genuine wool fiber in bulk - get it from a place that makes yarn, stuff that in place of the polyfill. It's a sealed system so you don't have to worry about moths eating it!
Nice work and I can't wait to see it finished.
Thanks for the advice,
I'll play around with some test enclosures before I glue everything 😀. The angel hair I have is even better than genuine wool fiber, the hairs are way thinner but have very similar behaviour otherwise. You need less of it for gaining the same results. I was thinking of lining the walls with 5 mm felt and only use the angel hair in the back half of the enclosure. The holes in the divider walls I plan to fill with some rockwool. Maybe cut only one side of the felt and fill the hole. I think you are right that some testing might show the best approach.
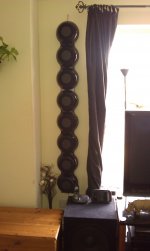
My aluminium came in for the baffles and I've reached the highest point (on one speaker) today. Still a loose stack of ply:

These things are huge!
I think I'm going to seal the inside too. A bit troublesome to do that after all the glue-ing so I think I will use Por 15 clear to seal the insides. That way I can do the sections as I go and make sure everything is sealed.
Last edited:
Slowly getting there... first speaker is glued

and roughly sanded in shape...

Standing free on it's own, the wooden array measures 2225 mm high 😀.

Same size reference as before 😉
and roughly sanded in shape...
Standing free on it's own, the wooden array measures 2225 mm high 😀.
Same size reference as before 😉
If I had a CNC milling machine....
And a stack of perfect wood, a wood shop, stacks of cash laying around and my wife loses her mind and supports me on the project...WOW! I'd be making sawdust and creating new cuss words. 😎
My 3-way vertical line array is done and I'm content--finishing up two 15" push-pull slot loaded powered subs (sealed and ported depending on mood) so I am happy and content...
Well, I was--thanks for planting the seed of discontent with your speaker array p@rn!
I'm not worthy!😱
If I had a CNC milling machine....
I wish I had one of those too! This was done with a router 😱.
I wish I had one of those too! This was done with a router 😱.
Patience is a virtue! I built my 3-way line arrays with 12 five inch woofers, 21 three-inch (full range) mids and 48 tweeters per box with a hand drill, Roto Zip, jig saw, orbital sander and circular saw and thought that was tedious.
Figure there are around 120 pieces cut out with a router and stacked--then it is time to build the second one! 😱
Hat's off to you and your patience mixed with speaker insanity--the cure is when you finish and get to enjoy the results of killing a year. 😎
Wesayo,
The speaker looks awesome - looking forward to seeing you load drivers into it and get first sound. How do you plan to do the EQ'ing? I forgot what driver you will be using? Tc9 or Tg9?
The speaker looks awesome - looking forward to seeing you load drivers into it and get first sound. How do you plan to do the EQ'ing? I forgot what driver you will be using? Tc9 or Tg9?
I'll be using the paper coned TC9. EQ will be done within JRiver media player, that way I can experiment with minimum phase vs linear phase EQ with additional vst plugins.
For all other sources (like radio/TV etc) I'll be using a Behringer DEQ 2496 Ultra-Curve Pro.
Thanks for the kind words everyone, that keeps me motivated!
For all other sources (like radio/TV etc) I'll be using a Behringer DEQ 2496 Ultra-Curve Pro.
Thanks for the kind words everyone, that keeps me motivated!
One is up, one more to go...

(in the right corner you see the "tool" I made for my drill to keep me sane while turning the nuts)
(in the right corner you see the "tool" I made for my drill to keep me sane while turning the nuts)
Last edited:
Wunderbar!
When you are done, it would probably be very useful to many of us here if you would take the time and describe the process of your build, as detailed as possible... This would be very very useful 😛
There are so many issues getting this right and obviously you did all the right choices, so we do have a lot to learn from you....
That is, if you can get away from listening to music when you're done with those speakers 😀
Wesayo,
Very nice work - I can't believe how tall they are when done.
Are you using the nuts to tighten and clamp each section before adding the next section? Wow, that is a lot of screwing and unscrewing of those nuts. Can you simply skip the nuts for the clamping process and use a stack of weights placed on top? 40 or 50 lbs of barbell discs should do the trick...
Very nice work - I can't believe how tall they are when done.
(in the right corner you see the "tool" I made for my drill to keep me sane while turning the nuts)
Are you using the nuts to tighten and clamp each section before adding the next section? Wow, that is a lot of screwing and unscrewing of those nuts. Can you simply skip the nuts for the clamping process and use a stack of weights placed on top? 40 or 50 lbs of barbell discs should do the trick...
Wunderbar!
When you are done, it would probably be very useful to many of us here if you would take the time and describe the process of your build, as detailed as possible... This would be very very useful 😛
There are so many issues getting this right and obviously you did all the right choices, so we do have a lot to learn from you....
That is, if you can get away from listening to music when you're done with those speakers 😀
I think I will document the full process some time in the near future. If I made the right choices only time will tell 😛. It is a bit crazy to do this using only hand tools. But I'll get there. Not nearly done yet!
- Status
- Not open for further replies.
- Home
- Loudspeakers
- Full Range
- Cloning IDS-25s