They sounded exquisite at low levels even in that sub-optimal setting. The transition to distress was not abrupt but it was definite. It was exactly what I would expect from an Aleph.
Graeme
Graeme
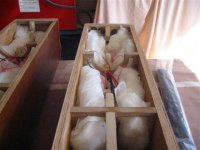
It appears he has used carpet pad for sound insulation.....hmmmm.........concidering the cost of the drivers and the price of labor involved, I'm not sure it's a good combination. The carpet pad is VERY dense and will absorb quite a bit of cabinet resonance (perhaps too much) and it takes up precious interior volume from the speaker. As to how to hold up the "stuffing", if you use long haired wool as I did, or polyfill (pillow stuffing) you could :
Hot melt glue it to the sides
Staple gun it to the insides
Use insulation "stabs" (stiff wire held in place like spring steel)
Use carpenters glue (lay cabinet on side while drying)
or use horizontal shelving for bracing support like I did.
You'll find a way that works for you.
Ron
Hot melt glue it to the sides
Staple gun it to the insides
Use insulation "stabs" (stiff wire held in place like spring steel)
Use carpenters glue (lay cabinet on side while drying)
or use horizontal shelving for bracing support like I did.
You'll find a way that works for you.
Ron
Attachments
I'm sure I'll do. 🙂
Spec says filling of 8 grams/liter. I got Dacron filling at 7 grams and sheeps wool at 9 grams so it'll be 50/50.
That's doing it by the numbers, folks! 😀
The MDF is cut and ready, so I'll start putting it together tomorrow.
Thanks again for all support so far. 🙂
Spec says filling of 8 grams/liter. I got Dacron filling at 7 grams and sheeps wool at 9 grams so it'll be 50/50.
That's doing it by the numbers, folks! 😀
The MDF is cut and ready, so I'll start putting it together tomorrow.
Thanks again for all support so far. 🙂
KarlXII said:Spec says filling of 8 grams/liter. I got Dacron filling at 7 grams and sheeps wool at 9 grams so it'll be 50/50.
Let me know how that works... i always speculated as to whether such a mix would bring wool's damping properties together with ployfluff's tendency to stay in one place.
dave
New day - new ideas. 🙄
What about this: Adding an extra baffle piece in a different color or wood, just to break the otherwise sleek lines of the box.
Perhaps half an inch thick.
How would this affect performance?
Today has been a day of drilling. I've got MDF dust just about everywhere from the swiss cheezing.
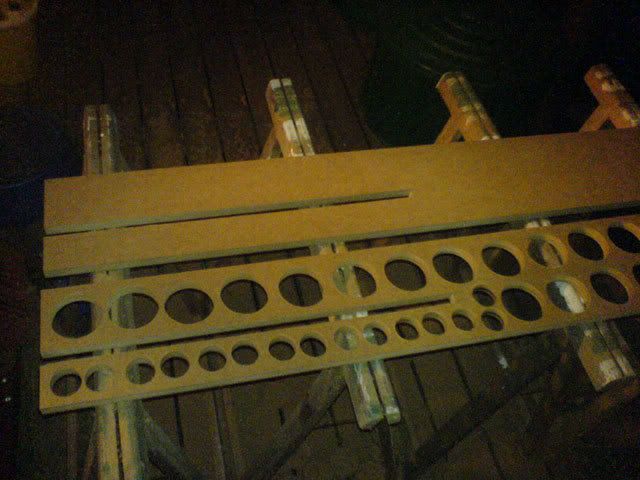
There's a lot of logistic issues to address before everything rolls. One thing I'm working on now is doing a jig for the router to do the holes in the baffle. There are no Jasper jigs available over here..
Speaking of MDF: Do you guys nail&glue, screw&glue, plug&glue...or just glue? 🙂
What about this: Adding an extra baffle piece in a different color or wood, just to break the otherwise sleek lines of the box.
Perhaps half an inch thick.
How would this affect performance?
Today has been a day of drilling. I've got MDF dust just about everywhere from the swiss cheezing.
There's a lot of logistic issues to address before everything rolls. One thing I'm working on now is doing a jig for the router to do the holes in the baffle. There are no Jasper jigs available over here..
Speaking of MDF: Do you guys nail&glue, screw&glue, plug&glue...or just glue? 🙂
That MDF sure makes a dusty mess, we were cleaning up afterwards for weeks. Wife has banished my MDF cut to outside the garage from now on.
Your baffles look good, nice holes. Reminds me of "Whack-a-Mole" 😉
😉
For cabinet layup I used (with good results) Titebond 3 waterproof wood glue with 5/8" & 1" pin nails to hold things while the glue set overnight. Lots & Lots of clamps too. Mine were roundish so I had to use ratcheting straps on the curved parts. Use lots of glue and a moist to wet rag to clean up the mess when it ooses out. I think the glue bonds best with ~15lbs of pressure until set. Yours may be different.
As far as the Router Jig goes, Madisound will ship you one. Make sure it fits your router. Some don't and you'll end up redrilling your router base, Which is OK if you don't mind the extra work.
Keep us informed.....looking good.....thanks for the pics.
I can't speak with any authority as to what the extra baffle will do to the sound, but the original is just the opposite IIRC. Somebody will be along shortly with the technical answer as to why.....sound diffraction.......baffle step........phase timing.......
Ron
Your baffles look good, nice holes. Reminds me of "Whack-a-Mole"
😉 For cabinet layup I used (with good results) Titebond 3 waterproof wood glue with 5/8" & 1" pin nails to hold things while the glue set overnight. Lots & Lots of clamps too. Mine were roundish so I had to use ratcheting straps on the curved parts. Use lots of glue and a moist to wet rag to clean up the mess when it ooses out. I think the glue bonds best with ~15lbs of pressure until set. Yours may be different.
As far as the Router Jig goes, Madisound will ship you one. Make sure it fits your router. Some don't and you'll end up redrilling your router base, Which is OK if you don't mind the extra work.
Keep us informed.....looking good.....thanks for the pics.
I can't speak with any authority as to what the extra baffle will do to the sound, but the original is just the opposite IIRC. Somebody will be along shortly with the technical answer as to why.....sound diffraction.......baffle step........phase timing.......
Ron
router jig
Hi,
For the jig, you can do one yourself. Have a look here: http://www.homecinema-fr.com/forum/viewtopic.php?p=167128711&sid=ca26c5c6fe1b201657cc876704344a48
The one i did is even simpler. I'm only using a screw, two spacers and a bolt instead of the small plastic part that you can see on the picture (second post).
I can post pic tomorrow if you need.
--stephan
An externally hosted image should be here but it was not working when we last tested it.
An externally hosted image should be here but it was not working when we last tested it.
An externally hosted image should be here but it was not working when we last tested it.
i have this tool for about 10 years now ,don`t know if they still sell it,but try perfect circle.
No router jigs within reach, so I did my own from a piece of acrylic glass. 🙂
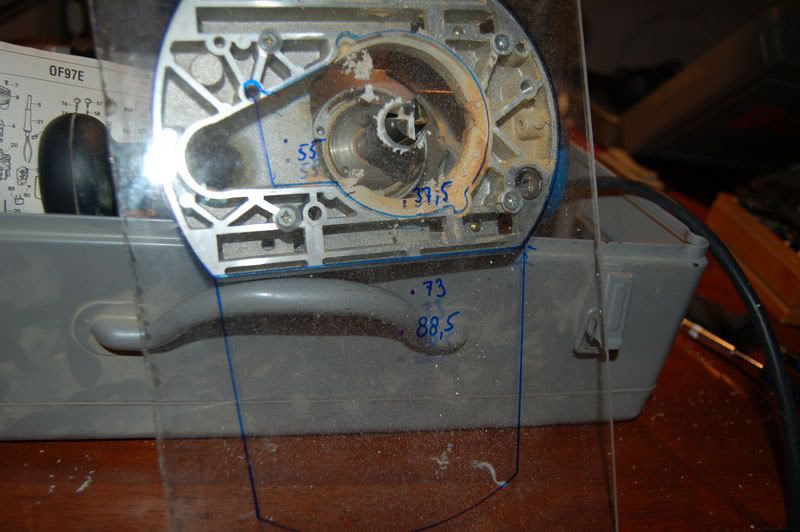
It worked out just beautifully.
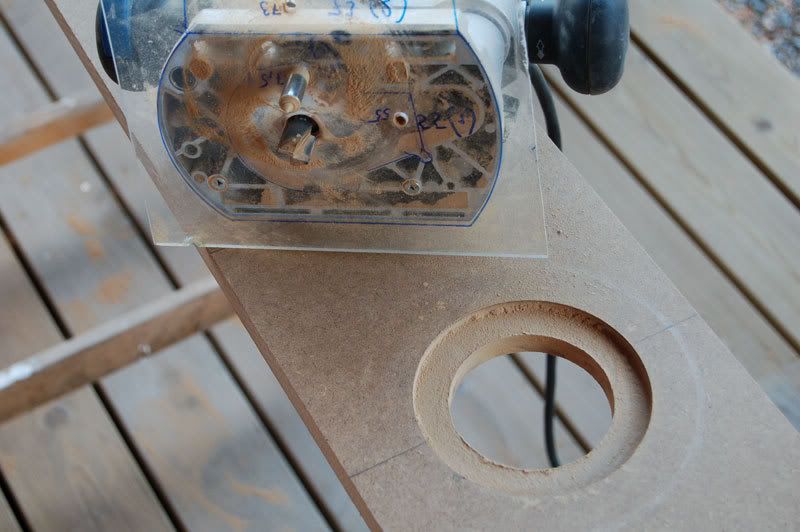
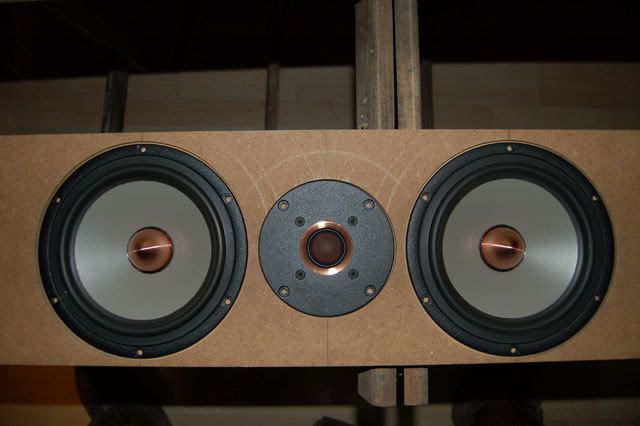
Now we can start to see where this project is going...
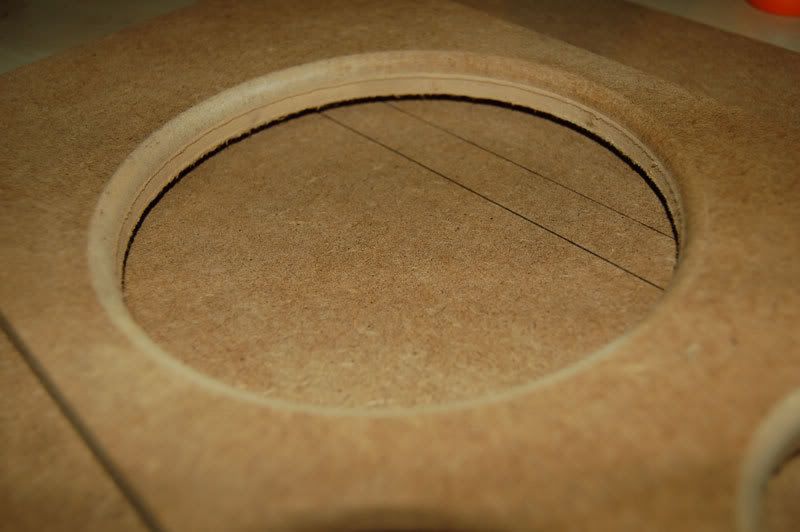
I also rounded of the holes on the back side of the baffle.
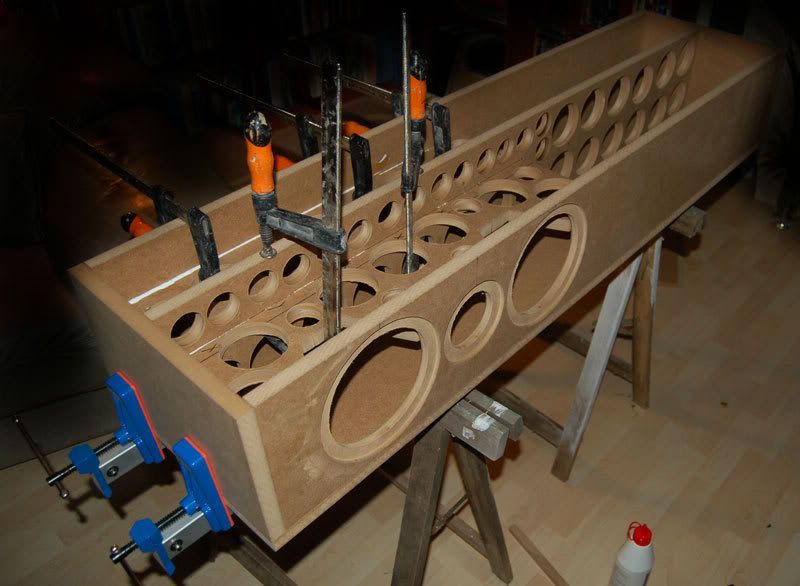
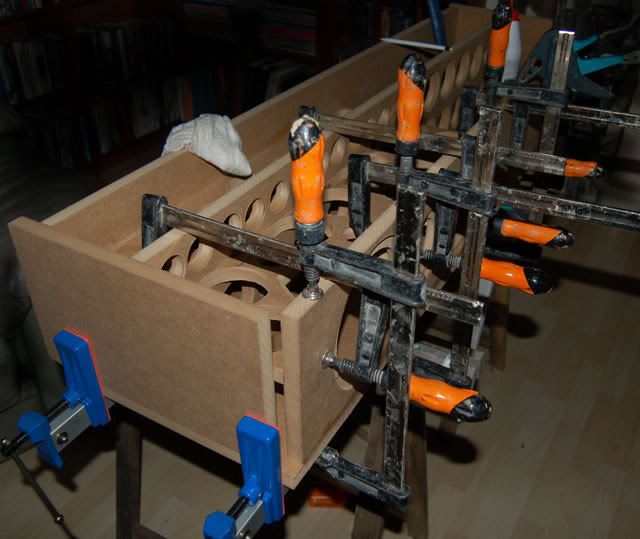
They´re coming together, slowly but surely. 🙂
One thing´s for sure when building loudspeakers: You cannot have too many clamps. 🙂
It worked out just beautifully.
Now we can start to see where this project is going...
I also rounded of the holes on the back side of the baffle.
They´re coming together, slowly but surely. 🙂
One thing´s for sure when building loudspeakers: You cannot have too many clamps. 🙂
KarlXII said:
I just looked at greenie512's nice smallThors. They look great!
But one thing puzzles me: He seems to have added some kind of stuffing along all sides of the inside walls.
Karl - the underlay lining is just a habit I have. No scientific reason - just a feel good factor - for me.
Scottmoose said:
Thors IMO need at least 200wpc in an ordinary domestic setting -they'll be idling most of the time, but they'll need that in reserve to fully handle dynamic peaks. I'm sure they'll sound good with lower power too, but if you want to maximise their capabilities, the more clean power you can pump into them, the better.
Scott up to recently I’d been driving the Thors with Musical Fidelity X-AS100 power amps and they are 100 watt amps which drove the Thors with ease. I’ve just gone valves and have two Class A mono block Ming Da MC805’s with are 40 watts and they drive the Thors easily and sound terrific. I’m absolutely happy with the dynamic of these speakers with this setup.
Cheers - Phil
Karl,
Nice photos, it looks very good. Well done on building the router jig.
Those bar clamps with the blue handles look impressive, who makes those? Any available in the "states"?
Ron
Nice photos, it looks very good. Well done on building the router jig.
Those bar clamps with the blue handles look impressive, who makes those? Any available in the "states"?
Ron
greenie512 said:Scott up to recently I’d been driving the Thors with Musical Fidelity X-AS100 power amps and they are 100 watt amps which drove the Thors with ease. I’ve just gone valves and have two Class A mono block Ming Da MC805’s with are 40 watts and they drive the Thors easily and sound terrific. I’m absolutely happy with the dynamic of these speakers with this setup.
Glad you're enjoying them. Nice amps BTW -my mate Nick has just built a pair of monster 45wpc SET amps for another friend with GM70s with the kind of output transformers that make most mains transformers look under-endowed.
In reality, I was understating above -Thor would actually need ~0.75Kw to properly handle ~live level dynamic peaks. Fortunately, most people are content with less, providing the amp's clipping & distortion behaviour is relatively benign.
In reality, I was understating above -Thor would actually need ~0.75Kw to properly handle ~live level dynamic peaks. Fortunately, most people are content with less, providing the amp's clipping & distortion behaviour is relatively benign.
So you are saying that I should be driving my short thors with around 750W? Because if you are I might have an excuse for a new project. So that is what you are saying right? Right?
KarlXII
Your speakers are coming along great man! Keep up the good work and keep those updates coming.
Repute is using an Adcom GFA-5802 on his fat Thors.
Class A for the first 10 watts then AB to 300 wpc! Needless to say his is VERY dynamic. I put him a 20 amp dedicated breaker / circuit for his stereo and it does sound pretty effortless.
Again the biggest single improvement I liked was the snap of the midbass. Completely unexpected improvement. Snare and rim shots were MUCH sharper and better defined once we rebuilt the cabinets. Repute likes the low end. 🙄
Class A for the first 10 watts then AB to 300 wpc! Needless to say his is VERY dynamic. I put him a 20 amp dedicated breaker / circuit for his stereo and it does sound pretty effortless.
Again the biggest single improvement I liked was the snap of the midbass.
Completely unexpected improvement. Snare and rim shots were MUCH sharper and better defined once we rebuilt the cabinets. Repute likes the low end. 🙄Byrd said:Looking good.
Keep em comming

Okidokie! 😉
Scottmoose said:Impressive. 🙂
Just following your plan. 🙂
OK, some progress here. 😀
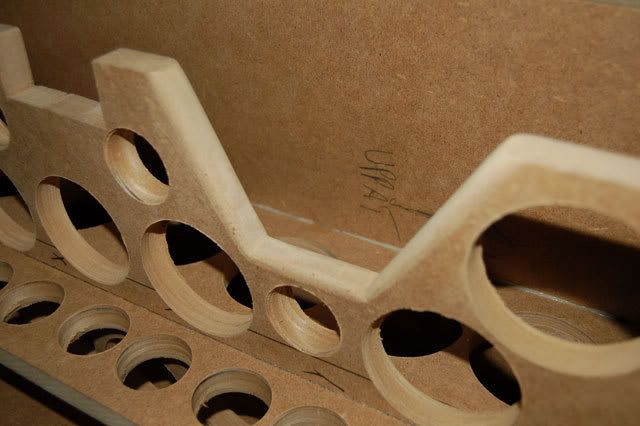
I've sanded the baffles and made the necessary holes:
Since I rounded the back side of the baffle holes, I came to think of perhaps doing it to the parts of the brace that are closest to the W18´s as well. At least it can be of no harm.:

MDF is a true dream to work with. I just cut with a knife and sanded it down.
I just glue this box. No nails, no screws, no plugs.
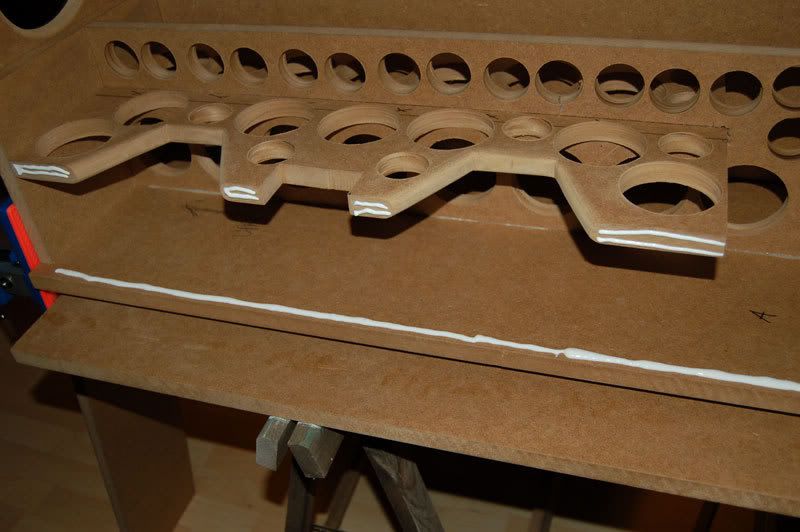
Glue, and a LOT af clamps. 🙂
Renron said:Karl,
Nice photos, it looks very good. Well done on building the router jig.
Those bar clamps with the blue handles look impressive, who makes those? Any available in the "states"?
Ron
Thanks, Ron!
I'm pretty sure you can find them if you want. They´re just cheap standard issue Chinese made clamps. I have no idea where though.
I bought them on a Swedish store called Jula.
And yes, they really impress me too. Godd stuff!
- Home
- Loudspeakers
- Multi-Way
- Clarity on Seas Thor Kit