planet10 said:
Easy enuff to get a hex head drill bit. The hexs are nice for driver mounting and such, but for regular work i'll stick with Robertsons (red usually).
dave
It may be easy but price increases with hex screws too (especially when it comes to 500 and more).😉
I've got at least 3 different types for ea size Allen bits, but for woodworking Robertson rules.
Dave,
Robertsons drives are a Canadian thing. They’re not as available in the US, although you can find them with some searching. Sears has been including them in some of the power driver sets.
GeniX,
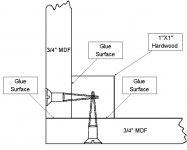
You can use a simple butt-joint with a brace inside like below. As long as you counter drill the holes for the size screw you’re using, it will not crack or chip the MDF, and it is very strong. Sink the screw heads below the surface and fill with wood putty.
Rodd Yamas***a
Robertsons drives are a Canadian thing. They’re not as available in the US, although you can find them with some searching. Sears has been including them in some of the power driver sets.
GeniX,
You can use a simple butt-joint with a brace inside like below. As long as you counter drill the holes for the size screw you’re using, it will not crack or chip the MDF, and it is very strong. Sink the screw heads below the surface and fill with wood putty.
Rodd Yamas***a
Attachments
When you driving 500 or more screws it's not easy anymore. You need a cordless drill gun
Peter,
Have you diversified from building amp/speakers to building houses 🙂 Or have to decided to live inside a speaker

Jag,
This sub-bass/end-table has nearly 150 wood screws in it and it is only half of the stereo pair. I wish I had the alternative drives (hex or Robertsons or torx or even a Philips wood screw) 25 years ago when I made them. Every screw is slotted and every hole was counter drilled. It’s not quite 500, but you wouldn’t want to do it all with a hand screwdriver.
Rodd Yamas***a
Attachments
roddyama said:Every screw is slotted and every hole was counter drilled. It’s not quite 500, but you wouldn’t want to do it all with a hand screwdriver.
Yuk. I pull apart a lot of old hifi. The German ones have good salvage in them, but they use slotted fasteners. Even an electric drill/screwdriver doesn't work well. Those fasteners all go into the metal recycle. Canadian HiFis on the other hand don't have as good a content but are an excellent source for recyclable Robertsons.
McFeely's sell Robertsons screws in the US, and if Sears starts selling more Robertson drives maybe they'll catch on. You certainly won't go back once you switch.
dave
jag said:
Peter,
Have you diversified from building amp/speakers to building houses 🙂 Or have to decided to live inside a speaker
I bought a house in 1996 and spend good few years renovating it. That's when I lost a touch with my Audio interests. I just came back to do Audio full time beginning this year, and I can honestly say, I'm better than ever, thanks to the internet. If only I had enough motivation and excitement I used to have before. But when you digging out the basement with your own hands, to make it two feet deeper, you may loose more than that.😉 😉
Rodd,
When you say fill with wood putty with regards to screwing, what do you mean? What is there to fill with putty? (unless you mean any cracks and seams - which Im already planning to do)
GeniX,
After you have counterdrilled, drive the screw so its head is about an 1/8" below the surface. This is what you fill with wood putty.
Rodd Yamas***a
After you have counterdrilled, drive the screw so its head is about an 1/8" below the surface. This is what you fill with wood putty.
Rodd Yamas***a
Whoa, This screw thread took off. Genix, glad the trick worked. Growing up on a farm, necessity was always a mother(of invention). Dave and Peter, those square drives are catching on with those in the know, but still must be ordered as local hardware stores don't stock. I have a square drive bit for my gun, and rarely use anything else if I can help it. Even without a magnet they stay attached to the bit and NEVER slip.
Mistakes are the best teacher life has, if one is willing to make them. I've learned as much putting old crap drivers in different baffles as I have reading about theory.
regards, Diypole
Mistakes are the best teacher life has, if one is willing to make them. I've learned as much putting old crap drivers in different baffles as I have reading about theory.
regards, Diypole
Genix, I'm glad its all coming together, can't wait to see the photos🙂
If all your crossover components will fit through the hole for the woofer, just pre assemble them then glue them inside with silicone sealant, that way you can build and finish the boxes first, as some solvents used in finishing products can attack the varnish used in insulating inductors.
Otherwise, just leave off the backs, as you say, it will be less cosmetically revealing.
I use the collated drywall screws meant for the auto feed screwdriver (the ones with the coarser threads), I get them surplus from my work for free.
Pink I see Screwfix is keeping you in screws! I've not tried the T-star screws as yet, do they grab better than the drywall type?
One thing I find a pain in the *** is having to change from a 4mm drill bit to 2.5 then change to a countersink bit then change to a screwdriver bit, So I use my 18v de-walt for the screwdriver bit drill press for the countersink bit, chepo power devil for the drill bits. this speeds things up and saves getting into a blind fury/red-mist situation because of losing the bits every time you set them down ;-)
Stew.
Stew, yup Screwfix are a great company, been dealing with them for about 7 years, I think the first catalogue was about 32 pages, now it's about 300!
The Spax screws grip very well in end grain, and seem to have a greater shear strength than drywall screws, so they break less often. The Spax head also virtually removes the problem of cam-out when driving, so, all in all, a much better product.
As we are going through the screwfix catalogue, try these, they should reduce your frustration level a little, and lead to greater productivity
🙂
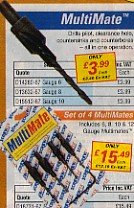
Attachments
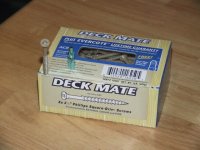
Just went by home depot, and they had some green screws that Peter posted a picture of above, but only in the larger diameter size. I found some Deck Mate (c) with Phillips Square-Driv(tm) ends on them and they include a bit to use. They seem just as good as square drive. Home Depot carries all sizes of these screws.
--
Brian
--
Brian
Attachments
liquid screws
Both speaker builder magazines here in Germany recommend using the stuff. There are at least three brands here, Bison, Pattex and Uhu. When dried, its a lot like contact glue, but you should not let it dry for more than a minute before joining pieces. You can still move pieces a little, but if you don't touch, parts won't move. The stuff is perfect both for building cabinets without braces, screws or anything as well as for attaching tiles and damping mats on the inside. Only nasty thing: the glue won't stop coming out of the nozzle unless you unlock the piston.
It's probably not as rigid as wood glue, but maybe it is even preferable to have 0.5 mm of something slightly elasting and damping between the individual boards. Haven't used screws since unless I want to be able to exchange things.
Eric
newmz said:something i always find to be essential and useful when i work with mdf is plain old cheap and easy construction adhesive in the gun tubes, i mean those cartridge guns you get silicone sealant in. here in australia we have stuff called "liquid nails" plus lots of other generic versions. when it is applied it's very sticky and holds well enough to allow you to brace or add more panels, while still allowing you to move and adjust pieces/panels into position. sometimes i actually just use this stuff and lots of battens and bracing and dont bother with screws at all.
Both speaker builder magazines here in Germany recommend using the stuff. There are at least three brands here, Bison, Pattex and Uhu. When dried, its a lot like contact glue, but you should not let it dry for more than a minute before joining pieces. You can still move pieces a little, but if you don't touch, parts won't move. The stuff is perfect both for building cabinets without braces, screws or anything as well as for attaching tiles and damping mats on the inside. Only nasty thing: the glue won't stop coming out of the nozzle unless you unlock the piston.
It's probably not as rigid as wood glue, but maybe it is even preferable to have 0.5 mm of something slightly elasting and damping between the individual boards. Haven't used screws since unless I want to be able to exchange things.
Eric
I've just been through similar levels of grief with the glue/screw method of building my new active studio monitors. It's been very time consuming doing all the drilling, filling, sanding and all the rest although I've ended up with (IMHO) a very good pair of cabinets.
Next time I think I'm going to get some frame clamps and just glue the things and save myself a load of time. Has anybody got any advice on this method? I presume that it will make just as sturdy cabinets given that the wood glue is usually stronger than the wood? I guess the only problem is the fiddly/messy nature of actually applying the glue and getting the clamps on so that it all makes right angles and lines up straight.
Next time I think I'm going to get some frame clamps and just glue the things and save myself a load of time. Has anybody got any advice on this method? I presume that it will make just as sturdy cabinets given that the wood glue is usually stronger than the wood? I guess the only problem is the fiddly/messy nature of actually applying the glue and getting the clamps on so that it all makes right angles and lines up straight.
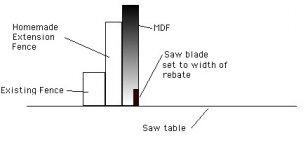
Try milling rebates in your timber ( see below). You can use a router or a table saw, and if made accurately, the cabinet will all line up and hold together during assembly. You will only need ratchet/webbing straps to hold it together whilst the glue sets, or perhaps a couple of panel pins, as Peter suggested
Attachments
Thanks pinkmouse. I was thinking of milling rebates to get the centre support in the right place, but you're right - if I do that for the end pieces as well then it should all line up (in theory at least).
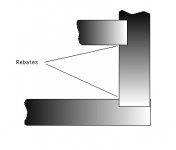
How would one do rebates with a table saw? Given the 'L' shape (well if you rotate it a bit)...
PS: Your suggestion of making the cabinets whole, and wiring the drivers and such up with crossover last is growing on me, PinkMouse. Provided the crossover can fit thru the drivers hole, it may prove much easier for the finishing of the cabinet as Im not stuck with a back piece to put on last.
Im also thinking of trying a 2nd-order crossover just for the hell of it. They arent that much more difficult than 1st order (and I think it suits my driver/tweeter overlap better)
Genix, first or second order, don't know without seeing the driver curves, but hey, why not🙂
Cutting Rebates with a table saw
YOU DO THIS AT YOUR OWN RISK!!! Do not attempt if you are unfamiliar with the use of power tools!
 You have to remove the blade guard for this operation, so it is vital to keep your hands out of the way of the blade, and to use eye protection
Cutting Rebates with a table saw
YOU DO THIS AT YOUR OWN RISK!!! Do not attempt if you are unfamiliar with the use of power tools!
You have to remove the blade guard for this operation, so it is vital to keep your hands out of the way of the blade, and to use eye protectionAttachments
- Status
- Not open for further replies.
- Home
- Loudspeakers
- Multi-Way
- Chipping MDF