Painting aluminum: I just wet-sand the entire surface with 220 grit sandpaper, wipe it all down with denatured alcohol or lacquer thinner, dry it throughly in the spot where it will be painted (I use a heat lamp), and then hit it with a light coat of any decent primer. Giving the primer that extra bite is the trick to keeping it from chipping easily.
I'll second Tom's comment about painting aluminum - my "secret" is sandblasting (or bead blasting, depending on which media I happen to have in the blast cabinet at the time) instead of anodizing (which is a pain as Miles mentioned). I've heard of others etching it in a sodium hydroxide solution (lye) which also works well but is messy - the blasting accomplishes pretty much the same thing. No primer - finish coat goes directly over the blasted surface and sticks well. I use a lot of Rust-Oleum "hammered" finish on my chassis', the vast majority of which have been aluminum. I only use steel for giant power supplies with very heavy transformers and chokes - for big ham transmitters...
Bud
Bud
k9swc said:I'll second Tom's comment about painting aluminum - my "secret" is sandblasting (or bead blasting, depending on which media I happen to have in the blast cabinet at the time) instead of anodizing (which is a pain as Miles mentioned).
Yep. I've done the sandblasting as well. It creates a nice uniform gray look.
I usually use a clear spray enamel/lacquer on aluminum. I've noticed issues if I buff the aluminum to a shine, but I haven't had issues with paint peel when I've sanded with 220 grit or 400 grit. I think the key is to leave enough surface area for the paint to bond and do a thorough job of cleaning it. Acetone works well - in a well-ventilated area!!
~Tom
I really enjoy mapping the progressions of threads here...very cool stuff. If you haven't noticed, I enjoy mining the experts for knowledge, which I sponge up.
Could anyone direct me to a link about this "dead bug" methodology? Looks a bit Rube Goldberg-ian...which I like. 😱 😀
Could anyone direct me to a link about this "dead bug" methodology? Looks a bit Rube Goldberg-ian...which I like. 😱 😀
One more method of making fast custom prototyping boards is to use drill bits for wood: they make a puncture in the middle and an insulating ring around in the copper clad, but you need to be careful because instead of an insulating ring it can cut a big hole!
Wavebourn said:One more method of making fast custom prototyping boards is to use drill bits for wood: they make a puncture in the middle and an insulating ring around in the copper clad, but you need to be careful because instead of an insulating ring it can cut a big hole!
Wavebourn...can you elaborate a bit more on this for me?
bereanbill said:
Wavebourn...can you elaborate a bit more on this for me?
Here you go:
An externally hosted image should be here but it was not working when we last tested it.
Ok...I see you are using Forstner bits, but I don't understand hoe they make an insulating ring in copper..😕
bereanbill said:Ok...I see you are using Forstner bits, but I don't understand hoe they make an insulating ring in copper..😕
In a copper clad board.
bereanbill said:Could anyone direct me to a link about this "dead bug" methodology? Looks a bit Rube Goldberg-ian...which I like. 😱 😀
There are a LOT of interesting hits on Google but this one was the best for showing the idea in pure principle. Significantly under uglificated when compared to most of the others. (I mean the other ones on Google NOT the ones shown above - all of which are really pretty)

Hearinspace said:
There are a LOT of interesting hits on Google but this one was the best for showing the idea in pure principle. Significantly under uglificated when compared to most of the others. (I mean the other ones on Google NOT the ones shown above - all of which are really pretty)
Shrinking epoxy can damage wires.
It isn't a Forstner bit. What he's referring to is a twist drill bit with an integral bit of smaller diameter in front of the main body of the bit. Rather annoying if you grind your bits to sharpen them, but useful in this instance, I suppose.bereanbill said:Ok...I see you are using Forstner bits, but I don't understand hoe they make an insulating ring in copper..😕
Let me see if I can get a high-res pic.
EDIT: Hmm. Perhaps Wavebourn is referring to
An externally hosted image should be here but it was not working when we last tested it.
, which is a guide-point wood bit. I was thinking of these:
An externally hosted image should be here but it was not working when we last tested it.
Wavebourn said:
Shrinking epoxy can damage wires.
Yeah, I meant to say something about that. I just picked it for the clean layout of the bugs.
Ok...I stand corrected...or sit actually. Be it a guide point, a brad point, or whatever...I still don't see how it makes an insulating collar around the entry hole??😕
454Casull said:
It isn't a Forstner bit. What he's referring to is a twist drill bit with an integral bit of smaller diameter in front of the main body of the bit. Rather annoying if you grind your bits to sharpen them, but useful in this instance, I suppose.
I've found once to be useful bits made in China that I bought in BigLots.
bereanbill said:Ok...I stand corrected...or sit actually. Be it a guide point, a brad point, or whatever...I still don't see how it makes an insulating collar around the entry hole??😕
I made it especially for you, right now. Enjoy!
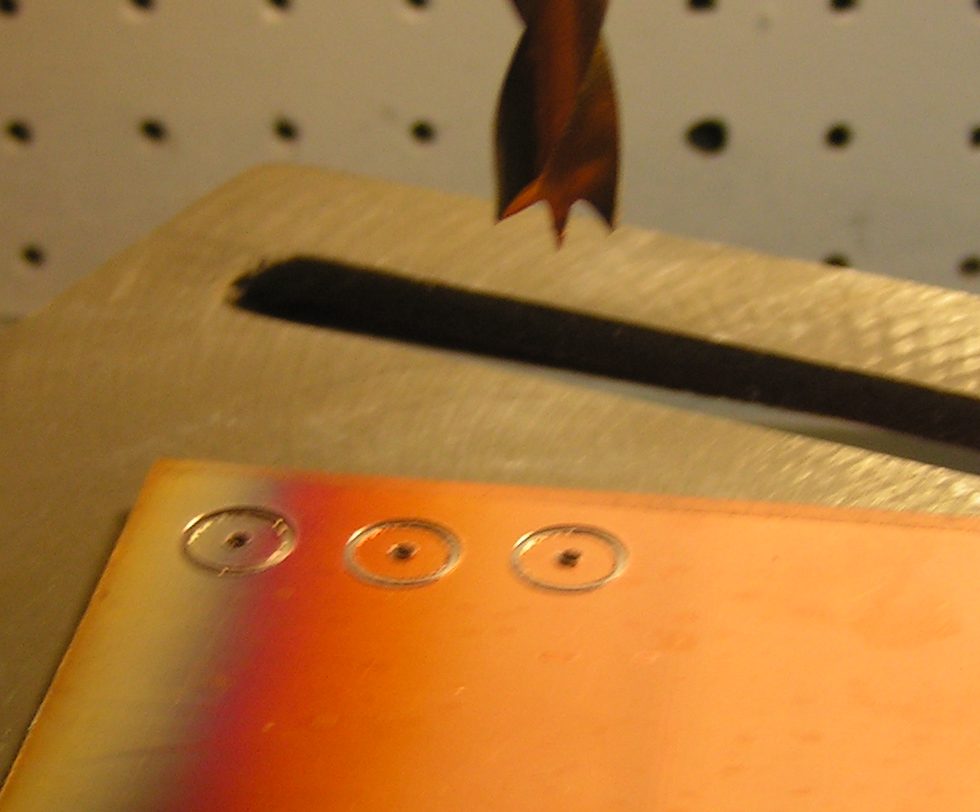
THANK YOU WAVEBOURN !!! You don't plunge the bit through...only through the cladding layer...underneath is some type of dielectric material then??? What a great idea...do you mind if I use it?😀 😀 😀
bereanbill said:THANK YOU WAVEBOURN !!! You don't plunge the bit through...only through the cladding layer...underneath is some type of dielectric material then??? What a great idea...do you mind if I use it?😀 😀 😀
Yes, you can use it, but only after you save the picture and read it's name. 😀 😀 😀
Thank you again, Wavebourn...I am all misty here. And tomorrow is my birthday as well !! What a wonderful birthday present!!! I'll print it out and frame it! 

Great. Too much stimulation before bed.. Mixed materials, timber chassis, wine crates, dead bugs, and fr3. Are there more material threads? I've searched several times.
- Status
- Not open for further replies.
- Home
- Amplifiers
- Tubes / Valves
- Chassis metal advantages/disadvantages?