Hi Guys,
I'm planning to replace the mylar on my ML Aerius. My biggest difficulty will be to stretch the membrane. Can anyone share there experience on a possible simplistic solution?
thank you
I'm planning to replace the mylar on my ML Aerius. My biggest difficulty will be to stretch the membrane. Can anyone share there experience on a possible simplistic solution?
thank you
DIYer "wreckingball" has been the latest to build such a jig with some success.
Check this whole thread out,
http://www.diyaudio.com/forums/planars-exotics/243508-building-large-curved-esl-4.html#post3943650
http://www.diyaudio.com/forums/planars-exotics/243508-building-large-curved-esl-4.html#post3991872
http://www.diyaudio.com/forums/planars-exotics/243508-building-large-curved-esl-4.html#post4021393
jer 🙂
Hi Guys,
I'm planning to replace the mylar on my ML Aerius. My biggest difficulty will be to stretch the membrane. Can anyone share there experience on a possible simplistic solution?
thank you
Hi Sakharov, this is my first post on the forum!
I recently rebuilt the panels on my Martin Logan Clarity. I have put a thread up on MartinLoganOwners forum. The jig building and diaphragm stretching can look intimidating, but it rather simple to do. I still have my jig, so can take a video of the mylar being stretched and put it on Youtube for you.
See attached pics
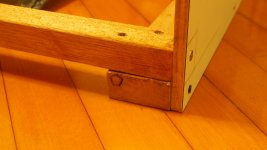
JIG
The head and footboards took time (didn' have a jigsaw so I cut it using a normal wood saw). The rest was a simple "glue and screw"! it seems stable with the extra screws. I put a single sided foam tape on the curved edges to protect the Mylar while stretching. I also put wood triangles to prevent the jig from flexing sideways (will put up the pics tomorrow)
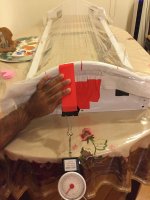
STRETCHING THE DIAPHRAGM
Stretching the diaphragm: Unfortunately I didn't take pictures of the final tensioned diaphragm, but just pictures of stretching part of it. I intend to redo one and then repost this section.
I used 3M duct tape. Widely available and can be torn easily by hand. I put some foam tape on the edge of the jig to prevent the film from snagging and tearing. I used a mechanical weighing scale rather than a digital one. Dont' use a digital one as you can't hold the tension without the digits going crazy!
Procedure:
1) Tape the breadth of the edges of the film to be tensioned before cutting it from the roll. Cut along the tape line as this will prevent the film from tearing and wastage. The film tears so easily!
2) First tape the middle of the film breadth to the middle of the jig and from the other end, do the same while applying tension of 2.5kgs.
NOTE: Don't tape the film to the foam on the edge of the curved portion of the jig, but rather on the flat surface below. In case there are any creases, you could always stretch the film breadth-ways along the foam edge before proceeding with the next tape tensioning.
3) Do the same starting to the right of that middle tape, then tension from the other side
4) Now do the same from the left of the middle tape and tension from the other side
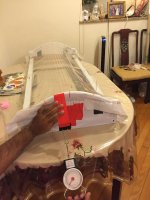
5) Tension the film, taping in a hand-fan shape.
6) To fine tune the tensioned diaphragm, try and pull near the corners of the diaphragm with some tape and see if the small creases go away.
7) Finally tape the remaining loose film along the length of the jig to the jig itself. Do not pull hard as its the longitudinal tensioning that is important and not the breadth-ways tensioning.
Note: The reason to tape the loose length to the jig length is that when lowering the tensioned diaphragm on the stator, it may crease like very tiny lengthways ripples from one spar to the next. Either tape it to the jig to maintain a light side tension, or ask someone else to manually lightly stretch the tensioned film breadthways while lowering it on the stator. I lowered the jig from one side, stretching the breadth on the top, middle and then bottom.
Attachments

Hi Sakharov, this is my first post on the forum!
I recently rebuilt the panels on my Martin Logan Clarity.
I am attempting to rebuild some Sequel IIs. I thought I could just recoat the Mylar, but upon getting everything in place, I saw that the mylar had ripped.
Two questions:
1. What is that gauge you're using to tension the diaphragm? I have found some push/pull force gauges but they cost $100+ for just the basic models.
2. What did you use to soften the adhesive to separate the panels?
I will try to source the diaphragm locally but it is not easy to come by.
Hi Neil5m,
thank you for the detailed report. I this is still a project that I've to restart due to the lack of time.
Meanwhile I've refurbished a pair of Maggies 1D
By the way what product did you use for the coating?
thank you for the detailed report. I this is still a project that I've to restart due to the lack of time.
Meanwhile I've refurbished a pair of Maggies 1D
By the way what product did you use for the coating?
I am attempting to rebuild some Sequel IIs. I thought I could just recoat the Mylar, but upon getting everything in place, I saw that the mylar had ripped.
Two questions:
1. What is that gauge you're using to tension the diaphragm? I have found some push/pull force gauges but they cost $100+ for just the basic models.
2. What did you use to soften the adhesive to separate the panels?
I will try to source the diaphragm locally but it is not easy to come by.
Hi Wildcat
It is a simple handheld scale. I just pulled the diaphragm (taped at the other end) till the scale showed a weight of 2.5kgs. Then I taped the pulled side down. The scale costs maybe US$5-8.
I used alcohol to soften the adhesive. Soak a cottonball with alcohol and squeeze it over the edge of the joined stators while lighly poking and prodding with a dulled blade. The foam tape softens and cuts better.
You can also pick up the diaphragm from ebay. Its easily available. Called Mylar or Hostaphan.
Hi Neil5m,
thank you for the detailed report. I this is still a project that I've to restart due to the lack of time.
Meanwhile I've refurbished a pair of Maggies 1D
By the way what product did you use for the coating?
Hi Sakharov, I used a coating supplied by Rob of ERAudio. It was water soluble, dried pretty quickly and adhered to the mylar well.
I'll copy over my post on the Martin Logan owners forum. I will also put up videos on youtube.
Hi Wildcat
It is a simple handheld scale. I just pulled the diaphragm (taped at the other end) till the scale showed a weight of 2.5kgs. Then I taped the pulled side down. The scale costs maybe US$5-8.
I used alcohol to soften the adhesive. Soak a cottonball with alcohol and squeeze it over the edge of the joined stators while lighly poking and prodding with a dulled blade. The foam tape softens and cuts better.
You can also pick up the diaphragm from ebay. Its easily available. Called Mylar or Hostaphan.
I did find the Mylar on eBay, 6 microns, so I am set there.
I tried alcohol months ago, though, and it did nothing to soften the adhesive. I might need more of it, for a longer time period, or perhaps a different kind. I tried a stronger product on a small corner of the panel, but it seems to really soften (or almost disintegrate) the white foam tape that is on the panels.
We have different panels, however, so that may account for different adhesive used in holding them together (as I had read elsewhere).
Last edited:
Widcat, Wrecking ball almost near your area, if you PM him Maybe he could give you a hand.
Cheers!! 😀
jer 🙂
Cheers!! 😀
jer 🙂
- Status
- Not open for further replies.
- Home
- Loudspeakers
- Planars & Exotics
- Can anyone suggest a jig to strech mylar for curved panel?