Hi all,
I'm trying to put together a chassis for a tube amp project and I have very limited experience with any sort of construction beyond a few various home-improvement DIY projects. I've seen some really great looking chassis constructed by various forum members in the project section, and they are really inspiring!
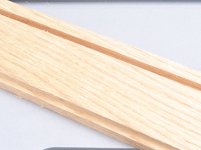
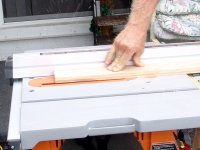
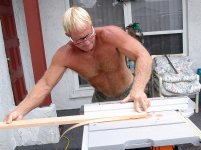
I recently put down maple hardwood flooring in my living room and have a few nice maple boards left over, which I figured would work out well as materials for building a chassis. On my table saw (if doing it again, I'd use a proper miter saw), I cut pieces at 45 degree angles for miter joints and did some finer trimming at the top of the boards that should allow for an aluminum sheet to fit nicely (I ordered an aluminum 2mm top plate from Hammond that will hopefully (we'll see) fit perfectly on top.
HW1310BKPL Hammond Manufacturing | Mouser
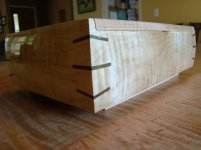
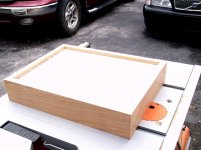
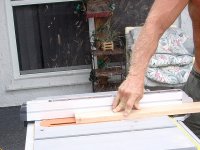
I'm not exactly a precision craftsman here, and I try to get all the pieces cut within targeted dimensions - and I got pretty close, but it's not perfect. The side pieces are cut, and I cut out some triangular pieces to wedge in the corners as support. Below is a picture of the box in its current state. The dimensions of the box are ~9x12. I can sort-of hold it together using a couple of clamps in one direction, but I don't have clamps long enough to grab it from the other direction.
First, thanks for reading if you've gotten up to this point. Now, for the questions.")
What's the best way to actually put this thing together? I figure it'll involve some combination of wood glue and screws, but in my mind, it's much tricker than it looks. The corners come together OK (but not perfect), and if I try to work on one corner, it's like playing jenga and all the other pieces will just fall out of place. I clearly am out of my element in doing this.
Thanks in advance for any advice!
I'm trying to put together a chassis for a tube amp project and I have very limited experience with any sort of construction beyond a few various home-improvement DIY projects. I've seen some really great looking chassis constructed by various forum members in the project section, and they are really inspiring!
I recently put down maple hardwood flooring in my living room and have a few nice maple boards left over, which I figured would work out well as materials for building a chassis. On my table saw (if doing it again, I'd use a proper miter saw), I cut pieces at 45 degree angles for miter joints and did some finer trimming at the top of the boards that should allow for an aluminum sheet to fit nicely (I ordered an aluminum 2mm top plate from Hammond that will hopefully (we'll see) fit perfectly on top.
HW1310BKPL Hammond Manufacturing | Mouser
I'm not exactly a precision craftsman here, and I try to get all the pieces cut within targeted dimensions - and I got pretty close, but it's not perfect. The side pieces are cut, and I cut out some triangular pieces to wedge in the corners as support. Below is a picture of the box in its current state. The dimensions of the box are ~9x12. I can sort-of hold it together using a couple of clamps in one direction, but I don't have clamps long enough to grab it from the other direction.
An externally hosted image should be here but it was not working when we last tested it.
First, thanks for reading if you've gotten up to this point. Now, for the questions.
What's the best way to actually put this thing together? I figure it'll involve some combination of wood glue and screws, but in my mind, it's much tricker than it looks. The corners come together OK (but not perfect), and if I try to work on one corner, it's like playing jenga and all the other pieces will just fall out of place. I clearly am out of my element in doing this.
Thanks in advance for any advice!
You need what my wood shop teacher called a band clamp. It is a ratcheting strap that goes around the perimeter of the outside of the wood box. It is then tightened by ratcheting until the box is held together.
You can buy these things at shops that cater to woodworking like Rockler.
Deluxe Band Clamp - Rockler Woodworking Tools
I am cheap and impatient, so I went to an auto parts store (Pep Boys) and picked up a 4 pack of ratcheting truck tie downs, and cut the hooks off with a Dremel. I then reassembled them into a band clamp with 1/4 inch bolts. 4clamps for $10 on sale. I use pieces of angle aluminum for the corner supports if needed.
I find that the whole job is easier if you use the top plate to assure that the box is square. Do a test run without glue first to make sure that everything fits.
Once assured that it will work then apply glue (use Titebond II, Titebond III, or Gorilla Wood glue) to mitered ends of each wood piece. Work the glue into the wood with your finger, or a brush. Lay some wax paper on your work surface to avoid a sticky situation.
Assemble the box, then lay the top plate in place to assure squareness. You can use masking tape on the plate in the corners to avoid getting glue on it. Then use the band clamp to gently squeeze the box together. I usually tighten it enough that I can pick up the box as soon as it is assembled without it coming apart. Again, try all of this before gluing. Allow overnight drying time.
Now you can glue in the corner braces. You can use short nails or small screws from the inside to hold them while the glue is drying. I don't even find them necessary unless you have really big transformers, but they offer a place to screw the top plate, bottom plate (if used) or rubber feet to.
I have never needed the cross braces that you have, but they can be glued in last. Allow ample drying time between each gluing step, or you risk the whole thing falling apart.
I have found that I sometimes prefer to set the top plate about 1/2 inch down into the box. This makes it impossible to remove the top plate after the box is glued together, but this is no different than a metal chassis. You simply cut a groove with your table saw in each piece before gluing. If you go this route, drill and cut all top plate holes before assembling the box.
Last edited:
A layer of masking tape first
Yes, you can tape miter joints together although the joint may not be as tight as with a clamp. Masking tape generally won't hurt wood, bur don't put duck tape directly on wood. It may not hurt some hardwoods, but does leave sticky stuff behind. It may pull the grain apart on some pine woods.
I just picked up a band clamp on ebay for $13 shipped:
1" x 15' Ratcheting Band Clamp Picture Frames Woodworking Miter Vise | eBay
I think this should do the trick. Once I get it and my aluminum top plate, I'll see how it all comes together.
Before I glue it, I should probably plan out and cut holes where I want the knob, switch, and terminals to go. I need to figure out the best practice for that as well. I'm trying to model some of what I'm doing based on another builder's finished project, which was highlighted in the DIYaudio projects page:
K12 G Valve Amplifier Photos by musrum | Photobucket
I tried to contact him to no avail... it looks like I might need a forstner bit(s) to drill out holes that leave some small amount of wood on the back end to enable fastening various connectors, knobs, switches, etc. Is that right? (I didn't know what a forstner bit was until yesterday after trying to research this stuff).
I guess another way to do it would be to use a router to cut out some section and then put a metal plate on the back. Are there recommended places to buy small/cheap metal plates? I don't have a band saw to cut metal down to size. (I've got a jigsaw that might work.... never cut metal with a jigsaw before, though). Anyway - thinking through the various options, and as always, would love to hear any recommendations.
many thanks!
it looks like I might need a forstner bit
I have used a forstner bit, and found that you really need a drill press to get round holes with flat floors. Leave as much wood as your pots or connectors will allow, otherwise bumping the knob can break out the wood and ruin your chassis.
I usually use the metal plate method, only I don't always use metal. PC board material, Lexan, Plexiglass. and even a thin piece of a hardwood like oak work fine.
I don't have a band saw to cut metal down to size.
You can cut aluminum with a jigsaw. Use the finest pitch blade you can find and clamp the metal to cut down on vibration. You can clamp or screw the metal sheet to a piece of thin wood and cut both at the same time.
My wood shop teacher strongly advised me not to, but I have been cutting aluminum on my table saw. I got a 10 inch cutoff blade for cutting storm shutter panels, but I find that a carbide tipped plywood blade works better on aluminum. Just go real slow.
I may have pictures of some of this when I get back to my real computer later tonight.
Tape....
I use a forstner bit to make spotfaces for my inputs/outputs. If you don't have a drill press you could use the forstner bit to make a hole in a scrap of wood and then use the hole as a drill guide to help with the important machining.
Evan
I use a forstner bit to make spotfaces for my inputs/outputs. If you don't have a drill press you could use the forstner bit to make a hole in a scrap of wood and then use the hole as a drill guide to help with the important machining.
Evan
Attachments
I can't find all my pictures since I have recently moved and built a new computer.
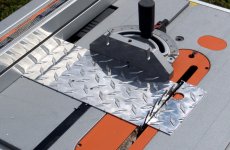
I have a picture of the result of cutting a piece of .062 aluminum diamond plate with the blade that came on the table saw. A finer tooth plywood blade gives a better cut. This was used for the chassis in a guitar amp.
Also a picture of the outer wood box for the guitar amp. The box got covered with tolex (vinyl covering) and I made a Lexan front plate.
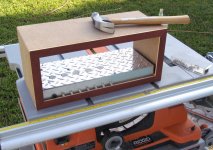
Next are some pictures of an amp chassis similar to your design. I made the top plate out of 1/4 inch clear Lexan to show off all the wiring and PC board. I do not have pictures of the final build, but several of the wood work.
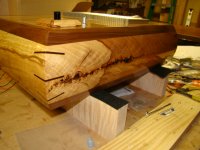
Here is a picture of the method used to cut the groove for a recessed top plate. The plate is 1/4 inch thick, so each side panel gets cut twice since the blade makes a 1/8 inch cut. I cut all 4 panels against the fence, then moved the fence 1/8 inch closer and cut all 4 again. the next picture shows the groove with the Lexan sitting in it.
Next I cut the rough edge off the bottom of each side panel. Then I cut the rabbet in the bottom of each edge for the bottom plate to sit in. This takes two passes of the blade. One pass is done and the blade is part way through the second pass. The next picture shows the panels after the long cuts are done.
Then each panel was miter cut to their final dimensions, and a Lexan panel was cut for the top plate. Next is a test assembly of the box before I took it to class for time at the router table to cut the openings for pot and connectors.
I have a picture of the result of cutting a piece of .062 aluminum diamond plate with the blade that came on the table saw. A finer tooth plywood blade gives a better cut. This was used for the chassis in a guitar amp.
Also a picture of the outer wood box for the guitar amp. The box got covered with tolex (vinyl covering) and I made a Lexan front plate.
Next are some pictures of an amp chassis similar to your design. I made the top plate out of 1/4 inch clear Lexan to show off all the wiring and PC board. I do not have pictures of the final build, but several of the wood work.
Here is a picture of the method used to cut the groove for a recessed top plate. The plate is 1/4 inch thick, so each side panel gets cut twice since the blade makes a 1/8 inch cut. I cut all 4 panels against the fence, then moved the fence 1/8 inch closer and cut all 4 again. the next picture shows the groove with the Lexan sitting in it.
Next I cut the rough edge off the bottom of each side panel. Then I cut the rabbet in the bottom of each edge for the bottom plate to sit in. This takes two passes of the blade. One pass is done and the blade is part way through the second pass. The next picture shows the panels after the long cuts are done.
Then each panel was miter cut to their final dimensions, and a Lexan panel was cut for the top plate. Next is a test assembly of the box before I took it to class for time at the router table to cut the openings for pot and connectors.
Attachments
-
 Test_Assy.jpg221.9 KB · Views: 355
 -
 CutLexan.jpg266.5 KB · Views: 284
 -
 Miter_3.jpg243.2 KB · Views: 242
 -
 Long_Cuts_Done.jpg233.9 KB · Views: 225
 -
 Rabbet_1.jpg213.4 KB · Views: 378
 -
 trimming.jpg276.2 KB · Views: 362
 -
 Groove.jpg242.5 KB · Views: 282
 -
 Groove_cut_1.jpg263.1 KB · Views: 420
 -
 Cabinet_2_A.jpg201.5 KB · Views: 446
 -
 DontDoThis_A.jpg163.2 KB · Views: 476
I just saw the pictures that Evan posted. His first picture is the same amp design that went into the box I made, a TSE. Unfortunately my amp was completed in wood shop class because they have a router table. All of those pictures were taken with a phone camera and are on a USB stick that is in a box somewhere. So is the completed amp. It will all be unboxed once the house id built.....several months from now depending on winter weather.....it snowed today.
Attachments
Mitred corners look great but are difficult to get 100% accurate and without tearout. Start with a good quality corner clamp to ensure that your joins are at 90%. Also make sure that you work on a flat surface. I usually do my first glue up with a corner clamp before doing the remaining joins with a band clamp - this helps keep the mitres square.
Regarding holes for terminals, power entry modules etc, use a router to reduce the thickness of the wood before drilling out your holes - this makes it possible to use speaker and RCA connectors intended for less thick metal enclosures, giving you a much larger choice. Route out and drill your plates before doing your glue-up.
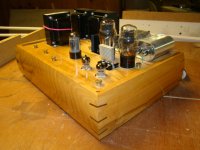
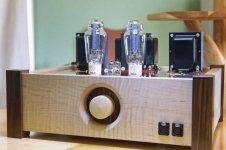
AS an aside, I recently invested in a Kreg pocket hole system and will build my next box using the kreg - the joins are very strong and it's easy to keep things flush and square. the pic shows the kind of look I plan to go for on my next project. - the Kreg makes this kind of build relatively easy.
This box was built by Sceleratus on Head-Fi.
Regarding holes for terminals, power entry modules etc, use a router to reduce the thickness of the wood before drilling out your holes - this makes it possible to use speaker and RCA connectors intended for less thick metal enclosures, giving you a much larger choice. Route out and drill your plates before doing your glue-up.
AS an aside, I recently invested in a Kreg pocket hole system and will build my next box using the kreg - the joins are very strong and it's easy to keep things flush and square. the pic shows the kind of look I plan to go for on my next project. - the Kreg makes this kind of build relatively easy.
This box was built by Sceleratus on Head-Fi.
Attachments
hmm... I don't have a router yet... I've got a little 'mouse' power sander that I could try to use, though. The wood already has a very nice polished finish on it (left over from a flooring project) and I want to try to minimize doing anything that will disrupt the finish, but that might be unavoidable. I guess I could touch up the edges with some type of gloss after sanding them....?
- Status
- This old topic is closed. If you want to reopen this topic, contact a moderator using the "Report Post" button.
- Home
- Design & Build
- Construction Tips
- building wooden chassis for tube amp, how to do it right?