I have been building these speakers for 4 months now. In case someone else is thinking about doing the same, I will share some experiences and photos of the process.
When I choose this kit there was zero reviews or experiences with this particular model. Only source of information is Mr. Gravesen very detailed website describing any and all aspects of speaker building. There are really good reviews about his other designs, but none (yet) of the Illuminator-4.
Kind of unnerving when kit just containing crossovers, internal wiring and elements set you back around 4.000EUR. Depending on your taste of wood, painting, speaker terminals etc. add another 500 or more
When the kit is delivered at you door you get the funny feeling. This is either the last big DIY speaker project you will ever do (since spending another 4.5k is not really happening) or it will be a fantastic experience going where very few other have gone before and getting a speaker in same class as the Wilson Alexia.
Here is link to speaker site:Illuminator-4
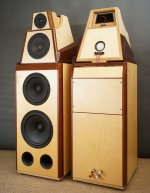
This is how his version looks:
When I choose this kit there was zero reviews or experiences with this particular model. Only source of information is Mr. Gravesen very detailed website describing any and all aspects of speaker building. There are really good reviews about his other designs, but none (yet) of the Illuminator-4.
Kind of unnerving when kit just containing crossovers, internal wiring and elements set you back around 4.000EUR. Depending on your taste of wood, painting, speaker terminals etc. add another 500 or more
When the kit is delivered at you door you get the funny feeling. This is either the last big DIY speaker project you will ever do (since spending another 4.5k is not really happening) or it will be a fantastic experience going where very few other have gone before and getting a speaker in same class as the Wilson Alexia.
Here is link to speaker site:Illuminator-4
This is how his version looks:
Attachments
Really nice work! 🙂
I personally have given up on the "super speaker" idea, but this is the type of project that always sings the siren's song.
Best,
E
I personally have given up on the "super speaker" idea, but this is the type of project that always sings the siren's song.
Best,
E
I agree what you are saying. Super is a bad thing and was maybe a wrong description of the kit.
The designer has not used all the "greatest" components he can find to build the ultimate speaker. He has just he the high quality parts that FITS together. Example is that the tweeter is Scanspeak Revelator model (and not the more expensive Illuminator-version).
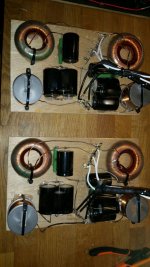
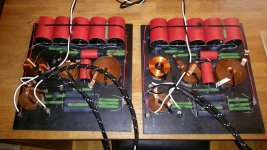
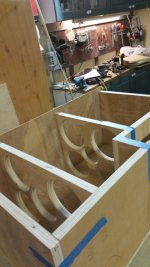
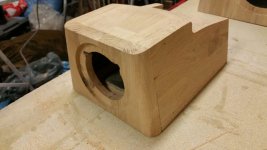
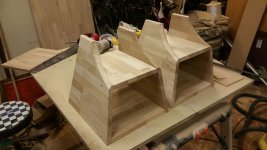
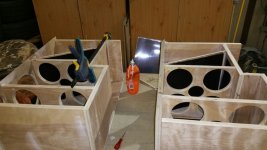
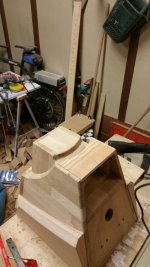
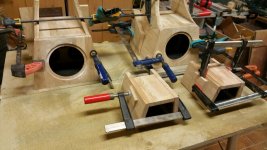
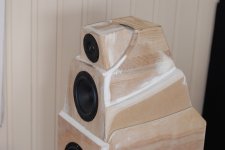
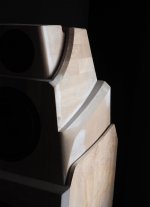
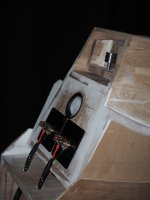
Here are some photos from the build process:
The designer has not used all the "greatest" components he can find to build the ultimate speaker. He has just he the high quality parts that FITS together. Example is that the tweeter is Scanspeak Revelator model (and not the more expensive Illuminator-version).
Here are some photos from the build process:
Attachments
-
 tweeter.jpg222.5 KB · Views: 435
 -
 bass.jpg242.8 KB · Views: 475
 -
 bass-3.jpg107.5 KB · Views: 424
 -
 bass-1.jpg102 KB · Views: 397
 -
 top3.jpg970 KB · Views: 398
 -
 top2.jpg56.6 KB · Views: 939
 -
 photo966128807514843458.jpg91.7 KB · Views: 944
 -
 top1.jpg112.7 KB · Views: 969
 -
 kit1.jpg123.8 KB · Views: 1,003
Nice, bet they're going to look great ! I hope you will follow up with your listening impressions.
I think this IS a super speaker. 🙂 Great components, great design, full range!
What I meant was, I don't think I will ever afford the space that could house these speakers. I've given up and decided that monitors + sub is something I can live with.
I am curious about doing these speakers as hybrid active/passive. Being able to drive the bass with EQ separately ..... Gods I need a home with a wood shop!
Envious of your work !
Best,
E
I think this IS a super speaker. 🙂 Great components, great design, full range!
What I meant was, I don't think I will ever afford the space that could house these speakers. I've given up and decided that monitors + sub is something I can live with.
I am curious about doing these speakers as hybrid active/passive. Being able to drive the bass with EQ separately ..... Gods I need a home with a wood shop!
Envious of your work !
Best,
E
Bass is both a blessing and lots of trouble. I have a dedicated room to have speakers in. Room shape is not optimal (3,1 meters by 5.6). Speaker must be at the 3.1 wall meaning they are too close to side walls. My current speakers are full range (+/-3 DB to 20hz). I have dampening material in all corners. I still generally have to use two subs to even out bad sound waves.
The Illuminator is ready for bi-amping. So it is possible to EQ just bottom bass cabinet. I am kind of hoping it will not be necessary. I have a Meridian surround processor with room-correction so I will do if needed, but experience from before is that it is easy to get something that measure well, but still sounds very thin.
monocle,
Looks like your build is progressing nicely. FYI, diyAudio member Pinocchio has built the ATS-4 and is very happy with it:
http://www.diyaudio.com/forums/multi-way/301985-troels-gravesen-ats-4-a.html
Look forward to more pics and updates.
Looks like your build is progressing nicely. FYI, diyAudio member Pinocchio has built the ATS-4 and is very happy with it:
http://www.diyaudio.com/forums/multi-way/301985-troels-gravesen-ats-4-a.html
Look forward to more pics and updates.
Very cool, subscribed! I've always been a sucker for his designs, but just don't have the woodworking skills to pull it off!
monocle,
Looks like your build is progressing nicely. FYI, diyAudio member Pinocchio has built the ATS-4 and is very happy with it:
http://www.diyaudio.com/forums/multi-way/301985-troels-gravesen-ats-4-a.html
Look forward to more pics and updates.
I wished I had Pinocchio's woodwork skills. Mine are improving, but looking at his precision work I am bit envious.
But for anyone else trying to build: You can save a lot of stuff with some glue and filler 🙂
Very cool, subscribed! I've always been a sucker for his designs, but just don't have the woodworking skills to pull it off!
Accordingly to Truls G. his Illumenator design can be build much easier. The stuff I did with wood on side of speakers took a long time. I did it because I like doing woodwork with router (!). It has no real influence on sound.
My previous experience before this build was making 5 square speaker cabinets. No angles, nothing exciting. It am just patient and use a lot of time looking at Youtube to learn stuff.
Please post more pictures as you progress. We all love a pictorial story of a speaker build. Especially one of this calibre. I have lusted after this one on the Troels website and wondered what it would sound like. Very nice work so far.
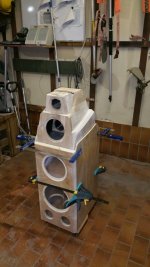
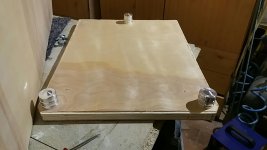
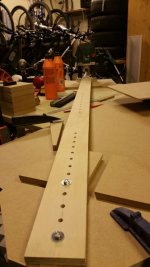
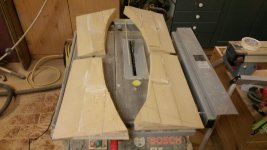
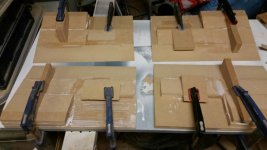
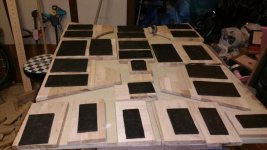
Here are some more pictures from build process. Stuff that has both angles and curves (on top speaker) requires some trial and error before getting it right.
For almost all of the the curves I made a template using a home-made ellipse jig. Then just router to copy curve. Benefit of this is that you have much more control over router/copy bit, than on a big ellipse jig with lots of slack.
More pictures will follow very soon. I will test listen to them before painting.
Morten.
Attachments
-
 33254419220_9ae22d333f_o.jpg90.1 KB · Views: 172
 -
 32795572404_15419461c2_o.jpg91.1 KB · Views: 267
 -
 32824490763_0fff5ff37d_o.jpg132.5 KB · Views: 270
 -
 33254419710_2e1e91e83f_o.jpg109.4 KB · Views: 194
 -
 33638043065_47a0eaa020_o.jpg107.9 KB · Views: 199
 -
 33597538526_5eca6c0ce9_o.jpg96.3 KB · Views: 471
 -
 33638050705_a2ebc48c37_o.jpg95.1 KB · Views: 474
 -
 33254424800_189ae1718f_o.jpg93.8 KB · Views: 481
 -
 32795568074_d0f3794128_o (1).jpg130.3 KB · Views: 488
 -
 33254427150_6cf14981da_o (1).jpg109.7 KB · Views: 502
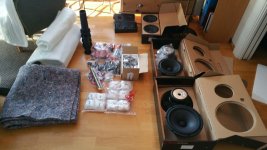
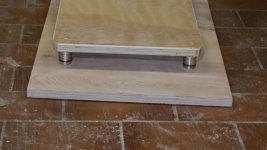
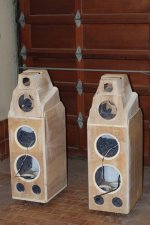
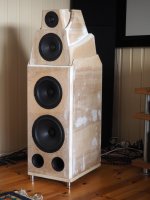
Finally ready for some listening tests 🙂 🙂 🙂
Attachments


Really nice skills, waiting for the listening session.
I don't know what your plan for finishing is but I can tell it's going to be nice.
I don't know what your plan for finishing is but I can tell it's going to be nice.
That's one wickedly hard build and I love the way floor looks! Ideally I'd match speakers to that.
Cool. 🙂
What amps will you be using?
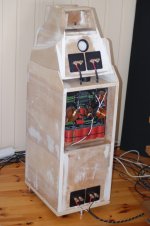
I will play on an older Meridian 861 (v4) with NCore NC400 monoblocks using Squeezebox Touch. No sure about bi-amping yet. It depends on how good control the NCore's will have over bass.
That's one wickedly hard build and I love the way floor looks! Ideally I'd match speakers to that.
Hihi! Yes, I think both speakers and floor will end up dark grey/black 🙂 Hopefully speakers will be painted first in a month or two. Need a break now 🙂
- Home
- Loudspeakers
- Multi-Way
- Building Illuminator-4 (design by T. Gravesen)