After reading good critics of this DAC (with Signature and Op-Amp upgrade), a few weeks ago I bought an Assemblage DAC 2.6 bare pcb from an other user on the Trading Post forum.
From the same user I also got the CS8414 receiver, two PCM1704U DAC, the DF1704E Digital Filter and its small Daughter Board to plug instead of the Microsonic PMD-100. The DF1704 is one of the upgrade that was available for this DAC.
It is a superb PCB, 4 layers, multiple regulators, etc...
Here it is.
Attachments
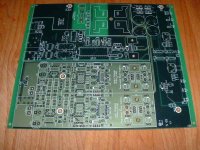
This DAC as 3 inputs, SPDIF BNC, AES/EBU and Toslink Optical.
Both channels are almost dual mono with separate DAC and regulators. A very nice DAC that can be improved easily.
Since I had to build the PCB from scratch, I decided to install the upgraded parts right away.
The signature upgrade contains Caddock & Holco resistors, Oscon & MultiCap Capacitors in the DAC section and Kimber wire and RCA Connectors.
I got all these parts from Parts Connexion. I will use my own silver with TFE wire and I bought Cardas RCA.
The Turbo Op-Amp upgrade consist in 4 BB OPA627AP op-amp, expensive but worth it I'm sure.
I decided to had my own upgrade. Soft recovery MUR860 diodes in the supply, Panasonic FC caps and RN60 resistors in the DAC for the ones that were not upgraded.
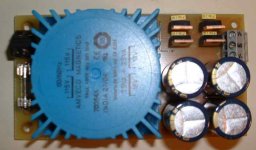
Since I didn't have the same casing I decided to add my own mods. I built a new separate raw supply to get full dual mono for the audio DAC section. It is an exact replica of the Assemblage supply. I'll just need to cut two small traces on the PCB to separate the supplies.
Here the upgrade supply
Here the upgrade supply
Attachments
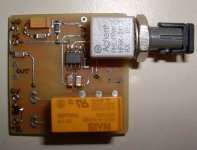
I did also some few other changes on the PCB. The AES/EBU was the default input at startup. I couldn't take a chance to have the family asking me everytime why the sound system was not making music 😉.
So I modified the DAC to be on the SPDIF BNC input by default.
Then I also decided to had an ST optical input. It will be selected by a small switch on the back, so the optical input will be Toslink or ST Optical. I had just to modified which input relay is default, the BNC and then control tis relay or not with the switch.
The front panel will contained 4 input leds, voilà 😀
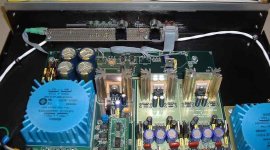
Here the PCB 😎
So I modified the DAC to be on the SPDIF BNC input by default.
Then I also decided to had an ST optical input. It will be selected by a small switch on the back, so the optical input will be Toslink or ST Optical. I had just to modified which input relay is default, the BNC and then control tis relay or not with the switch.
The front panel will contained 4 input leds, voilà 😀
Here the PCB 😎
Attachments
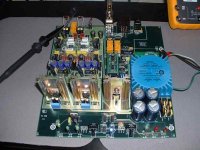
I was able to find all the other parts. And it was a lot of fun to solder all the SMD parts, the DF1704E package in particular has very small pins 😱
But I was able to put togehter the PCB. It worked after I fixed a few bad SMD pins soldering, just a few 😉.
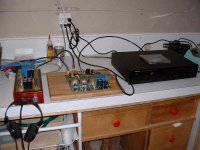
Here the PCB under test.
But I was able to put togehter the PCB. It worked after I fixed a few bad SMD pins soldering, just a few 😉.
Here the PCB under test.
Attachments

And finally the listening begin without the dual mono supply. First impression is very nice. I'll let it run for two days and resume the listening.
Here the review that started me in this project:
http://www.soundstage.com/revequip/assemblage_dac26.htm
I have a nice steel enclosure to put the pcb and my upgrade in.
Here the review that started me in this project:
http://www.soundstage.com/revequip/assemblage_dac26.htm
I have a nice steel enclosure to put the pcb and my upgrade in.
Attachments
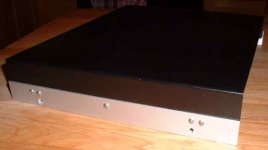
Finally got some time to install my Assemblage DAC into a proper enclosure. I'm recycling an old enclosure again. It is a very nice and rigide enclosure made of steel with tought black powder paint finish.
It was big enough to fit the upgrade dual mono supply but not tall enough for the PCB bigger caps and regulators heatsinks 🙄 So I had to increase the cover height using machined aluminium pieces. The result is not too bad and give a distinctive look 😉, kind of Musical Fidelity industrial style.
It was big enough to fit the upgrade dual mono supply but not tall enough for the PCB bigger caps and regulators heatsinks 🙄 So I had to increase the cover height using machined aluminium pieces. The result is not too bad and give a distinctive look 😉, kind of Musical Fidelity industrial style.
Attachments
I had to build new front and back covers to recycle the existing enclosure mounting holes. I used already anodysed 1/8 aluminium flat bar. I have only to keep the nice finish. I also recycled the enclosure pcb mounting studs. I cut them and relocate them to fit the new PCB. Two of the existing studs match exactly the upgrade supply .
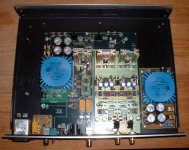
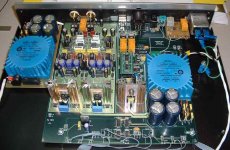
Here a view of the unfinish inside. Since the enclosure is not of the exact size, I will need to relocate the front switches and leds on a new small pcb (still to be made). We can see the main PCB, the upgrade power supply on the right and the new ST digital input on the lower left.
Here a view of the unfinish inside. Since the enclosure is not of the exact size, I will need to relocate the front switches and leds on a new small pcb (still to be made). We can see the main PCB, the upgrade power supply on the right and the new ST digital input on the lower left.
Attachments
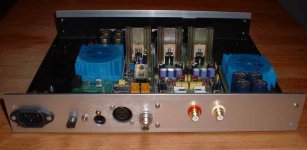
Here the rear panel view. The new alu flat bar makes a nice finish.
There is 4 digital inputs, from left to right: ST-glass (new input), SPDIF optical, AES/EBU and BNC (true 75R). This DAC supports only the 3 last inputs by default. I use a small toggle switch (between the ST and IR inputs) to select between each of the optical inputs. A 4th led on the front marked ST will also indicate the selection. Not too bad for a recycled box 😀
There is 4 digital inputs, from left to right: ST-glass (new input), SPDIF optical, AES/EBU and BNC (true 75R). This DAC supports only the 3 last inputs by default. I use a small toggle switch (between the ST and IR inputs) to select between each of the optical inputs. A 4th led on the front marked ST will also indicate the selection. Not too bad for a recycled box 😀
Attachments
Member
Joined 2002
Member
Joined 2002
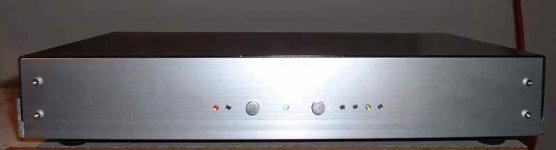
The DAC is completed and playing. The front panel is just looking great.
I did the two knobs with section of aluminium rod, then I polished them. On the left the Sync and Phase Leds and the Phase Select push button. Right in the middle the blue power On Led. On the right the input selection button and 4 input leds. Nice, clean and simple.
I did the two knobs with section of aluminium rod, then I polished them. On the left the Sync and Phase Leds and the Phase Select push button. Right in the middle the blue power On Led. On the right the input selection button and 4 input leds. Nice, clean and simple.
Attachments

Other views of the inside, everything connected. Here the rear view. I used very short piece of gold plated pure copper leads to connect the Cardas output connectors. We can also see the new ST input PCB on the right and the upgrade supply on the left.
Attachments
They became Sonic Frontiers then they were bought by Paradigm to build a new line of Home theater amplifier/processor products to sell more Paradigm speakers, the Anthem Audio line:
http://www.anthemav.com/NewSitev2.0/News1.html
By the way I also own Anthem processor and amplifer for my home theater. Great product.
Bye...
http://www.anthemav.com/NewSitev2.0/News1.html
By the way I also own Anthem processor and amplifer for my home theater. Great product.
Bye...
- Status
- Not open for further replies.
- Home
- Source & Line
- Digital Source
- Building an Assemblage DAC 2.6 from scratch